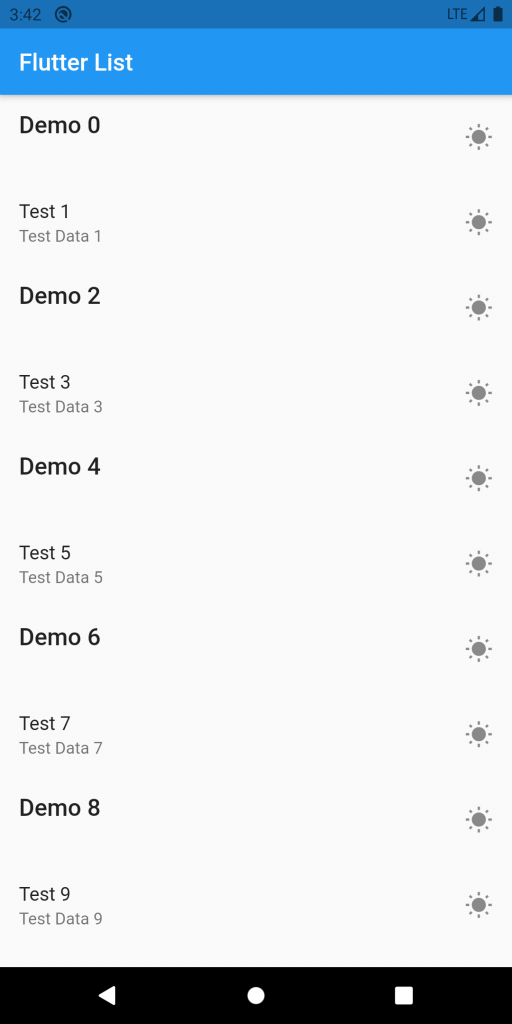
Overview to implement a How to create a list in a flutter. In this blog, we are going to learn about how to implement a How to create a list in a flutter. We will cover the implementation of the list in this blog. So let’s get started.
So, Firstly, all the steps to implement the list
For that first, we have to prepare a Data Source that you want to inflate in each of the list items in listview. Then we have to convert the data source into Widgets because, in the end, the listview expands in the array of the widgets.
And finally, you have to use all the widgets as children of a listview.
Check out more about our Flutter app development services.
Let’s understand this with an example.
1.) At the very first, main. dart file we have our main function.
We use a ListItem which contains the two Widgets “buildTitle” and “build subtitles” and we will use the “List<ListItem>.generate()” and I will generate about 1000 items and define the lambda expressions to generate all data sources.
Now, once the data source is ready, you have to wrap it on the “Data widgets”.
|
1 2 3 4 5 6 7 8 9 10 11 12 |
void main() { runApp( MyApp( items: List<ListItem>.generate( 1000, (i) => i % 2==0 ? DemoItem('Demo $i') : TestDataItem('Test $i', 'Test Data $i'), ), ), ); } |
|
1 2 3 4 5 |
abstract class ListItem { Widget buildTitle(BuildContext context); Widget buildSubtitle(BuildContext context); } |
|
1 2 3 4 5 6 7 8 9 10 11 12 13 14 15 |
class DemoItem implements ListItem { final String heading; DemoItem(this.heading); @override Widget buildTitle(BuildContext context) { return Text( heading, style: Theme.of(context).textTheme.headline6, ); } @override Widget buildSubtitle(BuildContext context) => SizedBox(); } |
|
1 2 3 4 5 6 7 8 9 10 11 12 |
class TestDataItem implements ListItem { final String test; final String data; TestDataItem(this.test, this.data); @override Widget buildTitle(BuildContext context) => Text(test); @override Widget buildSubtitle(BuildContext context) => Text(data); } |
2.) Here we include the different constructor “ListView.builder()”.
Now, one of the parameters of this builder constructor is “item builder” which plays a very significant role in creating our list items. Now, here we have to create a function that expects the parameter first one “context” and second one “index” of the item.
It defined a function where we have to define what should be your “Listitem”. The all of the “ListItem” is to be our “ListTile”.
We can get all our data sources from the “ListItem”. By defining the data source as “title” we can render the “ListItem” of a particular index.
All the 1000 elements will be executed by “ListTile” which will be generated for all the elements.
Finally, we can return the list within the “Scaffold” widget as a “body” parameter.
|
1 2 3 4 5 6 7 8 9 10 11 12 13 14 15 16 17 18 19 20 21 22 23 24 25 26 27 28 29 30 31 32 33 34 35 36 37 38 39 40 41 |
class MyApp extends StatelessWidget { final List<ListItem> items; MyApp({Key key, this.items}) : super(key: key); @override Widget build(BuildContext context) { final title = 'Flutter List'; return MaterialApp( debugShowCheckedModeBanner: false, title: title, home: Scaffold( appBar: AppBar( title: Text(title), ), body: ListView.builder( // Let the ListView know how many items it needs to build. itemCount: items.length, // Provide a builder function. This is where the magic happens. // Convert each item into a widget based on the type of item it is. itemBuilder: (context, index) { final item = items[index]; return ListTile( focusColor: Colors.red, trailing: Icon(Icons.wb_sunny_sharp), title: item.buildTitle(context), subtitle: item.buildSubtitle(context), onTap: (){ debugPrint('$item was tapped'); }, ); }, ), ), ); } } |
3.) Now all lists of items are displayed starting from item 0 and ending to 999 which will be down below.
For this, our application becomes memory efficient, just because “ListView.builder()” simply calls the “item builder” method only for those elements that are visible on the screen.
So, the rest of the elements that are hiding beyond the screen are not loaded into the memory, thus it is memory efficient, this function calls only once for the element.
For performing the clicking functionality in listview. We can use the “onTap()” anonymous function when this item is clicked.
“onTap()” -> Accordingly in this way in a very efficient manner without writing too much of code for each of the items, in a generic way you can add this property.
Finally, we have implemented the code part of the list view.
|
1 2 3 4 5 6 7 8 9 10 11 12 13 14 15 16 17 18 19 |
body: ListView.builder( // Let the ListView know how many items it needs to build. itemCount: items.length, // Provide a builder function. This is where the magic happens. // Convert each item into a widget based on the type of item it is. itemBuilder: (context, index) { final item = items[index]; return ListTile( focusColor: Colors.red, trailing: Icon(Icons.wb_sunny_sharp), title: item.buildTitle(context), subtitle: item.buildSubtitle(context), onTap: (){ debugPrint('$item was tapped'); }, ); }, ), |
You can also check these links.
Another mentioned URL.
For more understanding please can go through this link:
That’s all, You can enjoy your Listview implementation in a flutter.
Thank you very much.


Be the first to comment.