Cocoa Pods
Cocoa Pods manages library dependencies for your Xcode project and the dependencies for your project are specified in a single text file called Podfile. A dependency manager makes it easy to add, remove, update, and manage the 3rd-party dependencies which your application is using. Cocoa Pods is built with RUBY and it will be installable with the default Ruby available on macOS.
CocoaPod Installation
Run the below mention command in your terminal and enter the password of your system.
|
1 |
sudo gem install cocoapods |
Now, if you want to see the progress of cocoa pod installation in your terminal then run below mention command.
|
1 |
pod setup --verbose |
The [–verbose] options logs progress as the process runs, allowing you to watch the process instead of seeing a seemingly “frozen” screen.
Podfile
The Podfile is a specification that describes the dependencies of the target of one or more Xcode project. The file should simply be named Podfile.
Pod Commands
-
pod init
It is used to create a Podfile inside your project.
The default Podfile looks like this:
|
1 2 3 4 5 6 7 8 9 10 |
#uncomment the next line to define a global platform for your project # platform: ios,m'11.0' target 'CocoaTestProject' do #comment the next line if you're not using swift and don't want to use dynamic frameworks use_frameworks! #Pods for 'CocoaTestProject' end |
Now, delete the # and space before the platform, then delete the other lines starting with #. Your Podfile should now look like this:
|
1 2 3 4 5 |
platform: ios, '11.0' target 'CocoaTestProject' do use_frameworks! end |
The 1st line of the above code tells cocoa pod that your project target is iOS 11.0 and the 3rd line tells Cocoa Pod to use framework instead of static libraries.
While Swift & CocoaPods both support static linking, not all libraries you include do. iOS 8 introduced dynamic frameworks, which allow you to bundle code, images, and other assets together. Before iOS 8, cocoa pods were created as “fat” static libraries. ‘Fat” means they contained code instruction set like i386 for the simulator, arm7 for devices, etc. However, swift doesn’t allow static libraries to contain resources such as images or assets.
-
pod install
This is to be used every time you edit your Podfile to add a new pod to it (or remove one from it). Every time the pod install command is run & it downloads and installs new pods, it wries the version that it has installed, for each pod in the Podfile.lock file. When you run this command, it only resolves dependencies for pods that are not already listed in the Podfile.lock
-
pod outdated
When you run this command, Cocoa Pods will list all pods, that have a newer version that the ones listed in Podfile.lock and that could be updated(as long as it matches the restrictions like pod ‘MyPod’, ‘~>x.y’ set in your Podfile).
-
pod update
When you run pod update somePodName, cocoa Pds will try to find an updated version of the pod somePodName, without taking into account the version listed in Podfile.lock. It will update the pod to the latest version possible( as long as it matches the version restriction in your Podfile).
If you run pod update without ay Pod name, CocoaPod will update every pod listed in your Podfile to the latest version possible.
There are move commands available than the above mentioned. The above mention commands are essentials commands which you will very often if you are working with Cocoa Pods. If you want to explore them then click here.
Specifying Pod versions
If you want to work with the latest version of a pod, that omits the version requirements from a pod file. Eg:
|
1 |
pod 'Firebase/Core' |
If you want to freeze to a specific version of a pod, in this case, you can specify the version number. Eg.
|
1 |
pod 'Alamofire', '4.9.1' |
- You can also use logical operators:
- ‘>0.1’ Any version higher than 0.1
- ‘>=0.1’ Version 0.1 or any higher version
- ‘<0.1’ Any version lower than 0.1
- ‘<=0.1’ Version 0.1 or any lower version
- Cocoa Pods also has an optimistic Operator ‘~’:
- ‘~>0.1.3′ version 0.1.3 & the version upto 0.2 (0.2 excluded)
- ‘~>0.1′ Version 0.1 and the version upto 1.0 (1.0 excluded)
- ‘~>0′ Version 0 and higher, this is basically the same as not having it.
Podfile.lock
This file is generated after the first run of pod install, and track the version of each Pod that was installed. It is like a snapshot of exactly what CocoaPods has installed in your iOS projects. So if you are using the source control in your project then you must commit the Podfile.lock in your git. And for commit Pod directory in your source control is totally depends upon you. Let’s look benefit from doing both in your projects:
-
Benefits of commit the Pod Directory:
- After cloning the repo, the project can immediately build and run, even without having CocoaPods installed on the machine.
- The pod artifacts(code/ libraries) are always available.
- The Pod artifacts are guaranteed to b identical to those in the original installation after cloning the repo.
-
Benefits of ignoring the Pod Directory:
- The source control repo will be smaller and take up less space.
- There won’t be any conflicts to deal with when performing merge operation on different branch or other source code operations
- As long as the source for all Pods is available, CocoaPod is generally able to recreate the same installation.
Ignoring Podfile Warning:
Since, Cocoa Pod 0.18, it is possible to inhibit warning (turn them off) in Xcode for each specific pod.
|
1 |
pod 'Firebase/Core', :inhibit_warnings => true |
You can also inhibit warning for all pods at once by adding inhibit_all_warnings in your Podfile.
Semantic Versioning
Semantic Versioning is just a convention. It divides a pod version into 3 parts and each part tells about the type of change in the version. A pod version will look something like this 1.2.3 where 1 represents Major Release, 2 represent Minor Release and 3 represent Patch no. Let’s look into the details of these 3 numbering conversations:
-
Patch no:
As a general rule, anything an author makes any kind of bug fix, to their library that doesn’t break backward compatibility, they increment this number.
-
Minor Release No:
Library authors will increment this number when they add a new feature.
-
Major Release No:
Library authors will increment this when they make changes to their code that break backward compatibility. For example, Changing method signature
PodSpec File
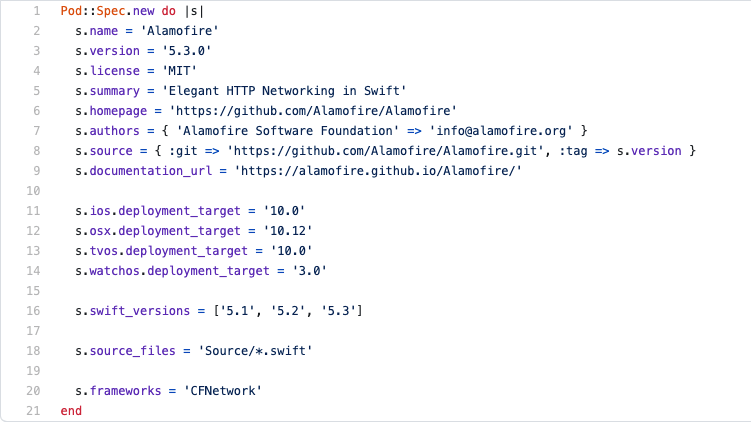
A specification describes a version of the Pod library. It includes details about where the source should be fetched from, what files to use, the build setting to apply & other general metadata such as its name, version, and description.
A stub specification file can be generated by the pod spec create command.
Below is an example of how a PodSpec file looks like. The below PodSpec file is of Alamofire which is a 3rd party library used for handling network requests.
Click here to see all available Pod Spec Commands
If you want to learn more about the PodSepc file do check out this link and for more in-depth analysis do check out this link.
Pod try
CocoaPods plugin allows us to quickly try the demo project of a pod.
Syntax:
|
1 |
pod try PodName |
Installation:
|
1 |
gem install cocoapods-try |
Pod try is a low commitment way of trying out any demo project associated with Cocoapod.
If you run pod try on a 3rd party library. CoocoaPods will go out to that library set of project files and download them to a temporary directory on your computer. Once there, it will scan them for anything that looks like on the Xcode project or workspace, preferably in a directory named something like demo or example. Now if it finds one pod try will open that project in Xcode so you can see how it work.
If it finds more than one Xcode project, it might ask you which one to open.
Thank you for reading this article.

Be the first to comment.