Unit Testing in iOS
Unit testing is a basic way to check the first phase of your code , it will help to check your model classes & Network Call in the App . so it helps & saves lot of time
of manual testing. In this part we will provide , how to setup the unit testing in the App.
1: Setup in App:
there is various way to add the Unit testing in the new App or Existing App.
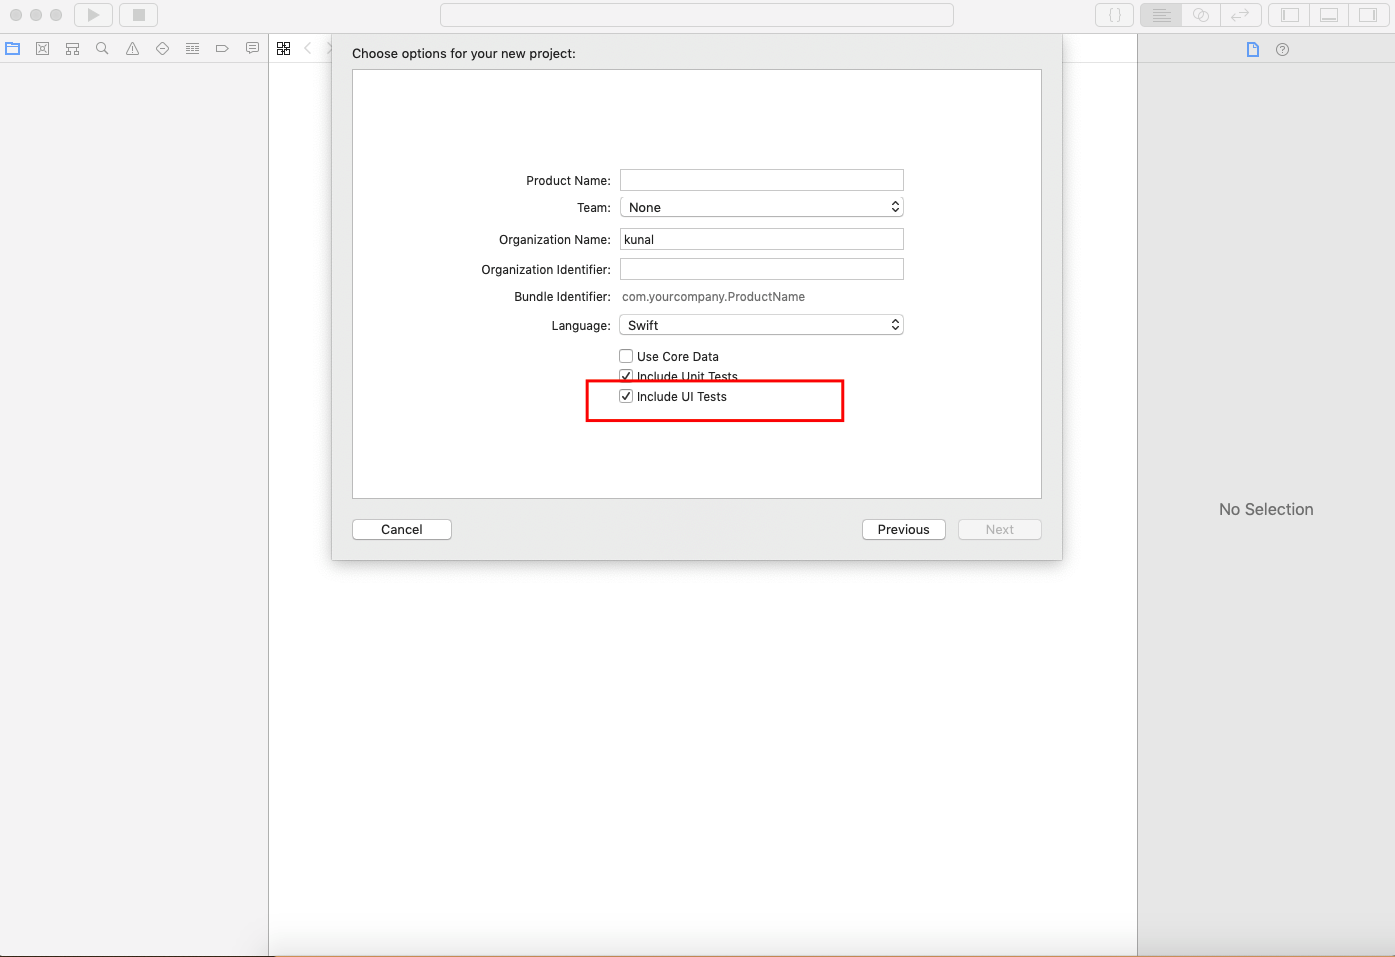
a: In New App : Check on Unit test.
b: In Existing App:
You can take the Unit test File in various way
b.1 : Go to file section & take a Unit Test File
.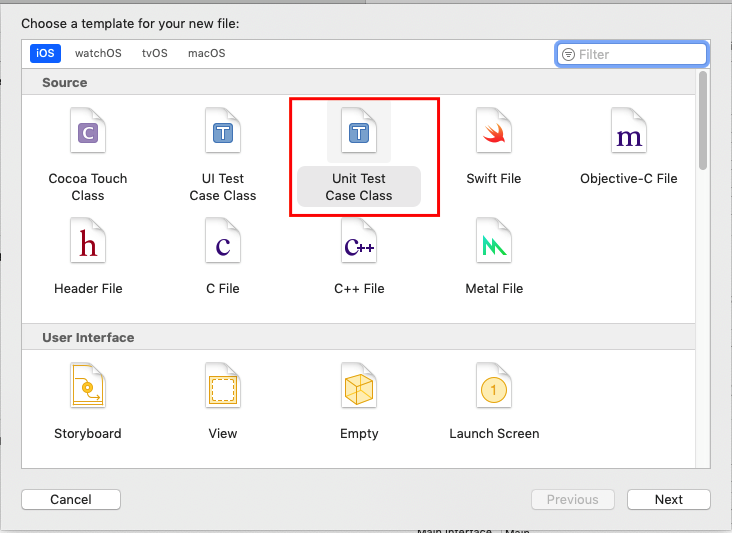
b.2 : Click on test navigator option then click on bottom + sign & take a Unit test file.

After Set the file now its time to write the code.
2: Unit test Class structure:
When you open the file you will get
|
1 2 3 4 5 6 7 8 9 10 11 12 13 14 15 16 17 18 19 20 21 22 23 24 25 |
import XCTest class Demo: XCTestCase { override func setUp() { // Put setup code here. This method is called before the invocation of each test method in the class. } override func tearDown() { // Put teardown code here. This method is called after the invocation of each test method in the class. } func testExample() { // This is an example of a functional test case. // Use XCTAssert and related functions to verify your tests produce the correct results. } func testPerformanceExample() { // This is an example of a performance test case. self.measure { // Put the code you want to measure the time of here. } } } |
func setUp() : This method will call at first when this class will load so any kind of setup you can do in this class like variable initialisation or model initialisation.
func tearDown(): This method will call ,when All your test method is executed so in this section you can free-up the memory .
func testExample() : This is Test method that will run after the setUp method , you will create your own but you need to append test on start of any method name
ex: testHomeAPI(), testMySample()
func testPerformanceExample(): this will give the total time of your test classes.
3: How to use :
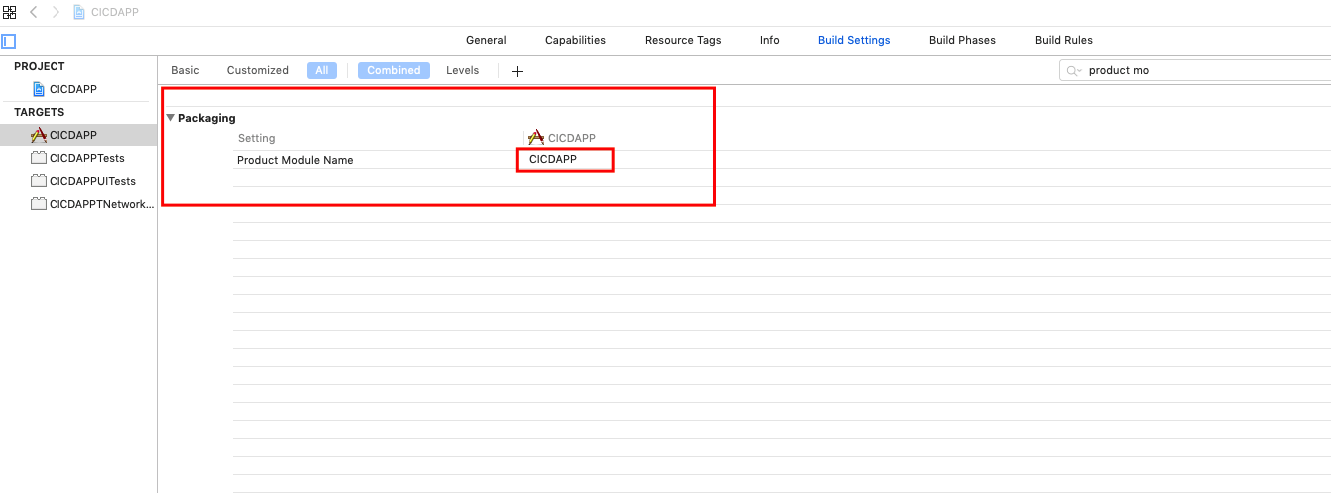
For Accessing the project in Test Class file you need to import your project module like this.
1: select your project target -> Build setting – > Product Module name
Write this way in your Test Class file:
|
1 2 |
import XCTest @testable import CICDAPP |
Now you can access all the classes of your project ,
Here i have taken one example of my project model class .
|
1 2 3 4 5 6 7 8 9 10 11 12 13 14 15 16 17 18 19 20 21 22 23 24 25 26 27 28 29 30 31 32 33 34 35 36 37 38 39 40 41 42 43 44 45 46 47 48 49 50 51 52 53 54 |
// /** CICDAPPTests @Category Webkul @author Webkul <[email protected]> FileName: CICDAPPTests.swift Copyright (c) 2010-2018 Webkul Software Private Limited (https://webkul.com) @license https://store.webkul.com/license.html */ import XCTest @testable import CICDAPP class CICDAPPTests: XCTestCase { var sut: BullsEyeGame! override func setUp() { super.setUp() sut = BullsEyeGame() sut.startNewGame() } override func tearDown() { sut = nil super.tearDown() } func testScoreIsComputed() { // 1. given let guess = sut.targetValue + 5 // 2. when sut.check(guess: guess) // 3. then XCTAssertEqual(1, 1, "Score computed from guess is wrong") } } |
Here we are accessing the model class of our project & do some checking .
4: How to Run & Observe
Before running there is some method you need to know first here we have taken some method for example.
1: XCTAssertNil(responseError,“Message in String”) : if nil is passed then no issue other wise it show the error
2: XCTFail(“Error: \(error.localizedDescription)”) : if you want to fail the test use this method.
3:XCTAssertTrue(true) : if there is no issue then use this.
4:XCTAssertEqual(statusCode, 200,”Message write here”) : it will compare the value if equal then no issue other wise show the error.
Here we have taken few method
Now run the test cases
there is various way to run the test classes.
1: Long press on project run button then it will show test option
2: Go to Test App navigator option
here you can see All the test classes & their method as well so select which classes you have to run just tap on run button

This is the introduction of Unit test Class in next Blog we will cover the Async Network call & Some other tips to test the Model classes.
Next Blog Link: https://mobikul.com/unit-testing-in-ios-using-swift-part-2/

Be the first to comment.