Hi guys, today we will learn about how to implement Tap Payment Gateway for an iOS application in Swift.
Let us know first what is the Payment gateway.
A payment gateway bridges the gap between customers, banks and online business. It safely and securely passes all the sensitive information such as customer’s credit card numbers and so on, from one end to the other. It is used for online transactions with the customer. It is a merchant service provided by an e-commerce application service provider that authorizes credit card or direct payments processing for e-businesses, online retailers, bricks and clicks, or traditional brick and mortar.
Now we can start the steps to integrate the payment gateway.
Step to Integrate Tap Payment Gateway
Step 1 => Add ‘goSellSdk’ in the project
To integrate goSellSDK into your Xcode project using CocoaPods, specify it in your Podfile:
|
1 2 3 |
target 'MyAPP' do pod 'goSellSDK' end |
and then run this command in the terminal
|
1 |
pod install |
Step 2 => Setup of SDK
To set it up, add the following line of code somewhere in your project and make sure it will be called before any usage of goSellSDK, otherwise, an exception will be thrown.
|
1 2 |
let secretKey = SecretKey(sanbox: "YOUR_SANDBOX_SECRET_KEY", production: "YOUR_PRODUCTION_SECRET_KEY") // (format of the key: "sk_XXXXXXXXXXXXXXXXXXXXXXXX") goSellSDK.secretKey = secretKey // Secret key (format: "sk_XXXXXXXXXXXXXXXXXXXXXXXX") |
Step 3 => Setup of Play Button
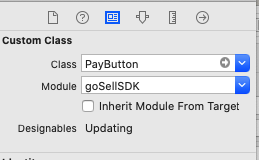
a) Using StoryBoard
- Drag & drop an instance of
UIViewat the desired location. - Select added view and open Identity Inspector
- Enter the following values:
- Class: PayButton
- Module: goSellSDK


b) Using code
|
1 2 3 4 5 6 7 8 9 10 |
import goSellSDK func addPayButton() { let buttonFrame = CGRect(x: 8.0, y: UIScreen.main.bounds.height - 52.0, width: UIScreen.main.bounds.width - 16.0, height: 44.0) let button = PayButton(frame: buttonFrame) self.view.addSubview(button) button.dataSource = self button.delegate = self } |
Step 4 => Implementing SessionDataSource and SessionDelegate
You have to implement SessionDataSource and SessionDelegate in the viewController where you have set up the Play button. Create an extension of the controller and add this code.
|
1 2 3 4 5 6 7 8 9 10 11 12 13 14 15 16 17 18 19 20 21 22 23 24 25 26 27 28 29 30 31 32 33 34 35 36 37 38 39 40 41 42 43 44 45 46 47 48 49 50 51 52 53 54 55 56 57 58 59 60 61 62 63 64 65 66 67 68 69 70 71 72 |
var mode: TransactionMode { return .purchase } var customer: Customer? { return self.newCustomer } /// Creating a customer with known identifier received from Tap before. var identifiedCustomer: Customer? { return try? Customer(identifier: "cus_to_mer") } /// Creating a customer with raw information. var newCustomer: Customer? { let emailAddress = try! EmailAddress(emailAddressString: JSONData["tabData"]["customerEmail"].stringValue) let phoneNumber = try! PhoneNumber(isdNumber: JSONData["tabData"]["countryCode"].stringValue, phoneNumber: JSONData["tabData"]["telephone"].stringValue) return try? Customer(emailAddress: emailAddress, phoneNumber: phoneNumber, firstName: JSONData["tabData"]["firstName"].stringValue, middleName: nil, lastName: JSONData["tabData"]["lastName"].stringValue) } var currency: Currency? { return .with(isoCode: JSONData["tabData"]["currency"].stringValue) } var amount: Decimal { return Decimal(JSONData["tabData"]["totalAmount"].doubleValue) } var postURL: URL? { return URL(string: "https://tap.company/post") } var paymentDescription: String? { return ""; } var paymentMetadata: [String : String]? { return [:] } var paymentReference: Reference? { return Reference(transactionNumber: JSONData["tabData"]["incrementId"].stringValue, orderNumber: JSONData["tabData"]["orderId"].stringValue) } var paymentStatementDescriptor: String? { return "Payment statement descriptor will be here" } var require3DSecure: Bool { return true } var receiptSettings: Receipt? { return Receipt(email: true, sms: true) } var allowsToSaveSameCardMoreThanOnce: Bool { return false } var isSaveCardSwitchOnByDefault: Bool { return true } |
Step 5=> Handle payment success and failure
You can handle payment success and failure by adding paymentSucceed method and paymentFailed method.
|
1 2 3 4 5 6 7 8 9 10 11 12 13 14 15 16 |
func paymentSucceed(_ charge: Charge, on session: SessionProtocol) { print(charge) self.dismiss(animated: true, completion: { self.callback?(charge.identifier,"1")}) } func paymentFailed(with charge: Charge?, error: TapSDKError?, on session: SessionProtocol) { print(charge?.status ?? "") DispatchQueue.main.async{ self.dismiss(animated: true, completion: { self.callback?(charge?.identifier ?? "0","0") }) } } |
Step 6 => Handle Session
You can handle Session by adding sessionHasStarted, sessionCancelled and sessionHasFailedToStart method.
|
1 2 3 4 5 6 7 8 9 10 11 12 13 14 15 |
func sessionHasStarted(_ session: SessionProtocol) { print(session) } func sessionCancelled(_ session: SessionProtocol) { print(session) DispatchQueue.main.async{ self.dismiss(animated: true, completion: { self.callback?("0","0") }) } } func sessionHasFailedToStart(_ session: SessionProtocol) { print(session) } |
Step 7 => Final Step
In viewDidload add the following code and call, updatePayButtonAmount and setData method
|
1 2 3 4 5 6 7 8 9 |
override func viewDidLoad() { super.viewDidLoad() button.isEnabled = true button.delegate = self updatePayButtonAmount() self.button?.updateDisplayedState() self.title = "Tap Payment" setData() } |
|
1 2 3 4 5 6 7 8 9 10 11 |
internal func updatePayButtonAmount() { self.button?.updateDisplayedState() } func setData(){ print(JSONData) label.text = "Total Amount to pay ".localized+"\(Decimal(JSONData["tabData"]["totalAmount"].doubleValue))" internal func TabPaymentGatewayViewController() { self.button?.updateDisplayedState() } |
Note:-
(i)You can test the payment gateway using the Test key and Test card Number which you can get from below URL.
https://tappayments.api-docs.io/2.0/testing/test-api-keys
(ii) You have to also register the bundle identifier with the Tap support team.
Conclusion
So please follow the above step to integrate the Tap payment gateway and if you have any issue or suggestion you can leave your query/suggestion in the comment section.

Errors detected on the backend:
Error ErrorCode: Invalid API Key
Error show on console.