Introduction:
Apple introduced the Speech framework, a useful API for speech recognition. In fact, Speech Kit is the framework which Siri uses for speech recognition.
There are a handful of speech recognition frameworks available today, but they are either very expensive or simply not as good. In this tutorial, I will show you how to create a Siri-like app for speech to text using Speech Kit.
Using Speech Framework
To use the Speech framework, you have to first import it and adopt the SFSpeechRecognizerDelegate protocol. So let’s import the framework, and add its protocol to the AudioDetectionViewController class. Now your AudioDetectionViewController.swift should look like this:
|
1 2 3 4 5 6 7 8 9 10 11 12 13 14 15 16 17 18 19 20 21 22 |
import UIKit import Speech class AudioDetectionViewController: UIViewController, SFSpeechRecognizerDelegate { @IBOutlet weak var listeningLbl: UILabel! @IBOutlet weak var recordingImg: UIImageView! @IBOutlet weak var detectedText: UILabel! @IBOutlet weak var searchBtn: UIButton! //For speech recognition language private let speechRecognizer = SFSpeechRecognizer(locale: Locale.init(identifier: Defaults.language ?? "en")) private var recognitionRequest: SFSpeechAudioBufferRecognitionRequest? private var recognitionTask: SFSpeechRecognitionTask? private let audioEngine = AVAudioEngine() weak var delegate: SeachProtocols? override func viewDidLoad() { super.viewDidLoad() } } |
User Permission and Authorization
Before using the speech framework for speech recognition, you have to first ask for user’s permission because the recognition doesn’t happen just locally on the iOS device but Apple’s servers.
All the voice data is transmitted to Apple’s backend for processing. Therefore, it is mandatory to get the user’s authorization.
Let’s authorize the speech recognizer in the viewDidLoad method. The user must allow the app to use the input audio and speech recognition. First, declare a speechRecognizer variable:
|
1 2 3 4 5 6 7 8 9 10 11 12 13 14 15 16 17 18 19 20 21 22 23 24 25 26 27 28 29 |
override func viewDidLoad() { super.viewDidLoad() self.searchBtn.isHidden = true SFSpeechRecognizer.requestAuthorization { (authStatus) in var isButtonEnabled = false switch authStatus { case .authorized: isButtonEnabled = true case .denied: isButtonEnabled = false print("User denied access to speech recognition") case .restricted: isButtonEnabled = false print("Speech recognition restricted on this device") case .notDetermined: isButtonEnabled = false print("Speech recognition not yet authorized") } OperationQueue.main.addOperation() { if isButtonEnabled { self.speechRecognizer?.delegate = self self.detectedText.text = "Say Something!!!" self.startRecording() } else { //when permission is not granted } } } } |
Providing the Authorization Messages
Apple requires all the authorizations to have a custom message from the app. In the case of speech authorization, we must authorize two things one is Microphone usage and another is Speech Recognition.
To customize the messages, you must supply these custom messages through the info.plistfile.
Let’s open info.plist file of the project. First, right click on info.plist. Then Open As > Source Code. Finally, copy the following XML code and insert them before the </dict> tag.
|
1 2 3 4 |
<key>NSMicrophoneUsageDescription</key> <string>Your microphone will be used to record your speech when you press the "Start Recording" button.</string> <key>NSSpeechRecognitionUsageDescription</key> <string>Speech recognition will be used to determine which words you speak into this device's microphone.</string> |
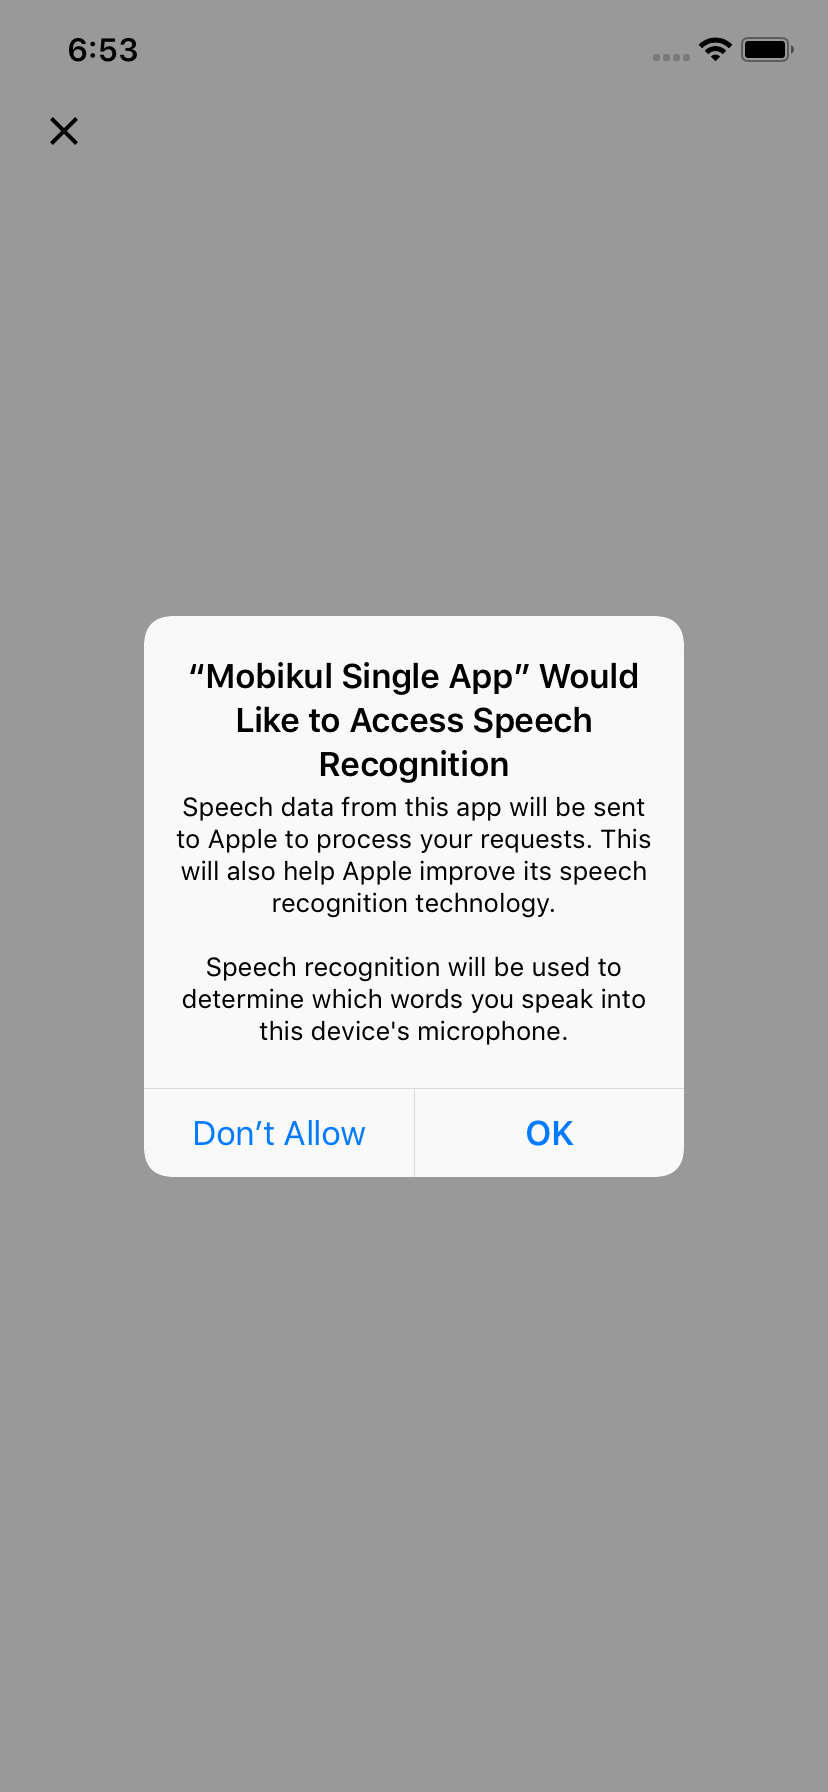
After adding permission the app asks the user to give permission like this.
When switching to another screen
In case of when the user does not stop recording and switch to another screen.
|
1 2 3 4 5 6 |
override func viewWillDisappear(_ animated: Bool) { if audioEngine.isRunning { audioEngine.stop() recognitionRequest?.endAudio() } } |
Handling Speech Recognition
Now we have to create a new function called startRecording() that handles the speech and translate into the text.
|
1 2 3 4 5 6 7 8 9 10 11 12 13 14 15 16 17 18 19 20 21 22 23 24 25 26 27 28 29 30 31 32 33 34 35 36 37 38 39 40 41 42 43 44 45 46 47 48 |
func startRecording() { if recognitionTask != nil { recognitionTask?.cancel() recognitionTask = nil } let audioSession = AVAudioSession.sharedInstance() do { try audioSession.setCategory(AVAudioSession.Category.record, mode: AVAudioSession.Mode.default, options: []) try audioSession.setMode(AVAudioSession.Mode.measurement) try audioSession.setActive(true, options: .notifyOthersOnDeactivation) } catch { print("audioSession properties weren't set because of an error.") } recognitionRequest = SFSpeechAudioBufferRecognitionRequest() let inputNode = audioEngine.inputNode guard let recognitionRequest = recognitionRequest else { fatalError("Unable to create an SFSpeechAudioBufferRecognitionRequest object") } recognitionRequest.shouldReportPartialResults = true recognitionTask = speechRecognizer?.recognitionTask(with: recognitionRequest, resultHandler: { (result, error) in var isFinal = false if result != nil { print(result?.bestTranscription.formattedString as Any) self.detectedText.text = result?.bestTranscription.formattedString if self.detectedText.text != "" { self.searchBtn.isHidden = false } isFinal = (result?.isFinal)! } if error != nil || isFinal { self.audioEngine.stop() inputNode.removeTap(onBus: 0) self.recognitionRequest = nil self.recognitionTask = nil } }) let recordingFormat = inputNode.outputFormat(forBus: 0) inputNode.installTap(onBus: 0, bufferSize: 1, format: recordingFormat) { (buffer, when) in self.recognitionRequest?.append(buffer) } audioEngine.prepare() do { try audioEngine.start() } catch { print("audioEngine couldn't start because of an error.") } listeningLbl.text = "Listening".localized } |
Use of Recognized Text
You can do anything with recognized text in the below method:
|
1 2 3 |
@IBAction func tapSearchBtn(_ sender: Any) { //Do what to want to do with recognized text. } |
Thank you!!!

Be the first to comment.