Overlay means displaying something over an existing surface. Similarly, OverlaySupport in Flutter, it is used to display some notifications/messages/data over another widget.
Check our Flutter app development services page
In this blog, we will discuss how can we integrate the overlay notifications/messages in our app with the help of the overlay_support package.
Steps for Integrating OverlaySupport in Flutter
Step – 1 -> Firstly, we will need to add the “overlay_support” package in our pubspec.yaml file and run “pub get” command.
|
1 |
overlay_support: ^2.0.1 |
You can check out the updated version of overlay_support.
Step – 2 -> Now, we can start using this package in our code.
Here, after adding the package to our project, we will need to first wrap the MaterialApp with OverlaySupport.global so that the OverlaySupport works over the complete app.
|
1 2 3 4 5 6 7 |
OverlaySupport( child: new MaterialApp( home: MyApp(), title: appName, initialRoute: '/', ), ), |
Let’s start —
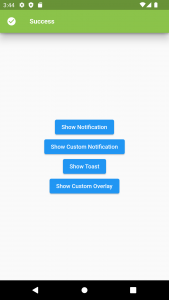
1. We can display a notification overlay with the help of an OverlayEntry i.e. showSimpleNotification().
It has various properties like context, background, subtitle,autoDismiss, etc.
|
1 2 3 4 5 6 7 8 9 |
return showSimpleNotification(Text("Success",style: TextStyle(fontSize: 16.0,fontWeight: FontWeight.bold,color: Colors.white),), context: context, background: Colors.lightGreen, leading: Icon( Icons.check_circle, color: Colors.white, ), slideDismissDirection: DismissDirection.up, subtitle: Text(msg,style: TextStyle(color: Colors.white),)); |
2. We can display a toast overlay with the help of toast(). It requires a message field and has properties like context and duration.
|
1 |
return toast("Success",context: context,duration: Duration(seconds: 1)); |
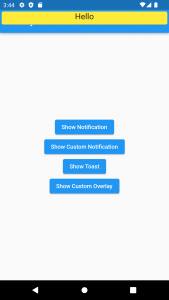
3. We can display a custom notification with the help of showOverlayNotification().
4. We can display a custom overlay widget with the help of showOverlay().
Code Sample-
|
1 2 3 4 5 6 7 8 9 10 11 12 13 14 15 16 17 18 19 20 21 22 23 24 25 26 27 28 29 30 31 32 33 34 35 36 37 38 39 40 41 42 43 44 45 46 47 48 49 50 51 52 53 54 55 56 57 58 59 60 61 62 63 64 65 66 67 68 69 70 71 72 73 74 75 76 77 78 79 80 81 82 83 84 85 86 87 88 89 90 91 92 93 94 95 96 97 98 99 100 101 |
import 'package:flutter/material.dart'; import 'package:overlay_support/overlay_support.dart'; void main() { runApp(const MyApp()); } class MyApp extends StatelessWidget { const MyApp({super.key}); @override Widget build(BuildContext context) { return const OverlaySupport.global( child: MaterialApp( debugShowCheckedModeBanner: false, home: MyHomePage(), ), ); } } class MyHomePage extends StatefulWidget { const MyHomePage({Key? key}) : super(key: key); @override MyHomePageState createState() => MyHomePageState(); } class MyHomePageState extends State<MyHomePage> { @override Widget build(BuildContext context) { return Scaffold( appBar: AppBar( title: const Text("OverlayDemo"), ), body: Center( child: Column( mainAxisAlignment: MainAxisAlignment.center, crossAxisAlignment: CrossAxisAlignment.center, children: [ ElevatedButton( onPressed: () { showSimpleNotification( const Text( "Success", style: TextStyle( fontSize: 16.0, fontWeight: FontWeight.bold, color: Colors.white), ), context: context, background: Colors.lightGreen, leading: const Icon( Icons.check_circle, color: Colors.white, ), slideDismissDirection: DismissDirection.up, ); }, child:const Text("Show Notification")), ElevatedButton( onPressed: () { showOverlayNotification( (context) { return SafeArea(child: Container( width: MediaQuery.of(context).size.width, height: 40.0, child: const Card( color: Colors.yellow, child: Text("Hello",style: TextStyle(fontSize: 20.0),textAlign: TextAlign.center), ), )); }, context: context, duration: const Duration(seconds: 4) ); }, child: const Text("Show Custom Notification")), ElevatedButton( onPressed: () { toast("Success", context: context, duration: const Duration(seconds: 1)); }, child: const Text("Show Toast")), ElevatedButton( onPressed: () { showOverlay((context, _) { return Opacity( opacity: 1, child: SafeArea( child: Scaffold( body: Container(height:100,width:MediaQuery.of(context).size.width,color:Colors.redAccent,child: const Center(child:Text("Welcome To Overlay Support Demo")))), ), ); }); }, child: const Text("Show Custom Overlay")), ], ), ), ); } } |
Conclusion
In this blog, we have discussed how we can integrate Overlay Support in Flutter.
I hope it will help you out in understanding and get a brief idea about it.
Here are some other blogs you can check out – https://mobikul.com/blog/
Thanks for reading!!
References
https://api.flutter.dev/flutter/widgets/Draggable-class.html


Be the first to comment.