Neumorphic is a design style used in graphical user interface. It is commonly identified by a soft and light look, (for which it is sometimes referred to as soft UI), So we will implement Neumorphic design in flutter.
Neumorphic design adds 3D feel for real buttons, which you can reach out and press, To Implement the design in flutter we need flutter package called flutter_neumorphic which offer simple and easy to implement feature like widgets in flutter.
Read more about Flutter app development services from mobikul.
Implementation
First Create a new flutter project and then add following dependency package in pubspec.yaml file.
|
1 |
flutter_neumorphic: ^3.2.0 |
In order to use Neumorphic design in Flutter remove default MaterialApp and Wrap the root widget of the app with NeumorphicApp as shown in below code.
|
1 2 3 4 5 6 7 8 9 10 |
class MyApp extends StatelessWidget { @override Widget build(BuildContext context) { return NeumorphicApp( debugShowCheckedModeBanner: false, title: 'Neumorphic App', home: NeumorphicPage(), ); } } |
Create a new Stateful Widget and import the neumorphic package. Create First Neumorphic Widget, Wrap a child inside Neumorphic to apply neumorphic design.
|
1 2 3 4 5 6 7 8 9 10 11 |
Neumorphic( style: NeumorphicStyle( shape: NeumorphicShape.convex, boxShape: NeumorphicBoxShape.roundRect(BorderRadius.circular(12)), depth: 12, intensity: 1, color: Colors.grey ), child: Container(height: 200, width: 200,) ) |
Shape :- define the shape for the child, there are three types – concave / convex/ flat.
Intensity :- The intensity of the Light, that influences the shadow of child. Double value range between (0 – 1).
Depth :- The distance of the widget from its parent widget. value range from (-20 to 20).
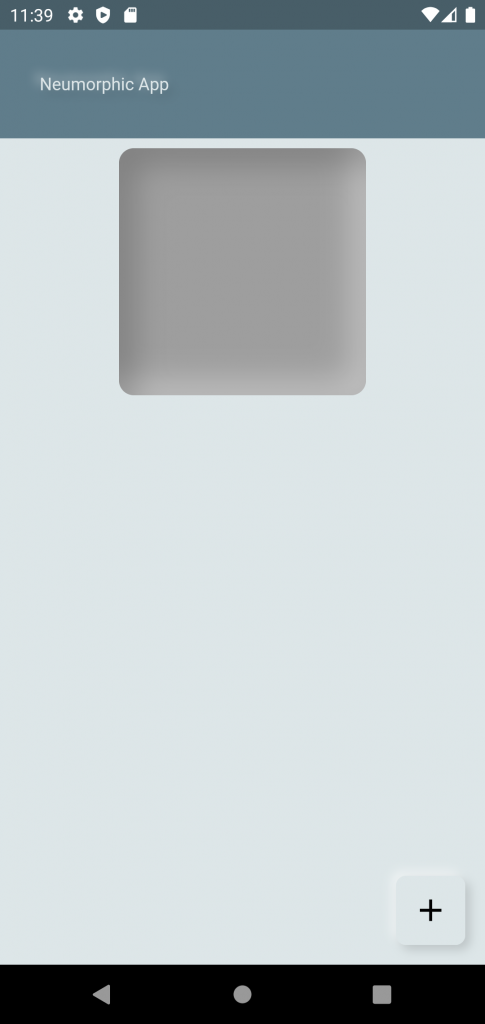
Output of Example code
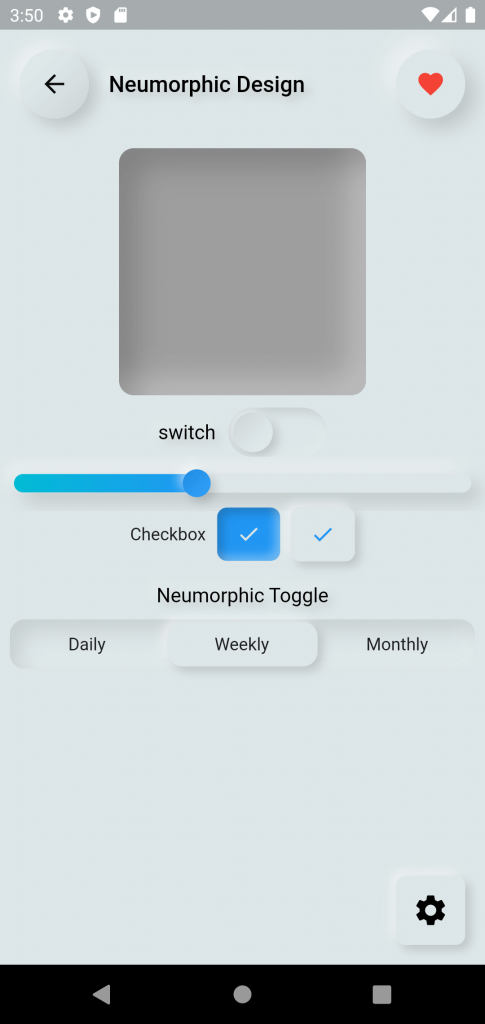
Complete UI Example
|
1 2 3 4 5 6 7 8 9 10 11 12 13 14 15 16 17 18 19 20 21 22 23 24 25 26 27 28 29 30 31 32 33 34 35 36 37 38 39 40 41 42 43 44 45 46 47 48 49 50 51 52 53 54 55 56 57 58 59 60 61 62 63 64 65 66 67 68 69 70 71 72 73 74 75 76 77 78 79 80 81 82 83 84 85 86 87 88 89 90 91 92 93 94 95 96 97 98 99 100 101 102 103 104 105 106 107 108 109 110 111 112 113 114 115 116 117 118 119 120 121 122 123 124 125 126 127 128 129 130 131 132 133 134 135 136 137 138 139 140 141 142 143 144 145 146 147 148 149 150 151 152 153 154 155 |
class NeumorphicPage extends StatefulWidget { const NeumorphicPage({Key? key}) : super(key: key); @override State<NeumorphicPage> createState() => _NeumorphicPageState(); } class _NeumorphicPageState extends State<NeumorphicPage> { double marks = 40; var isEnable = false; var selectCourse = true; int index = 0; @override Widget build(BuildContext context) { return Scaffold( appBar: NeumorphicAppBar( leading: NeumorphicButton( onPressed: () {}, style: NeumorphicStyle( shape: NeumorphicShape.convex, depth: 6, boxShape: NeumorphicBoxShape.circle(), ), padding: const EdgeInsets.all(12.0), child: Icon( Icons.arrow_back, ), ), title: NeumorphicText( "Neumorphic Design", textStyle: NeumorphicTextStyle(fontSize: 18, fontWeight: FontWeight.w500), style: NeumorphicStyle(color: Colors.black), ), actions: [ NeumorphicButton( onPressed: () {}, style: NeumorphicStyle( shape: NeumorphicShape.flat, depth: 8, boxShape: NeumorphicBoxShape.circle(), ), padding: const EdgeInsets.all(12.0), child: Icon( Icons.favorite_outlined, color: Colors.red, ), ), ], ), body: SizedBox( width: MediaQuery.of(context).size.width, height: MediaQuery.of(context).size.height, child: Column( children: [ SizedBox(height: 8,), Neumorphic( style: NeumorphicStyle( shape: NeumorphicShape.convex, boxShape: NeumorphicBoxShape.roundRect(BorderRadius.circular(12)), depth: -12, intensity: 1, color: Colors.grey ), child: Container(height: 200, width: 200,) ), SizedBox(height: 10,), getRow("switch", NeumorphicSwitch( value: isEnable, onChanged: (val){ setState(() {isEnable = val;}); },)), SizedBox(height: 10,), NeumorphicSlider( min: 0, max: 100, value: marks, style: SliderStyle(depth: 10), onChanged: (val){ setState(() {marks = val; }); }, ), Row( mainAxisAlignment: MainAxisAlignment.center, children: [ Text("Checkbox"), Padding( padding: const EdgeInsets.all(8.0), child: NeumorphicCheckbox( onChanged: (val){ setState(() {selectCourse = val;}); }, value: selectCourse, ), ), NeumorphicCheckbox( onChanged: (val){ setState(() {selectCourse = val;}); }, value: false, ) ], ), SizedBox(height: 10,), NeumorphicText( "Neumorphic Toggle", textStyle: NeumorphicTextStyle(fontSize: 16), style: NeumorphicStyle(color: Colors.black), ), SizedBox(height: 10,), NeumorphicToggle( displayForegroundOnlyIfSelected: true, thumb: Text(""), selectedIndex: index, onChanged: (idx){ setState(() {index = idx;}); }, children: [ ToggleElement( background: Text("Daily") ), ToggleElement( foreground: Text("Weekly") ), ToggleElement( background: Text("Monthly"), foreground: Text("Monthly") ) ], style: NeumorphicToggleStyle(depth: 8), ) ], ), ), floatingActionButton: NeumorphicFloatingActionButton( child: Icon(Icons.settings, size: 30), onPressed: () {}, ), ); } Widget getRow(String title, Widget child) { return Row( mainAxisAlignment: MainAxisAlignment.center, children: [ NeumorphicText( title, textStyle: NeumorphicTextStyle(fontSize: 16), style: NeumorphicStyle(color: Colors.black), ), SizedBox(width: 10,), child, ], ); } } |
NeumorphicAppBar :- App bar for the Neumorphic design similar to AppBar in flutter provided by Material library.
NeumorphicStyle :- Provide style for the Neumorphic widgets such as depth, intensity, shape.
Output
Neumorphic Design
Neumorphic is a design style used in graphical user interface. It is commonly identified by a soft and light look, (for which it is sometimes referred to as soft UI), So we will implement Neumorphic design in flutter.
Conclusion
Thanks for reading this article ❤️
I hope this blog will help you to learn about how to implement neumorphic design in flutter and you will be able to implement it. For more updates, make sure to keep following Mobikul Blogs to learn more about mobile app development.
Happy Learning ✍️


Be the first to comment.