While developing mobile apps, communicating with the server to fetch or store data is the primary need of most of the mobile apps. One of the most popular format for the data transfer is JSON.
You may also check our flutter app development services
The most easy way is to parse the JSON manually. Manual decoding can be done using the built in JSON decoder in dart:convert. Using manual decoding requires the use of following function jsonDecode(). This function returns Map<String, dynamic> which can be parsed to read the required values.
Let’s see an example of manual JSON parsing with the following model:
|
1 2 3 4 |
Now to read the values of JSON we will use the function jsonDecode()
|
1 2 3 4 |
Map<String, dynamic> user = jsonDecode(jsonString); print('Hey, ${user['name']}!'); print('Here is your Email address ${user['email']}.'); |
The another way of JSON serialization is by using code generation libraries. There are many libraries present but we will be using json_serializable, an automated source code generator that generates the JSON serialization boilerplate for you.
Setting up json_serializable in project for serialization
We need to add below dependencies in the pubspec.yaml file of your project.
|
1 2 3 4 5 6 7 8 |
dependencies: # Your other regular dependencies here json_annotation: <latest_version> dev_dependencies: # Your other dev_dependencies here build_runner: <latest_version> json_serializable: <latest_version> |
Run flutter pub get inside your project root folder (or click Packages get in your editor) to make these new dependencies available in your project.
Creating Model class for JSON serialization
Let’s create a class name User with the file name as used.dart for an example:
|
1 2 3 4 5 6 7 8 9 10 11 12 13 14 15 16 17 18 19 20 21 22 23 24 25 26 27 28 |
import 'package:json_annotation/json_annotation.dart'; //This allows the `User` class to access private members in the generated file. //The value for this is *.g.dart, where the star denotes the source file name. part 'user.g.dart'; //An annotation for the code generator to know that this class needs the JSON serialization logic to be generated. @JsonSerializable() class User { User(this.name, this.email); @JsonKey(name: 'name', defaultValue: '') String name; @JsonKey(name: 'email', defaultValue: '') String email; // A necessary factory constructor for creating a new User instance from a map. //Pass the map to the generated `_$UserFromJson()` constructor. //The constructor is named after the source class, in this case, User. factory User.fromJson(Map<String, dynamic> json) => _$UserFromJson(json); //`toJson` is the convention for a class to declare support for serialization to JSON. //The implementation simply calls the private, generated helper method `_$UserToJson`. Map<String, dynamic> toJson() => _$UserToJson(this); } |
Running the code generation utility
While creating json_serializable classes the first time, you may see the error as below image:
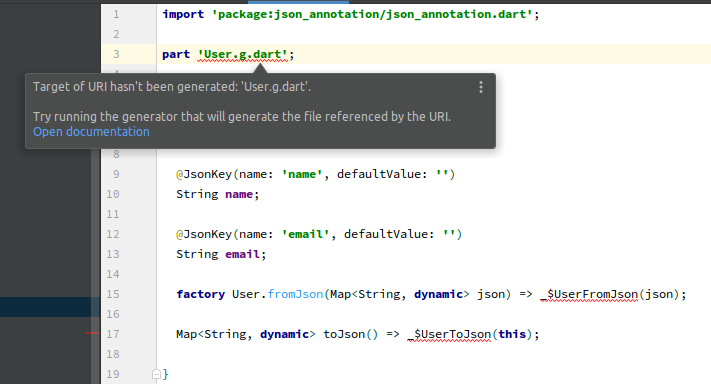
This is just a normal error which came just because currently generated code of the model class does not exist. To resolve this we just need to run the below command on terminal.
|
1 |
flutter pub run build_runner build |
NOTE: You need run this command every time you make changes in your model class.
Using the model class
Finally, we need to know how we can use the model class in the our code. We just need to pass our JSON response and get the results.
|
1 2 |
Map userMap = jsonDecode(jsonString); var user = User.fromJson(userMap); |
Now we can use the model easily with more code safety.

Be the first to comment.