Grand Central Dispatch (GCD) is used for managing concurrent operation, it is a low-level API. It was first introduced in iOS 4. The main purpose of Grand Central Dispatch is to manage the heavy tasks in the background.
First, we will see what is a queue, a queue is a block of code that is managed by the operating system to execute it synchronously or asynchronously either on the main thread or background thread. A queue follows the “FIFO” order. The queue can be either Serial or Concurrent.
Serial:- In the serial, the work item will not start the execution until the previous one is finished.
Concurrent:- In this, the execution occurs parallelly.
Let start with Dispatch Queue
First, we create a dispatch queue.
|
1 |
let myqueue = DispatchQueue(label: "com.app.myqueue") |
For label a reverse-DNS naming style (com.example.myqueue) is recommended. Let create a method and on which we create our Dispatch Queue.
|
1 2 3 4 5 6 7 8 9 10 11 12 |
func myFirstQueue() { let myqueue = DispatchQueue(label: "com.app.myqueue") myqueue.sync { for item in 1..<10{ print(item) } } for item in 20..<30 { print(item) } } |
The first For loop will execute on the background thread and the last one will execute on the main thread. If we call the myFirstQueue method then it prints “1 2 3 4 5 6 7 8 9 10 20 21 22 23 24 25 26 27 28 29 30”. In the above method, we have used synchronous execution, so unless the queue code is not finished it will not execute the main thread code.
Now we will execute the code asynchronously and see what will happen.
|
1 2 3 4 5 6 7 8 9 10 11 12 |
func myFirstQueue() { let myqueue = DispatchQueue(label: "com.app.myqueue") myqueue.async { for item in 1..<10{ print(item) } } for item in 20..<30 { print(item) } } |
We will see that the code on the main thread and the code in the dispatch queue will execute parallelly.
Quality Of Service (QoS)
To determine the priorities of the task we used the QoS class property. It is done so that system will know which task has higher priority. So that the execution has to be done accordingly. Although the task runs on the main thread has the highest priority since it makes UI responsive.
The below-listed QoS case is set on the order of its priority. The first one has the highest priority while the last one has the lowest. You can find the documentation from here.
- userInteractive
- userInitiated
- default
- utility
- background
- unspecified
Now we see some example of QoS
|
1 2 3 4 5 6 7 8 9 10 11 12 13 14 15 |
func exampleQoS() { let firstQueue = DispatchQueue(label: "com.app.firstQueue", qos: .userInitiated) let secondQueue = DispatchQueue(label: "com.app.secondQueue", qos: .utility) secondQueue.async { for item in 1..<10{ print(item) } } firstQueue.async { for item in 20..<30 { print(item) } } } |
In the above example, the priority of “firstQueue” is higher than “secondQueue”. When we call the exampleQoS method then we can see the output from the below image.

We can see clearly that the priority of “firstQueue” is higher than “secondQueue” so it executes faster.
Concurrent Queues
So, far we have seen that our queue is serial, which means if we assign more than one task to a single queue then it is executed one after another. Now we will see how they will run together. In another word, we will see a concurrent queue.
Let first see one example
|
1 2 3 4 5 6 7 8 9 10 11 12 13 14 15 16 17 18 19 20 21 22 |
func exampleQueue() { let queue = DispatchQueue(label: "com.app.queue", qos: .utility) queue.async { for _ in 1..<5{ print("**********") } } queue.async { for _ in 1..<5{ print("AAAAAAAAAA") } } queue.async { for _ in 1..<5{ print("0000000000") } } } |
Output
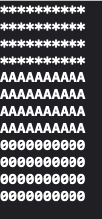
From the above screenshot, we can see when we call the “exampleQueue” method, then we can see all the tasks execute in a serial manner.
Now we will add the extra argument “attributes” with value concurrent, our queue is now concurrent, when attributes are not present then it is serial. Let see its example.
|
1 2 3 4 5 6 7 8 9 10 11 12 13 14 15 16 17 18 19 20 |
func concurrentQueueExample(){ let concurrentQueue = DispatchQueue(label: "com.app.concurrentQueue", qos: .userInitiated, attributes: .concurrent) concurrentQueue.async { for _ in 1..<10{ print("**********") } } concurrentQueue.async { for _ in 30..<40{ print("AAAAAAAAAA") } } concurrentQueue.async { for _ in 50..<60{ print("0000000000") } } } |
When we run the above method “concurrentQueueExample” then we can see that the task will execute simultaneously. Also, change in QoS will also affect the task execution. The attributes also take another value “initiallyInactive“. When we pass “initiallyInactive” the task does not start automatically, it needs to trigger to start the execution.
Let see an example.
|
1 2 3 4 5 6 7 8 |
func queueInactive(){ let queue = DispatchQueue(label: "com.app.inactive", qos: .utility, attributes: .initiallyInactive) queue.async { for _ in 1..<5{ print(item) } } } |
When the above method is called then it crashes. We need to activate it first. For this, we will use activate() method.
|
1 2 3 4 5 6 7 8 9 |
func queueInactive(){ let queue = DispatchQueue(label: "com.app.inactive", qos: .utility, attributes: .initiallyInactive) self.queue = queue queue.async { for _ in 1..<5{ print(item) } } } |
|
1 2 3 4 5 6 7 8 9 10 11 12 13 |
class ViewController: UIViewController { var queue: DispatchQueue? override func viewDidLoad() { super.viewDidLoad() queueInactive() if let queue = queue{ queue.activate() } } } |
Note:- We have not passed the concurrent value in attributes, so it will execute in a serial manner. To make it concurrent we will pass both the “initiallyInactive” and “concurrent” in the attributes.
example
|
1 |
let queue = DispatchQueue(label: "com.app.inactive", qos: .utility, attributes: [.initiallyInactive,.concurrent]) |
Delaying the Execution
Now, we see how we delay the execution of work. Let see by an example
|
1 2 3 4 5 6 7 8 9 10 |
func delayQueue() { let firstQueue = DispatchQueue(label: "com.app.secondQueue", qos: .utility) print(Date()) firstQueue.asyncAfter(deadline: .now() + 4) { for item in 10..<20 { print(item) } print(Date()) } } |
Output
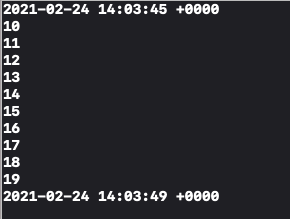
We can also use DispatchTimeInterval for providing the delay time. We can use seconds, microseconds, nanoseconds, and milliseconds. Let take an example of it.
|
1 2 3 4 5 6 7 8 9 10 11 |
func delayQueue() { let firstQueue = DispatchQueue(label: "com.app.secondQueue", qos: .utility) print(Date()) let time: DispatchTimeInterval = .seconds(4) firstQueue.asyncAfter(deadline: .now() + time) { for item in 10..<20 { print(item) } print(Date()) } } |
Main and Global Queues
So, Far we are creating a custom queue, but the system creates a collection of background queues which is known as global queues. If we don’t want to use a custom queue then we can use global queues.
Example
|
1 2 3 4 5 6 7 8 |
func globalQueue(){ let globalqueue = DispatchQueue.global() globalqueue.async { for items in 1..<5{ print(items) } } } |
We can also specify the quality of service that we want to use.
Example
|
1 2 3 4 5 6 7 8 |
func globalQueue(){ let globalqueue = DispatchQueue.global(qos: .utility) globalqueue.async { for items in 1..<5{ print(items) } } } |
Now we will see how to access the main queue. The main purpose of the main queue is for UI update, All the UI updating parts are done on the main thread. And the task which required more time is done on the background thread.
|
1 2 3 |
DispatchQueue.main.async { // Your code } |
DispatchWorkItem
When we don’t want to use the code block then at the time we used DispatchWorkItem. A contain codes of DispatchWorkItem can be executed on a background thread or main thread.
Let see an example of it.
|
1 2 3 4 5 6 7 8 9 10 11 12 13 14 15 16 17 18 19 20 21 22 23 24 25 |
func workItem() { let work = DispatchWorkItem{ for item in 0..<5{ print(item) } } // When the work item is dispatch, we notifiy here the main queue work.notify(queue: DispatchQueue.main) { print("Work item is dispatched") } //Execution of workitem on the main thread. work.perform() let queue = DispatchQueue.global() //Execution of workitem on the background thread using first method. queue.async(execute: work) //Execution of workitem on the background thread using second method. queue.async { print("****") work.perform() } |
You can also check other blogs from here. if you have any issue or suggestion you can leave your query/suggestion in the comment section.
Reference
You can check more information from Appcoda

Be the first to comment.