Are you searching “How to implement Expandable Tableview in iOS in Swift”
Then you are at the right place , here is the quick solution for you.
Just follow these steps to go further:-
- Take a UIViewController on the interface builder. Name it as ExpandableViewController.
- Drop a UITableView over it and assign the necessary constraints.
- Drop a UITableViewCell over the table and then a label inside it. Assign the constraints.
Now your ViewController is looking just like the below picture.

4. Assign the TableView’s Datasource and Delegate to the ExpandableViewController.
5. Assign “ExpandCell” as the UITableViewCell class.
Now paste the below code inside your ExpandableViewController class.
|
1 2 3 4 5 6 7 8 9 10 11 12 13 14 15 16 17 18 19 20 21 22 23 24 25 26 27 28 29 30 31 32 33 34 35 36 37 38 39 40 41 42 43 44 45 46 47 48 49 50 51 52 53 54 55 56 57 58 59 60 61 62 63 64 65 66 |
import UIKit class ExpandableViewController: UIViewController { @IBOutlet weak var expandTable: UITableView! var expandData = [NSMutableDictionary]() override func viewDidLoad() { super.viewDidLoad() self.expandData.append(["isOpen":"1","data":["banana","mango"]]) self.expandData.append(["isOpen":"1","data":["banana","mango","apple"]]) self.expandData.append(["isOpen":"1","data":["banana"]]) // Do any additional setup after loading the view. } override func didReceiveMemoryWarning() { super.didReceiveMemoryWarning() // Dispose of any resources that can be recreated. } } class ExpandCell:UITableViewCell{ @IBOutlet weak var expandLbl: UILabel! } extension ExpandableViewController : UITableViewDelegate,UITableViewDataSource{ func tableView(_ tableView: UITableView, numberOfRowsInSection section: Int) -> Int { if self.expandData[section].value(forKey: "isOpen") as! String == "1"{ return 0 }else{ let dataarray = self.expandData[section].value(forKey: "data") as! NSArray return dataarray.count } } func numberOfSections(in tableView: UITableView) -> Int { return self.expandData.count } func tableView(_ tableView: UITableView, cellForRowAt indexPath: IndexPath) -> UITableViewCell { let cell = tableView.dequeueReusableCell(withIdentifier: "expand", for: indexPath) as! ExpandCell let dataarray = self.expandData[indexPath.section].value(forKey: "data") as! NSArray cell.expandLbl.text = dataarray[indexPath.row] as? String return cell } func tableView(_ tableView: UITableView, viewForHeaderInSection section: Int) -> UIView? { let headerView = UIView(frame: CGRect(x: 0, y: 0, width: tableView.bounds.size.width, height: 30)) headerView.backgroundColor = UIColor.gray let label = UILabel(frame: CGRect(x: 5, y: 3, width: headerView.frame.size.width - 5, height: 27)) label.text = "\(section)" headerView.addSubview(label) headerView.tag = section + 100 let tapgesture = UITapGestureRecognizer(target: self , action: #selector(self.sectionTapped(_:))) headerView.addGestureRecognizer(tapgesture) return headerView } func sectionTapped(_ sender: UITapGestureRecognizer){ if(self.expandData[(sender.view?.tag)! - 100].value(forKey: "isOpen") as! String == "1"){ self.expandData[(sender.view?.tag)! - 100].setValue("0", forKey: "isOpen") }else{ self.expandData[(sender.view?.tag)! - 100].setValue("1", forKey: "isOpen") } self.expandTable.reloadSections(IndexSet(integer: (sender.view?.tag)! - 100), with: .automatic) } } |
Don’t worry , I am explaining everything.
Now lets dive into the code , Read the following step by step explanation.
- var expandData = [NSMutableDictionary]() this is our data format.
- self.expandData.append([“isOpen”:”1″,”data”:[“banana”,”mango”]]) the key “isOpen” is actually helping us to expand the table sections and key “data” is holding the cell data
- Inside the numberOfRowsInSection method we are checking the “isOpen” key value and returning the rows according to it.
- Inside the viewForHeaderInSection method we are creating a custom view for section header of tableView and assigning a UITapGestureRecognizer to it. This will help us to handle section taps.
- Whenever a user tap the section we are changing the “isOpen” key value and reloading the section this will result in changing the number of rows for that section , Hence we will see an expanding animation with the tableView section.
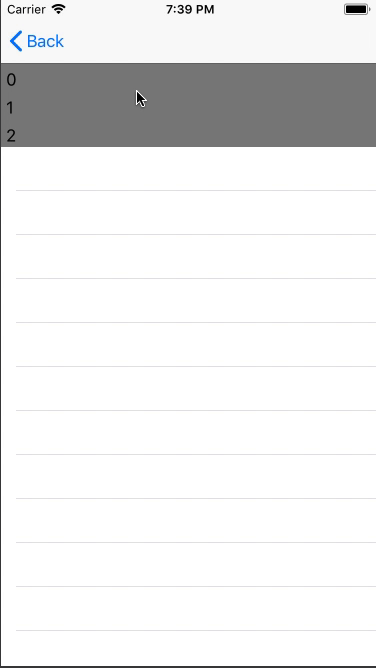
Finally after running the project the table will look like this.
Thats How we have created our Expandable UITableVIew.
Its done , enjoy…..

. . .
Be the first to comment.