Dart package that contains an API written in Dart code combined with one or more platform-specific implementations. Plugin packages can be written for Android (using Kotlin or Java), iOS (using Swift or Objective-C), web, macOS, Windows, or Linux, or any combination thereof.
Flutter allows us to create our own plugins where we can manage our native code.
Read about the variety of Flutter App Development Services offered by Mobikul
Let’s create a plugin where we will implement webview.
Step 1: Create the package
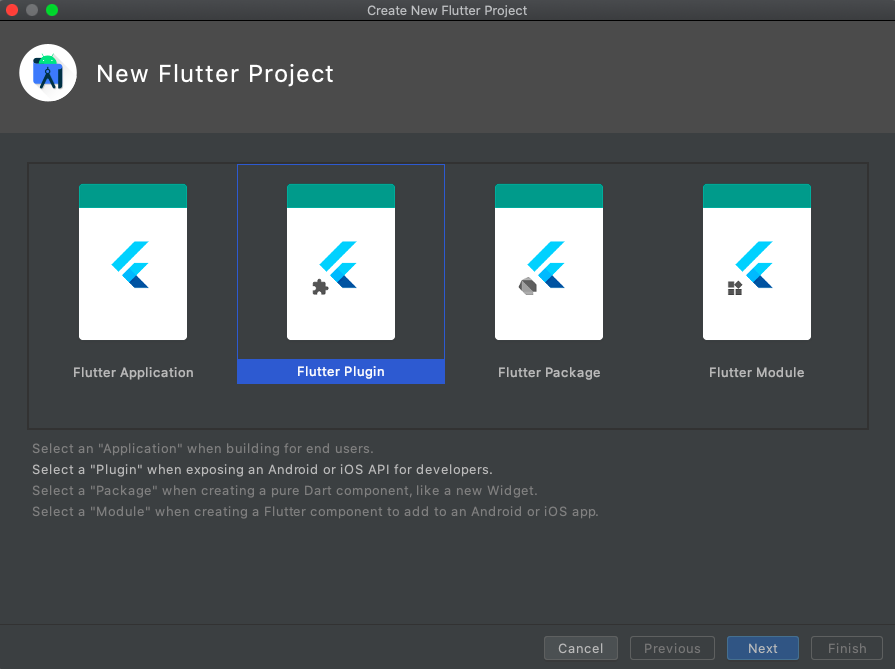
Open the android studio got to File –>> New –>> New flutter project.

Click on the New flutter project –>> Select the Flutter plugin option and create the plugin.
Step 2: Specifying a plugin’s supported platforms. In pubspec.yaml file we can add specific information about the package.
|
1 2 3 4 5 6 7 8 9 10 11 12 13 14 |
flutter: plugin: platforms: android: package: com.mobikul.webview pluginClass: WebviewPlugin ios: pluginClass: WebviewPlugin environment: sdk: ">=2.1.0 <3.0.0" # Flutter versions prior to 1.12 did not support the # flutter.plugin.platforms map. flutter: ">=1.12.0" |
Step 3: Now open lib/WebviewPlugin.dart file and create a method where we will pass URL string.
|
1 2 3 4 5 6 7 8 |
class WebviewPlugin { static const MethodChannel _channel = const MethodChannel('webview_plugin'); static Future<void> openWebview(String url) async { await _channel.invokeMethod('openWebview',url); } } |
Step 4: Now implement Webview code in iOS end. Open SwiftWebviewPlugin.swift file from ios folder and add code to handle API request.
|
1 2 3 4 5 6 7 8 9 10 11 |
public func handle(_ call: FlutterMethodCall, result: @escaping FlutterResult) { if call.method == "openWebview", let url = call.arguments as? String{ let vc = WkWebviewController() vc.url = url let viewController = UIApplication.shared.keyWindow?.rootViewController let nav = UINavigationController(rootViewController: vc) nav.modalPresentationStyle = .fullScreen viewController?.present(nav, animated: true) } } |
And Add WKWebview implementation code.
|
1 2 3 4 5 6 7 8 9 10 11 12 13 14 15 16 17 18 19 20 21 22 23 24 25 26 27 28 29 30 31 32 33 34 35 36 37 38 39 40 41 42 43 44 45 46 47 48 49 50 51 52 53 54 55 56 57 58 59 60 61 62 63 64 65 |
class WkWebviewController: UIViewController, WKUIDelegate { // MARK: - Lifecycle Methods var url = "" override func viewDidLoad() { super.viewDidLoad() setupUI() setupNavItem() let myURL = URL(string: url) let myRequest = URLRequest(url: myURL!) webView.load(myRequest) } override func viewWillAppear(_ animated: Bool) { super.viewWillAppear(animated) setupNavBar() } // MARK: - Actions @objc func backAction() { print("backAction") self.dismiss(animated: true, completion: nil) } // MARK: - Properties lazy var webView: WKWebView = { let webConfiguration = WKWebViewConfiguration() let webView = WKWebView(frame: .zero, configuration: webConfiguration) webView.uiDelegate = self webView.translatesAutoresizingMaskIntoConstraints = false return webView }() } extension WkWebviewController { func setupUI() { self.view.backgroundColor = .white self.view.addSubview(webView) NSLayoutConstraint.activate([ webView.topAnchor .constraint(equalTo: self.view.safeAreaLayoutGuide.topAnchor), webView.leftAnchor .constraint(equalTo: self.view.safeAreaLayoutGuide.leftAnchor), webView.bottomAnchor .constraint(equalTo: self.view.safeAreaLayoutGuide.bottomAnchor), webView.rightAnchor .constraint(equalTo: self.view.safeAreaLayoutGuide.rightAnchor) ]) } func setupNavItem() { let backBarItem = UIBarButtonItem(title: "Close", style: .plain, target: self, action: #selector(backAction)) self.navigationItem.leftBarButtonItem = backBarItem } func setupNavBar() { self.navigationController?.navigationBar .barTintColor = .systemBlue self.navigationController?.navigationBar .tintColor = .white } } |
Step 5: Now implement Webview code in Android end. Open WebviewPlugin.kt file from android folder and add code to handle API request.
|
1 2 3 4 5 6 7 8 9 10 11 12 13 14 15 16 17 18 19 20 21 22 23 24 25 26 27 28 29 30 31 32 33 34 35 36 37 38 39 40 41 |
class WebViewPlugin: FlutterPlugin, MethodCallHandler,ActivityAware { private lateinit var channel : MethodChannel private lateinit var activity : Activity private lateinit var context: Context override fun onAttachedToEngine(@NonNull flutterPluginBinding: FlutterPlugin.FlutterPluginBinding) { channel = MethodChannel(flutterPluginBinding.binaryMessenger, "webView_plugin") channel.setMethodCallHandler(this) context = flutterPluginBinding.applicationContext } override fun onDetachedFromActivityForConfigChanges() { } override fun onReattachedToActivityForConfigChanges(binding: ActivityPluginBinding) { activity = binding.activity } override fun onDetachedFromActivity() { } override fun onAttachedToActivity(binding: ActivityPluginBinding) { activity = binding.activity } override fun onMethodCall(@NonNull call: MethodCall, @NonNull result: Result) { if (call.method == "openWebview") { val intent = Intent(context, WebViewActivity::class.java) intent.putExtra("URL",call.arguments.toString()) activity.startActivity(intent) } else { result.notImplemented() } } override fun onDetachedFromEngine(@NonNull binding: FlutterPlugin.FlutterPluginBinding) { channel.setMethodCallHandler(null) } } |
Now add WebViewActivity code in the package
|
1 2 3 4 5 6 7 8 9 10 11 12 13 14 15 16 17 18 19 20 21 22 23 24 25 26 27 28 |
class WebViewActivity : Activity() { private var mWebView: WebView? = null public override fun onCreate(savedInstanceState: Bundle?) { super.onCreate(savedInstanceState) actionBar?.setDisplayHomeAsUpEnabled(true); window.requestFeature(Window.FEATURE_NO_TITLE) mWebView = WebView(this) val extras = intent.extras mWebView!!.loadUrl(extras?.getString("URL")!!) mWebView!!.webViewClient = object : WebViewClient() { override fun shouldOverrideUrlLoading(view: WebView, url: String): Boolean { view.loadUrl(url) return true } } this.setContentView(mWebView) } override fun onKeyDown(keyCode: Int, event: KeyEvent): Boolean { if (keyCode == KeyEvent.KEYCODE_BACK && mWebView!!.canGoBack()) { mWebView!!.goBack() return true } return super.onKeyDown(keyCode, event) } } |
webview.xml:
|
1 2 3 4 5 6 7 8 9 10 11 12 13 |
<?xml version="1.0" encoding="utf-8"?> <LinearLayout xmlns:android="http://schemas.android.com/apk/res/android" android:orientation="vertical" android:layout_width="match_parent" android:layout_height="match_parent"> <WebView android:id="@+id/webView" android:layout_width="match_parent" android:layout_height="match_parent"> </WebView> </LinearLayout> |
Step 6: Thats all for the implemention part, now call the openWebview method.
|
1 |
await WebviewPlugin.openPDF('https://www.google.com/'); |
Step 7: Now publish the plugin.
Run the publish command in dry-run mode to see if everything passes analysis:
|
1 |
flutter pub publish --dry-run |
The next step is publishing to pub.dev:
|
1 |
flutter pub publish |
I hope this code will help you better to understand Custom Plugin in Swift. If you feel any doubt or query please comment below.
Thanks for the read this blog and if you want to visit my other blog click here.

4 comments
Hi, sorry for the typo.
It is WebviewPlugin.kt(kotlin file).
We have updated the blog now.