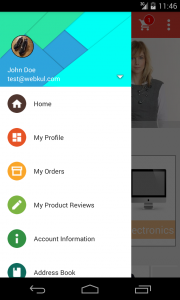
Android provide us NavigationView according to the material specification provided by Google. However to get the full control over a drawer. We can create our custom implementation in the navigation view.
NavigationView is a subclass of FrameLayout, which can have multiple children. That means you can add a custom view to your NavigationView
Here is a sample of custom navigation view created using Recycler View
|
1 2 3 4 5 6 7 8 9 10 11 12 13 14 15 16 17 18 19 20 21 22 23 24 25 26 27 28 29 |
<android.support.design.widget.NavigationView android:id="@+id/nav_view" android:layout_width="wrap_content" android:layout_height="match_parent" android:layout_gravity="start" android:fitsSystemWindows="false"> <android.support.v4.widget.NestedScrollView android:layout_width="match_parent" android:layout_height="wrap_content"> <LinearLayout android:layout_width="match_parent" android:layout_height="wrap_content" android:orientation="vertical"> <include layout="@layout/nav_header_main" /> <android.support.v7.widget.RecyclerView android:id="@+id/nav_drawer_recycler_view" android:layout_width="280dp" android:layout_height="wrap_content" android:background="@android:color/white" android:nestedScrollingEnabled="false" tools:targetApi="lollipop" /> </LinearLayout> </android.support.v4.widget.NestedScrollView> </android.support.design.widget.NavigationView> |
Note: Make sure you have removed app:menu from the NavigationView.
Now you can use adapter to load view inside RecyclerView or our custom NavigationView.
That’s all folks. Stay updated !!


2 comments
RecyclerView holds in memory only the visible elements. By putting it in a NestedScrollView, you make it inflate all its elements from top to bottom and the off-screen elements are no longer “recycled”, and this way the RecyclerView no longer serves its purpose.
You might as well use a ListView or CoordinatorLayout instead.