In this blog, we will learn how we can create Android Component for React Native Application.
Well, if you start working on React Native, you will find that this is much simpler to use and built applications beautifully.
But if you have worked on any one platform for some time, you will soon find that there are many things that you just want to implement in the native platform code and then use it in your react native code.
This blog will just be a guide on creating a Custom Android View for your React Native Application.
Objectives :
After completing this blog we will be able to :
- Create a Custom UI component
- Passing props to Custom Component
Tools You Will Need :
- Android Studio
- TextEditor for Editing the JavaScript files. ( We used Visual Studio Code)
- React Native Development Environment (Just make sure that you have react-native cli installed).
Let’s start
Part 1: Create a Custom UI component
Firstly, we will open the android code of our React Native Application in Android Studio.
Now, we will create our Custom Android View.
Changes in Android Code :
We name this as MyComponent which actually is an extension of the AppCompatButton.
Now Our custom Component class will look like something below :
|
1 2 3 4 5 6 7 8 9 10 11 |
public class MyComponent extends AppCompatButton { public MyComponent(Context context) { this(context,null,0); } public MyComponent(Context context, @Nullable AttributeSet attrs) { this(context, attrs,0); } public MyComponent(Context context, @Nullable AttributeSet attrs, int defStyleAttr) { super(context, attrs, defStyleAttr); } } |
As we have completed the creation of our view component.
We now need to create a bridge that will help our native component to be bound two way( both Java & React Native code).
This bridge will help us in retrieving the properties changed through React Native code to the component & on the screen.
Also, this bridge will help us with the user interaction & bringing the user interaction related changes to our React Native code.
This in React Native is known as ViewManager.
You can find a reference to ViewManager in the official guides over here
Next step is to create a MyComponentManager.java class which extends the SimpleViewManager class from React Native Package.
|
1 2 3 4 5 6 7 8 9 10 11 12 13 14 15 16 17 18 19 20 |
public class MyComponentManager extends SimpleViewManager<MyComponent> { /** * @return the name of this view manager. This will be the name used to reference this view * manager from JavaScript in createReactNativeComponentClass. */ @Override public String getName() { return "MyComponent"; } /** * Subclasses should return a new View instance of the proper type. * * @param reactContext */ @Override protected MyComponent createViewInstance(ThemedReactContext reactContext) { return new MyComponent(reactContext); } } |
As we complete this step, now we need to create a Package so that we are finally able to use this view in our React Native Code.
Let’s name our package as MyCustomPackage.java
|
1 2 3 4 5 6 7 8 9 10 11 12 13 14 15 16 17 18 19 |
public class MyCustomPackage implements ReactPackage { /** * @param reactContext react application context that can be used to create modules * @return list of native modules to register with the newly created catalyst instance */ @Override public List<NativeModule> createNativeModules(ReactApplicationContext reactContext) { return Collections.emptyList(); } /** * @param reactContext * @return a list of view managers that should be registered with {@link ViewManager} */ @Override public List<ViewManager> createViewManagers(ReactApplicationContext reactContext) { return Collections.<ViewManager>singletonList(new MyComponentManager()); } } |
Now, we need to add this package to our Application class.
Go to the MainApplication.java class and add our newly created package name in the file as shown below :
|
1 2 3 4 5 6 7 8 9 10 11 12 13 14 15 16 17 18 19 20 21 22 23 24 25 26 27 28 29 30 31 32 33 |
public class MainApplication extends Application implements ReactApplication { private final ReactNativeHost mReactNativeHost = new ReactNativeHost(this) { @Override public boolean getUseDeveloperSupport() { return BuildConfig.DEBUG; } @Override protected List<ReactPackage> getPackages() { return Arrays.<ReactPackage>asList( new MainReactPackage(), new MyCustomPackage() ); } @Override protected String getJSMainModuleName() { return "index"; } }; @Override public ReactNativeHost getReactNativeHost() { return mReactNativeHost; } @Override public void onCreate() { super.onCreate(); SoLoader.init(this, /* native exopackage */ false); } } |
With this final step, we just completed creating the Android Component.
Changes in React Native Code
Now let’s switch over to our React Native Code and try to use our newly created package.
Open React Native Code in your TextEditor.
Modify the content of your App.js
|
1 2 3 4 5 6 7 8 9 10 11 12 13 14 15 16 17 18 19 20 21 22 23 24 25 26 27 28 29 30 31 32 33 |
import React, { Component } from 'react'; import { Platform, StyleSheet, View, requireNativeComponent // This will actually be needed to call our component } from 'react-native'; const MyComponent = requireNativeComponent("MyComponent") // This will be the declaration of our component export default class App extends Component { render() { return ( <View style = {styles.container}> {/* A Call to our newly created Component */} <MyComponent style = {styles.myComponentStyle}/> </View> ); } } const styles = StyleSheet.create({ container: { flex: 1, backgroundColor: '#FF0000', justifyContent: 'center', alignItems: 'center', }, myComponentStyle: { width:200, height:80, justifyContent: 'center', alignItems: 'center', backgroundColor:"#FFFFFF" }, }); |
Now, just try running the Android application through react-native cli (i.e using react-native run-android) command.
As soon as your application is launched, you will see the screen like below 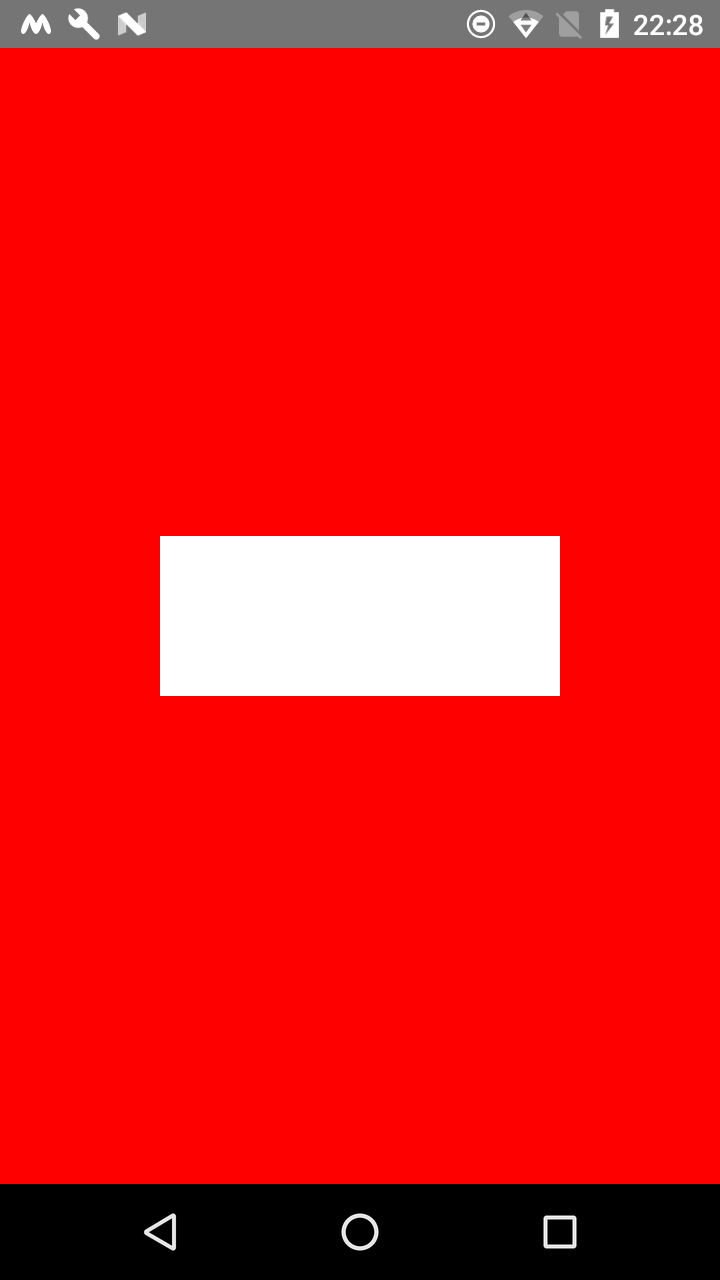
With this, we just completed creating a custom android component and using this in our React Native Code.
The background in the above is actually maintained by the SimpleViewManager class & the styles attribute we used in our App.js class.
Part 2: Passing props to Custom Component
Now, we will start looking into how we can create our custom properties and pass those as arguments to the View just created.
Let’s just try setting the background color & text in the views created.
Firstly we will modify our MyComponent.java class as shown below :
|
1 2 3 4 5 6 7 8 9 10 11 12 13 14 15 16 17 18 19 20 21 22 23 24 25 26 27 28 29 30 |
public class MyComponent extends AppCompatButton { public MyComponent(Context context) { this(context,null,0); } public MyComponent(Context context, @Nullable AttributeSet attrs) { this(context, attrs,0); } public MyComponent(Context context, @Nullable AttributeSet attrs, int defStyleAttr) { super(context, attrs, defStyleAttr); } /** * @param color --> String containg hexcode of the color to be used e.g. #FFFFFF */ public void setComponentBackgroundColor(String color) { super.setBackgroundColor(Color.parseColor(color)); } /** * @param text --> string containg the text to be displayed */ public void setComponentText(String text) { super.setText(text); } } |
Modify MyComponentManager.java class so we can add custom properties to our view
|
1 2 3 4 5 6 7 8 9 10 11 12 13 14 15 16 17 18 19 20 21 22 23 24 25 26 27 28 29 30 31 32 33 34 35 36 37 38 39 40 |
public class MyComponentManager extends SimpleViewManager<MyComponent> { /** * @return the name of this view manager. This will be the name used to reference this view * manager from JavaScript in createReactNativeComponentClass. */ @Override public String getName() { return "MyComponent"; } /** * Subclasses should return a new View instance of the proper type. * * @param reactContext */ @Override protected MyComponent createViewInstance(ThemedReactContext reactContext) { return new MyComponent(reactContext); } /** * @param component --> refrence of our Custom component * @param colorCode --> string for color code passed on from JavaScript Code */ @ReactProp(name = "componentBackgroundColor") public void setComponentBackgroundColor(MyComponent component,String colorCode){ component.setComponentBackgroundColor(colorCode); } /** * @param component --> refrence of our Custom component * @param text --> string for text to be displayed passed on from JavaScript Code */ @ReactProp(name = "componentText") public void setComponentText(MyComponent component, String text){ component.setComponentText(text); } } |
Now we just need to pass these as properties of our Component in our React Native Code, so we will modify our React Native App.js file as below :
|
1 2 3 4 5 6 7 8 9 10 11 12 13 14 15 16 17 18 19 20 21 22 23 24 25 26 27 28 29 30 31 32 33 34 |
import React, { Component } from 'react'; import { Platform, StyleSheet, View, requireNativeComponent // This will actually be needed to call our component } from 'react-native'; const MyComponent = requireNativeComponent("MyComponent") // This will be the declaration of our component export default class App extends Component { render() { return ( <View style = {styles.container}> {/* A Call to our newly created Component */} <MyComponent style = {styles.myComponentStyle} componentBackgroundColor={'#00FF00'} componentText={'Text from JavaScript'}/> </View> ); } } const styles = StyleSheet.create({ container: { flex: 1, backgroundColor: '#FF0000', justifyContent: 'center', alignItems: 'center', }, myComponentStyle: { width:200, height:80, justifyContent: 'center', alignItems: 'center', }, }); |
Let’s just have a view of what we built :
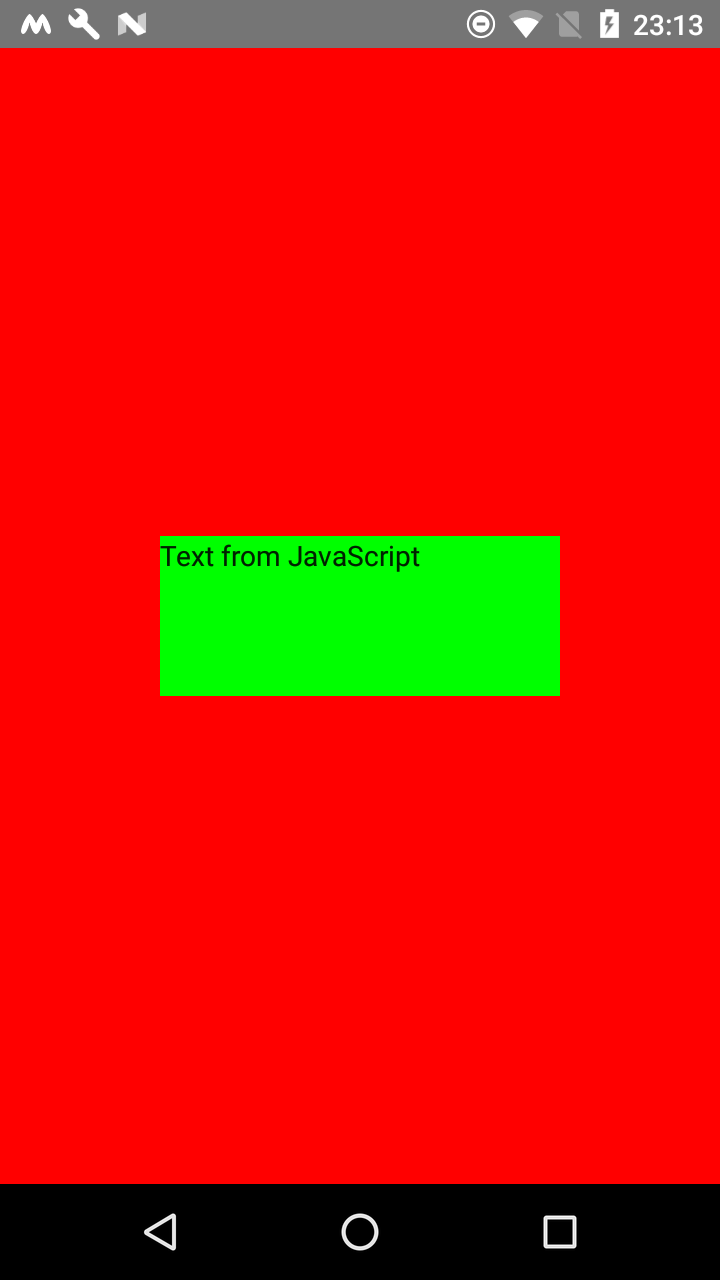
And with this, we just completed creating our Android Component for React Native Application.
P.S: The blog & screenshots associated focuses on code end, you can obviously use your logic to make the component beautiful, presentable as per your use case.
Keep coding and Keep Sharing 
References: https://facebook.github.io/react-native/docs/native-components-android

Be the first to comment.