Chrome extensions serve as powerful tools to enhance users’ browsing experiences, offering functionalities ranging from productivity tools to entertainment utilities.
With Flutter’s cross-platform capabilities and rich widget library, building Chrome extensions becomes not only feasible but also efficient and enjoyable.
Let’s embark on a journey to explore how you can leverage Flutter to create a Chrome extension in flutter.
In today’s blog we are going to learn about how to build chrome extension in flutter.
Before starting with the blog, if you are looking to develop Mobile Apps, You may also check our flutter app development services.
Implementation
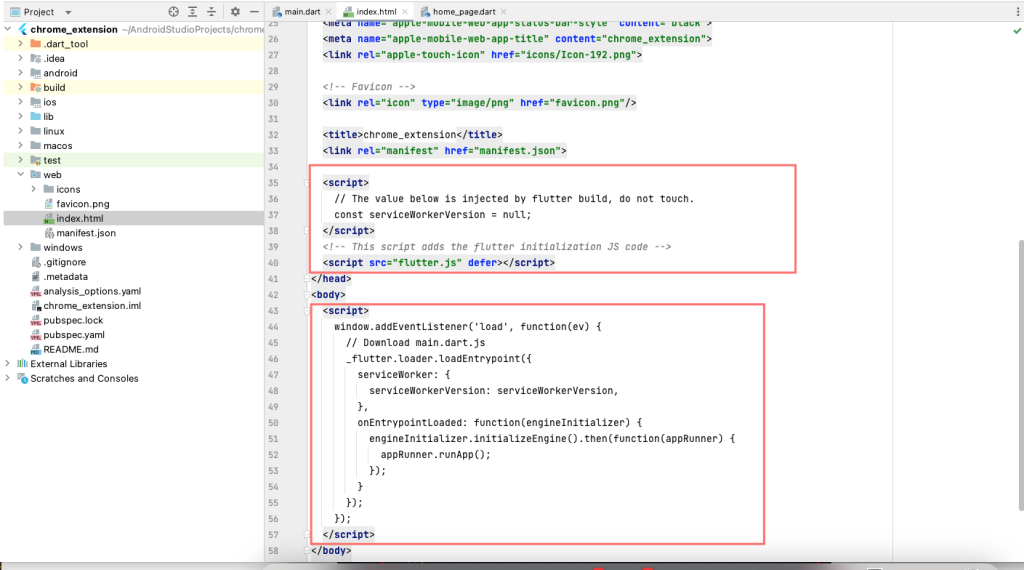
First, Create A New Project in flutter and Remove non-supported scripts tags from index.html
- Navigate to
web/index.htmlfile and remove all the<script>..</script>tags as shown below:

2. Set the extension height and width
For setting height and width for Extension add inside style property of <html> tag :
|
1 |
<html style="height: 700px; width: 400px"> |
3. Make changes in the manifest.json file
Navigate to web/manifest.json file and replace the entire content with the following :
|
1 2 3 4 5 6 7 8 9 10 11 12 13 |
{ "name": "QR Extension demo", "description": "QR Extension demo", "version": "1.0.0", "content_security_policy": { "extension_pages": "script-src 'self' ; object-src 'self'" }, "action": { "default_popup": "index.html", "default_icon": "icons/Icon-192.png" }, "manifest_version": 3 } |
4. RUN this command to build the extension for web
Open terminal and run below command to build extension for chrome :
|
1 |
flutter build web --web-renderer html --csp |
Create flutter app
Create flutter app and add QR code(qr_flutter: ^4.1.0) generator dependency in pubspec.yaml file and add example code in dart file as below :
|
1 2 3 4 5 6 7 8 9 10 11 12 13 14 15 16 17 18 19 20 21 22 23 24 25 26 27 28 29 30 31 32 33 34 35 36 37 38 39 40 41 42 43 44 45 46 47 48 49 50 51 52 53 54 55 56 57 58 |
class MyHomePage extends StatefulWidget { const MyHomePage({super.key}); @override State<MyHomePage> createState() => _MyHomePageState(); } class _MyHomePageState extends State<MyHomePage> { late final TextEditingController _textController = TextEditingController(); String generatedQrCode = ''; int qrColorIndex = 0; @override Widget build(BuildContext context) { return Scaffold( backgroundColor: Colors.white, appBar: AppBar( title: const Text("Chrome extension demo"), ), body: SingleChildScrollView( child: Padding( padding: const EdgeInsets.all(20), child: SizedBox( height: MediaQuery.of(context).size.height, child: Column( crossAxisAlignment: CrossAxisAlignment.start, mainAxisAlignment: MainAxisAlignment.center, children: [ TextField( controller: _textController, decoration: InputDecoration( hintText: 'Please enter QR code', enabledBorder: OutlineInputBorder( borderRadius: BorderRadius.circular(30), ), focusedBorder: OutlineInputBorder( borderRadius: BorderRadius.circular(30), ), ), onChanged: (value) => setState(() { generatedQrCode = value; }), ), const SizedBox(height: 30), QrImageView( data: generatedQrCode, padding: const EdgeInsets.all(16), ), ], ), ), ), ), ); } } |
Installation on chrome
Open chrome and Enable the Developer mode option with toggle present in the top-right corner of the chrome browser.
Install the build extension by clicking on load unpacked option and Select the <flutter_project_dir>/build/web folder.

Output
Chrome extension
Type the text in textfield and QR code generator generate the QR code.
Conclusion
Thanks for reading this article ❤️
I hope this blog will help you to learn about how to build chrome extension in flutter and you will be able to implement it.
For more updates, make sure to keep following Mobikul Blogs to learn more about mobile app development.
Happy Learning ✍️
Other blogs you may like…

Be the first to comment.