In this blog, we will learn about Changing radio button and checkbox color and appearance in your android application.
The radio button and checkbox button all take the default accent color for selection from your application. Changing the layout to something that you want is not that simple, but is very easy if you follow through correctly.
After reading this blog, you can change the default colors of all your radio button and checkbox( whether created through XML or through java code).
APPROACH
For changing the colors of selected/ checked button state to some color of your choice, all you need to do is to create a drawable with correct state mapped to colors of your choice and a default color and set it in your styles.xml file.
CODE :
my_compound_button_color_selector.xml
|
1 2 3 4 5 |
<selector xmlns:android="http://schemas.android.com/apk/res/android"> <item android:state_pressed="true" android:color="#1E88E5"/> <item android:state_checked="true" android:color="#00e676"/> <item android:color="#757575"/> </selector> |
styles.xml
|
1 2 3 4 5 6 7 8 9 10 11 12 13 14 15 16 17 18 |
<style name="AppTheme" parent="Theme.AppCompat.Light.DarkActionBar"> .............your other style configurations............. <item name="radioButtonStyle">@style/MyRadioButtonStyle</item> <item name="android:radioButtonStyle">@style/MyRadioButtonStyle</item> <item name="checkboxStyle">@style/MyCheckBoxStyle</item> <item name="android:checkboxStyle">@style/MyCheckBoxStyle</item> </style> <style name="MyCheckBoxStyle" parent="Base.Widget.AppCompat.CompoundButton.CheckBox"> <item name="android:textColor">@drawable/my_compound_button_color_selector</item> <item name="buttonTint">@drawable/my_compound_button_color_selector</item> </style> <style name="MyRadioButtonStyle" parent="Widget.AppCompat.CompoundButton.RadioButton"> <item name="android:textColor">@drawable/my_compound_button_color_selector</item> <item name="buttonTint">@drawable/my_compound_button_color_selector</item> </style> |
And all your Radio Button and Checkbox colors will be changed from this settings.
Now, let’s see how we can change the appearance, what I needed was the button on the right side of the text and doing this was pretty easy.
APPROACH :
Your compound button should have layout params of (width: match_parent and height: wrap_content). now you need to reverse the layout direction from the parent layout direction. I needed this in my dynamic views created at runtime from java files, so I am sharing the snippet from Java code, but you can execute the same from your xmls too.
CODE :
|
1 2 3 4 5 6 7 8 9 10 11 12 13 14 15 16 17 18 |
RadioGroup radioGroup = new RadioGroup(getContext()); //create the RadioGroup radioGroup.setLayoutParams(new ViewGroup.LayoutParams(ViewGroup.LayoutParams.MATCH_PARENT, ViewGroup.LayoutParams.WRAP_CONTENT)); RadioButton radioButton = new RadioButton(getContext()); radioButton.setLayoutParams(new ViewGroup.LayoutParams(ViewGroup.LayoutParams.MATCH_PARENT, ViewGroup.LayoutParams.WRAP_CONTENT)); if (ViewCompat.getLayoutDirection(radioButton)== ViewCompat.LAYOUT_DIRECTION_LTR){ ViewCompat.setLayoutDirection(radioButton,ViewCompat.LAYOUT_DIRECTION_RTL); }else{ ViewCompat.setLayoutDirection(radioButton,ViewCompat.LAYOUT_DIRECTION_LTR); } radioGroup.addView(radioButton); CheckBox checkBox = new CheckBox(getContext()); checkBox.setLayoutParams(new ViewGroup.LayoutParams(ViewGroup.LayoutParams.MATCH_PARENT, ViewGroup.LayoutParams.WRAP_CONTENT)); if (ViewCompat.getLayoutDirection(checkBox)== ViewCompat.LAYOUT_DIRECTION_LTR){ ViewCompat.setLayoutDirection(checkBox,ViewCompat.LAYOUT_DIRECTION_RTL); }else { ViewCompat.setLayoutDirection(checkBox,ViewCompat.LAYOUT_DIRECTION_LTR); } |
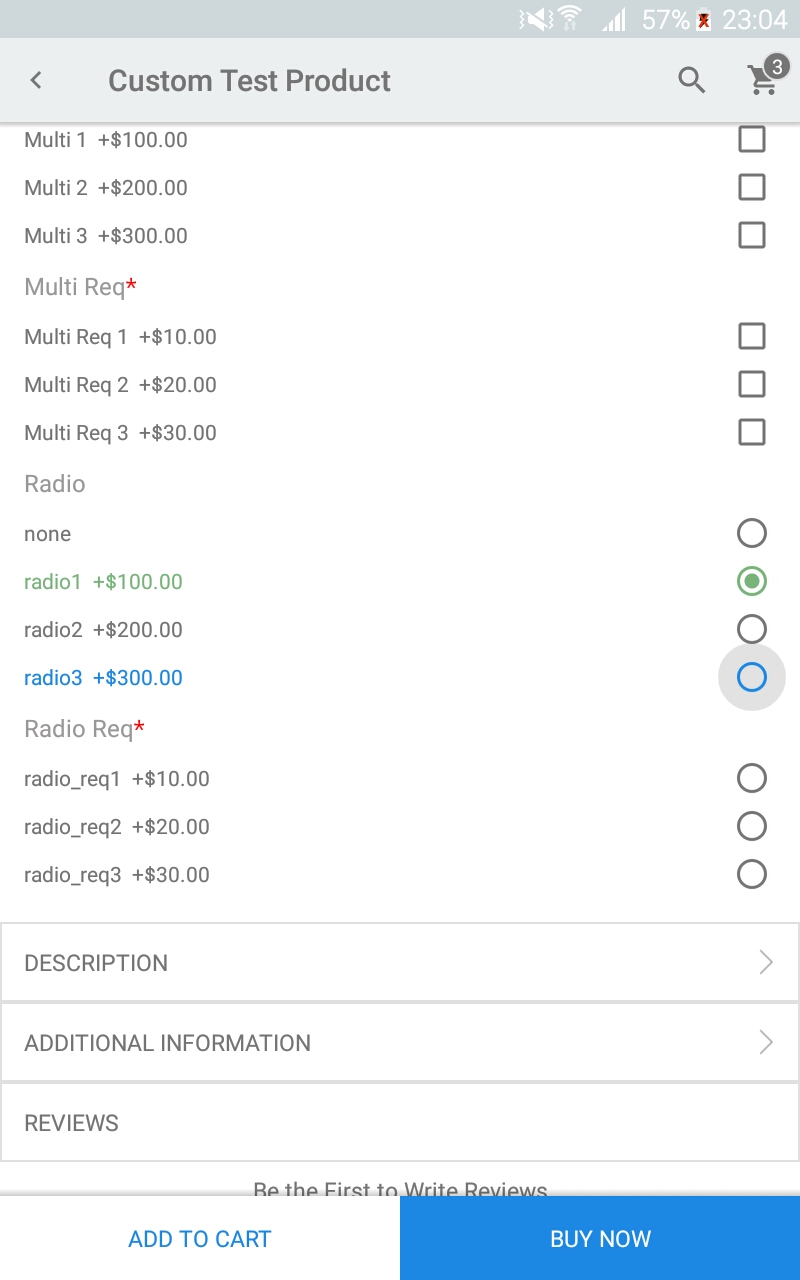
And with this code, you can change the appearance of your compound buttons(Radio Button and Checkbox).
After following this blog, the appearance of your compound buttons will be like this from this code.

11 comments
I have a doubt, can you help me please?
How can I use two different color to radio button text?
I mean, in radio button text, ‘radio_req1 +$10.00’ how can use one color for ‘radio_req1’ , another color for ‘+$100’.
Hope you understand my doubt.
Thanks.