AR Persistence Model using Swift 4.2
Now a days AR is mostly used in various places like eCommerce or for study material etc. Today I am going to tell you about how to save the AR session and load on real environment.
It is more use full for custom map which can be used in house map because google or Apple Map will not work inside the house or mall so here I am taking the example of Shop where the
user will get the path to their product so the user will not get to ask from the shop assistant or shop keeper.
In this Blog We will cover only path draw part & save only other work will cover on next blog .
It will work on Xcode 10 & iOS 12
For Draw the Path Follow this Steps:
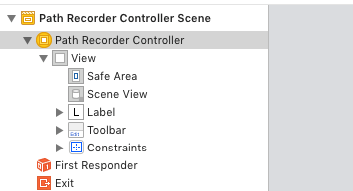
1: Create A UIViewController Class name “ARPathRecorderController”.
a: Take all the necessary controller that are shown in the screenshot.
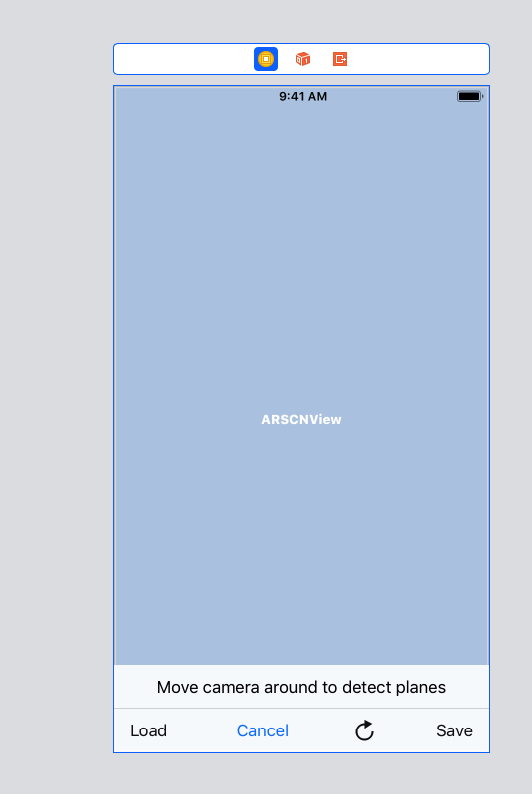
Note:
Load : this will load and check it is fine or not (it is just for testing).
Cancel: Cancel the Record.
Save : it will save the AR session to local Document directory.
2: Now Create the Outlet of ARscniew and other UIComponent Outlet.
|
1 2 3 4 5 6 7 8 9 10 11 |
import UIKit import ARKit class ARPathRecorderController: UIViewController { @IBOutlet weak var sceneView: ARSCNView! @IBOutlet weak var label: UILabel! var mapID:String = "" } |
3: Write the ViewDidload method and Viewwill Appear method :
|
1 2 3 4 5 6 7 8 9 10 11 12 13 14 15 16 17 18 19 20 21 22 23 24 25 26 27 28 29 30 31 32 33 34 35 36 37 38 39 40 41 42 43 44 45 46 47 48 49 50 51 52 53 54 55 56 |
override func viewDidLoad() { super.viewDidLoad() sceneView.delegate = self configureLighting() addTapGestureToSceneView() } func addTapGestureToSceneView() { let tapGestureRecognizer = UITapGestureRecognizer(target: self, action: #selector(didReceiveTapGesture(_:))) sceneView.addGestureRecognizer(tapGestureRecognizer) } @objc func didReceiveTapGesture(_ sender: UITapGestureRecognizer) { let location = sender.location(in: sceneView) guard let hitTestResult = sceneView.hitTest(location, types: [.featurePoint, .estimatedHorizontalPlane]).first else { return } let anchor = ARAnchor(transform: hitTestResult.worldTransform) sceneView.session.add(anchor: anchor) } func configureLighting() { sceneView.autoenablesDefaultLighting = true sceneView.automaticallyUpdatesLighting = true } override func viewWillAppear(_ animated: Bool) { super.viewWillAppear(animated) resetTrackingConfiguration() } func resetTrackingConfiguration(with worldMap: ARWorldMap? = nil) { let configuration = ARWorldTrackingConfiguration() configuration.planeDetection = [.horizontal] let options: ARSession.RunOptions = [.resetTracking, .removeExistingAnchors] if let worldMap = worldMap { configuration.initialWorldMap = worldMap setLabel(text: "Found saved world map.") } else { setLabel(text: "Move camera around to map your surrounding space.") } sceneView.debugOptions = [.showFeaturePoints] sceneView.session.run(configuration, options: options) } func setLabel(text: String) { label.text = text } override func viewWillDisappear(_ animated: Bool) { super.viewWillDisappear(animated) sceneView.session.pause() } |
Note:
First we set the delegate of ARScnview , after that set the light for clear model & add the tap gesture so that when the user will tap on screen it will add image or GIF image on Horizontal Surface for path .
4: On Tap on the screen there will be one delegate method will be called , here we will have to draw the image or GIF on surface.
|
1 2 3 4 5 6 7 8 9 10 11 12 13 14 15 16 17 18 19 20 21 22 23 24 25 26 27 28 29 30 31 32 33 34 35 36 37 38 39 40 41 42 43 44 45 46 47 48 49 50 51 52 53 54 55 56 57 58 59 60 |
extension ARPathRecorderController: ARSCNViewDelegate { func renderer(_ renderer: SCNSceneRenderer, didAdd node: SCNNode, for anchor: ARAnchor) { guard !(anchor is ARPlaneAnchor) else { return } DispatchQueue.main.async { let planeNode = self.displayProductDetailView() node.addChildNode(planeNode) } } } extension ARPathRecorderController{ func displayProductDetailView()->SCNNode { let webViewPlane = SCNPlane(width: 0.15, height: 0.15) webViewPlane.cornerRadius = 0 let webViewNode = SCNNode(geometry: webViewPlane) // Set the web view as webViewPlane's primary texture webViewNode.geometry?.firstMaterial?.diffuse.contents = self.returnAnimationArrow() webViewNode.position.z -= 0.0 // position of images webViewNode.opacity = 0 webViewNode.eulerAngles.x = -.pi / 4 webViewNode.runAction(.sequence([ .wait(duration: 1.0), .fadeOpacity(to: 1.0, duration: 1.0), .moveBy(x: 0, y: 0, z: -0.0, duration: 1.0), .moveBy(x: 0, y: 0, z: -0.0, duration: 0.2) ]) ) return webViewNode } func returnAnimationArrow()->UIImageView{ let jeremyGif = UIImage.gifImageWithName("greenarrow") let imageView = UIImageView(image: jeremyGif) imageView.frame = CGRect(x: 0, y: 0, width: 50, height: 50) return imageView } } |
Note:
Here we are taking the gif image that will draw on surface on every tap .
5: Now its time to save to this model .
You have to save every model by unique ID so that you can identify easily.
a: Now write the outlet function of Save button:
|
1 2 3 4 5 6 7 8 9 10 11 12 13 14 15 16 17 18 19 20 21 22 23 24 25 26 27 28 29 30 31 32 |
@IBAction func saveBarButtonItemDidTouch(_ sender: UIBarButtonItem) { sceneView.session.getCurrentWorldMap { (worldMap, error) in guard let worldMap = worldMap else { return self.setLabel(text: "Error getting current world map.") } do { try self.archive(worldMap: worldMap) DispatchQueue.main.async { self.setLabel(text: "World map is saved.") } } catch { fatalError("Error saving world map: \(error.localizedDescription)") } } } func archive(worldMap: ARWorldMap) throws { let data = try NSKeyedArchiver.archivedData(withRootObject: worldMap, requiringSecureCoding: true) try data.write(to: self.worldMapURL(), options: [.atomic]) } func worldMapURL()->URL{ do { let id = mapID return try FileManager.default.url(for: .documentDirectory, in: .userDomainMask, appropriateFor: nil, create: true) .appendingPathComponent("worldMapURL"+id) } catch { fatalError("Error getting world map URL from document directory.") } } |
Now your model is saved with corresponding Map Id.
In Next Blog we will cover the Load Part of Model & Complete project Link of GitHub.
If you find any issue or problem to implement this part feel free to ask.

Be the first to comment.