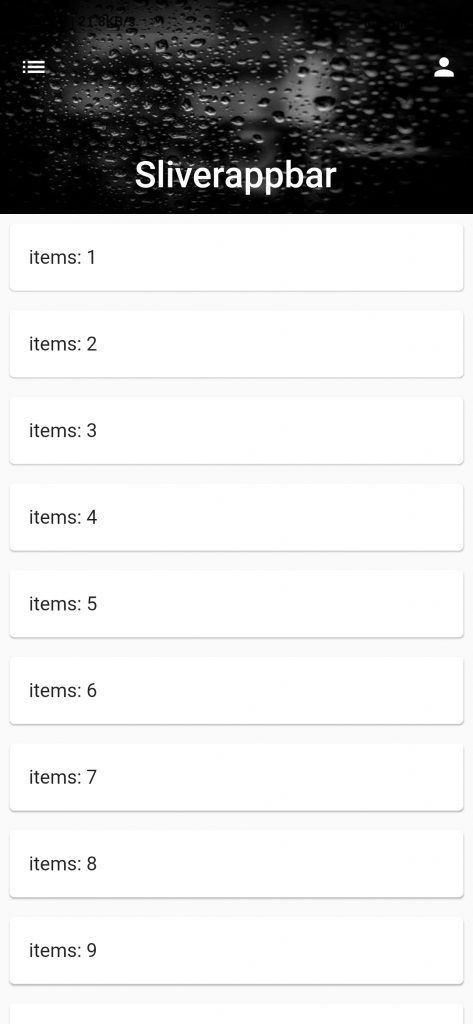
SliverAppBar in Flutter is a Material Design widget in flutter which gives a scrollable or collapsible app-bar.
Read more about Flutter app development services from mobikul.
SliverAppBar most importantly gives us the means to create an app-bar that can change appearance, blend in the background, or disappear as we scroll.
Properties of SliverAppBar
- action – you can use this property to displayed the list of widgets after the title of the SliverAppBar.
- backgroundColor – you can use this property to add colors to the background of the SliverAppBar.
- centerTitle – you can use this property to determines whether the title is in center of the SliverAppBar.
- flexibleSpace – you can use this property to stacks widgets behind the took bar when it collapse in SliverAppBar.
- expandedHeight – you can use this property to set the size of the app bar when expanded.
- floating – you can use this property to determine whether the SliverAppBar is visible as soon as you scrolls towards it(top or bottom) or not.
- pinned – you can use this property to SliverAppBar remain visible at the start of scroll view.
- stretch – you can use this property to determine whether the SliverAppBar stretch to full space of the over scroll area.
Implementation of SliverAppbar in Flutter
At first, you have the CustomScrollView widget in SliverAppBar. Then you can use the slivers property that takes a list of widgets and makes them scrollable.
Now you have to pass SliverAppBar as the first child in the sliver. The properties like snap, pinned, floating will give you different effects to your SliverAppBar.
And, In SliverAppBar, you can pass the image of your choice in the background of SliverAppbar because of the background property in FlexibleScapeBar.
|
1 2 3 4 5 6 7 8 9 10 11 12 13 14 15 16 17 18 19 20 |
CustomScrollView( slivers: [ SliverAppBar(centerTitle: true,backgroundColor: Colors.black, snap: true, pinned: true, floating: true, expandedHeight: 150.0, flexibleSpace: FlexibleSpaceBar(title: Text("Sliverappbar"),centerTitle: true, background: Image.network("https://images.pexels.com/photos/396547/pexels-photo-396547.jpeg?auto=compress&cs=tinysrgb&h=350", fit: BoxFit.fill, ),collapseMode: CollapseMode.pin,), leading: IconButton(onPressed: (){},icon: Icon(Icons.list),), actions: [ IconButton(icon: Icon(Icons.person), onPressed: (){}) ], ), SliverList(delegate: SliverChildListDelegate(_getItems())) ], ), |
In the FlexibleSpaceBar widget you can pass the title and the cover image with their respective properties.
Complete Code & Outputs
Here’s the final code below –
|
1 2 3 4 5 6 7 8 9 10 11 12 13 14 15 16 17 18 19 20 21 22 23 24 25 26 27 28 29 30 31 32 33 34 35 36 37 38 39 40 41 42 43 44 45 46 47 48 49 50 51 52 53 54 55 56 57 58 |
import 'package:flutter/material.dart'; void main() { runApp(MyApp()); } class MyApp extends StatelessWidget { @override Widget build(BuildContext context) { return MaterialApp( debugShowCheckedModeBanner: false, home: MyHomePage(), ); } } class MyHomePage extends StatefulWidget { @override _MyHomePageState createState() => _MyHomePageState(); } class _MyHomePageState extends State<MyHomePage> { List<Widget> _getItems() { List<Card> _cards=[]; for(int i=1;i<=50;i++) { _cards.add(Card( margin: EdgeInsets.all(8.0), child: ListTile( title: Text("items: $i"), ), )); } return _cards; } @override Widget build(BuildContext context) { return Scaffold( body: CustomScrollView( slivers: [ SliverAppBar(centerTitle: true,backgroundColor: Colors.black, snap: true, pinned: true, floating: true, expandedHeight: 150.0, flexibleSpace: FlexibleSpaceBar(title: Text("Sliverappbar"),centerTitle: true, background: Image.network("https://images.pexels.com/photos/396547/pexels-photo-396547.jpeg?auto=compress&cs=tinysrgb&h=350", fit: BoxFit.fill, ),collapseMode: CollapseMode.pin,), leading: IconButton(onPressed: (){},icon: Icon(Icons.list),), actions: [ IconButton(icon: Icon(Icons.person), onPressed: (){}) ], ), SliverList(delegate: SliverChildListDelegate(_getItems())) ], ), ); } } |
Demo Video –
Conclusion
In this blog, we have read about the SliverAppBar in Flutter.
I hope it will help you out in understanding and getting a brief idea about it.
Thank you for reading!!
References
https://api.flutter.dev/flutter/material/SliverAppBar-class.html


Be the first to comment.