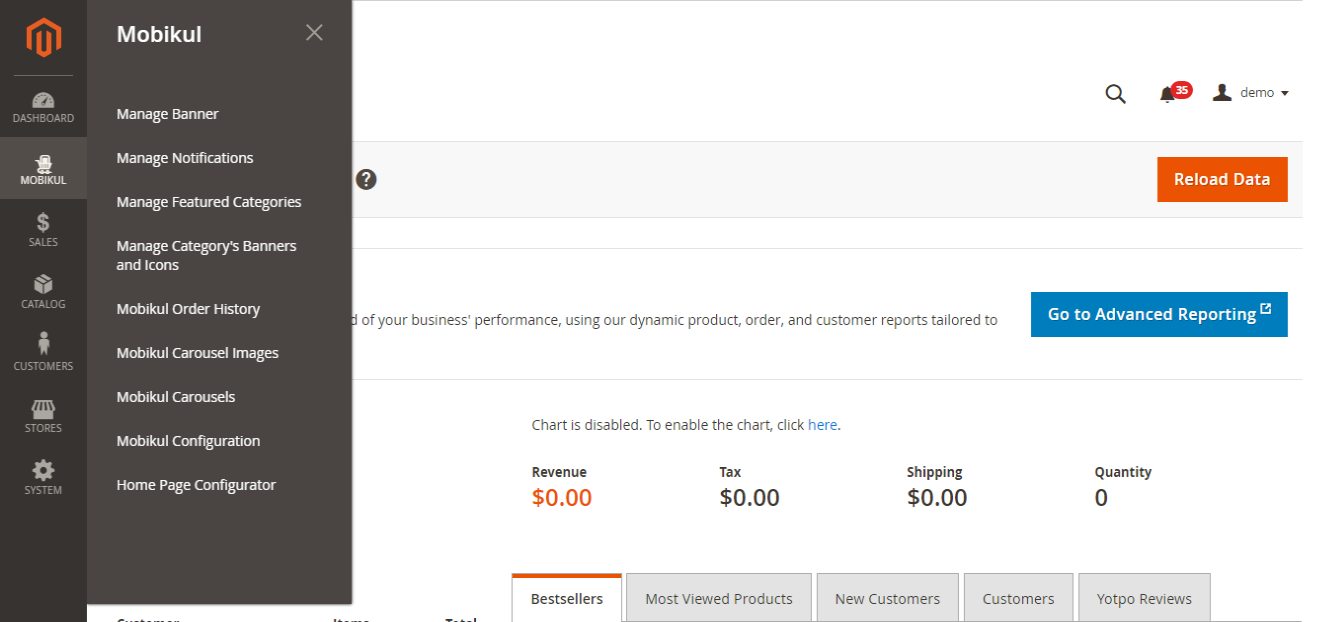
1- Mobikul Configuration-
The Mobikul configuration in the backend can include the settings as-

I-Mobikul Basic Configuration
It includes the basic configuration regarding Mobikul’s initial requirement. Wherein the admin can fill in details related to the app.
Navigation- Stores > Settings > Configuration > Webkul > Mobikul.
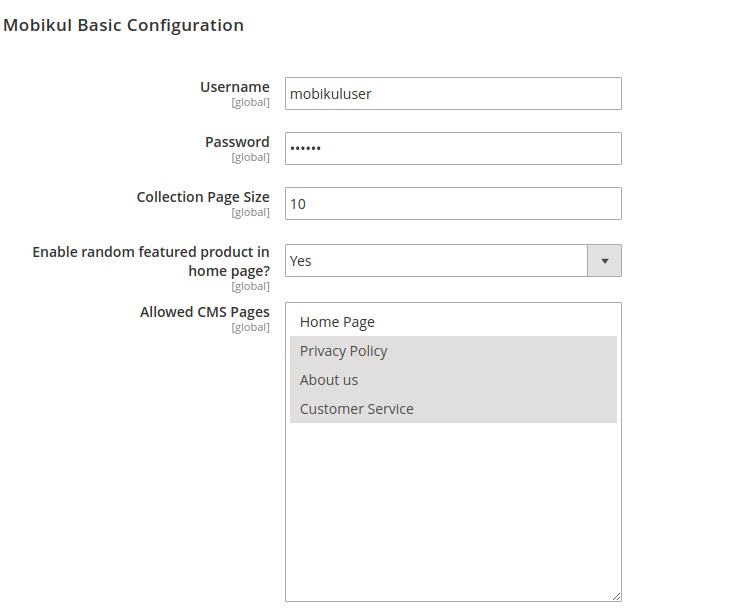
- Username-Admin needs to provide the username for the Mobikul. This is used for connecting to the respective server. The username is required to be mentioned in the code end as well.
- Password– Here you will provide the password for the Mobikul. This will be used with the above username for connecting to the server. The password is required to be mentioned in the code end as well.
- Collection Page Size- As the label name of the field is self-explainable. Here you need to set the number of products that you want to display on the collection page of your Mobikul application at a time.
- Enable random featured products on the home page? – If the field is set to “Yes” then, the featured image displayed on your Mobikul application will be taken on a random basis.
Note- If the field is set to “No” then, the admin needs to enable “Is featured for Mobikul ?” on the product page.
So, for enabling any product to get in featured product display on the application homepage you need to navigate through the following path at your admin panel.
Navigation- Products > Catalog > Add Product / Edit
- Allowed CMS Pages- The admin can select the CMS pages which they wish to display in the frontend.
II-FCM Push Notification Parameter
If an admin needs to set up a push notification feature for your Mobikul mobile application then you must require this section’s fields to be set up.
So, please refer to our blog for learning more about:
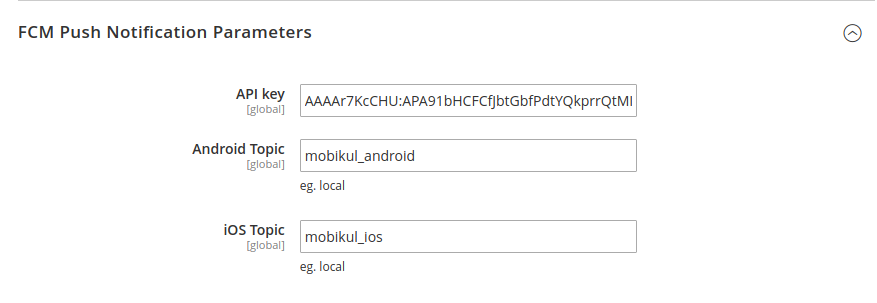
- API key: Admin needs to provide the Server API key which you will get after the firebase console registration.
- Android Topic: This will be used in sending the notification on a group basis on android devices.
The topic name which you will provide in this field will be the name of the group. This will include all the mobile devices which have installed your application.
- iOS Topic: This will be used in sending the notification on a group basis on iOS devices.
The topic name which you will provide in this field will be the name of the group. This will include all the mobile devices which have installed your application.
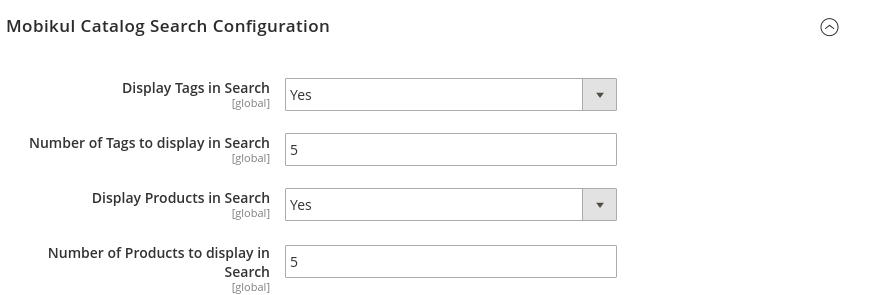
III-Mobikul Catalog Search Configuration
Admin can also configure your Mobikul’s mobile application SEARCH. You can configure your applications’ search on the basis of products and tags.
- Display Tags in Search: If you want you can display the tags in your Mobikul application’s search result.
- Number of Tags to display in Search: Here you will set the limit on the number of tags that will be displayed in the search result.
- Display products in Search: If you want you can display the products in your Mobikul application’s search result.
- Number of Products to display in Search: Here you will set the limit on the number of products that will be displayed in the search result.

IV-Application Download from Website
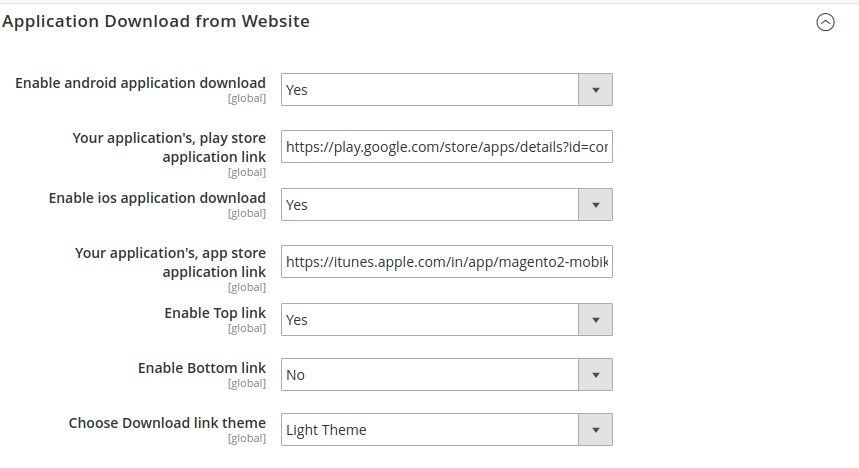
Here, the admin will enter the details as-
- Enable android application download- The admin can set it, Yes to make the Android app link visible on the website.
- Your application’s, play store application link- The admin can specify the link of the play store.
- Enable ios application download- The admin can set it, Yes to make the iOS app link visible on the website.
- Your application’s, app store application link-The admin can specify the link of the app store.
- Enable Top link- This will make the app links visible on the website at the top.
- Enable Bottom link- This will make the app links visible on the website at the bottom.
- Choose Download link theme- The link of the apps will be visible on the lighter or darker theme.
V-Mobikul API Cache Settings
This section is meant for Cache maintenance for any action taken on the mobile app.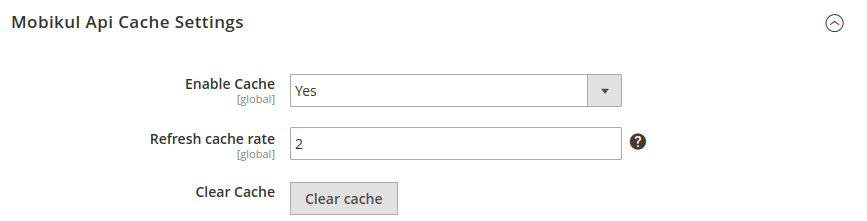
- Enable Cache– This is enabled to save the API cache data by setting it to Yes.
- Refresh cache rate– This will be the rate of hits after which the cache data will be cleared and refreshed.
- Clear Cache- This clears the cache data of API on click the button.
VI. Homepage Layout Configuration

Here, the admin can configure the theme of the mobile application as Layout One, and Layout Two.
VII. App Category View

From the App Category View, the admin can set the category type for the mobile app. There are two types of app category view i.e Default Category View, Tab Category View.
VIII. Color Pallet

Form the color pallet, the admin can define the color of the button, theme, theme text, and button text.
IX. Logo
![]()
For here, the admin can upload the logo of the application.
X. Home Page Configurator
The admin can manage the sorting of the category carousels present in the mobile app. For this, the admin will navigate to Mobikul > Manage App Creator. Then the admin can change the position by easily dragging the category and drop it to the desired position.

2- Push Notification
The Push Notification of your Mobikul Mobile App can be easily configured.
The admin can share notification from this section with information like
- notification image,
- title,
- content,
- sorting order,
- category/ product to be redirected and information related to store views.
So, this can control notification from this section to allow easy sharing of the information.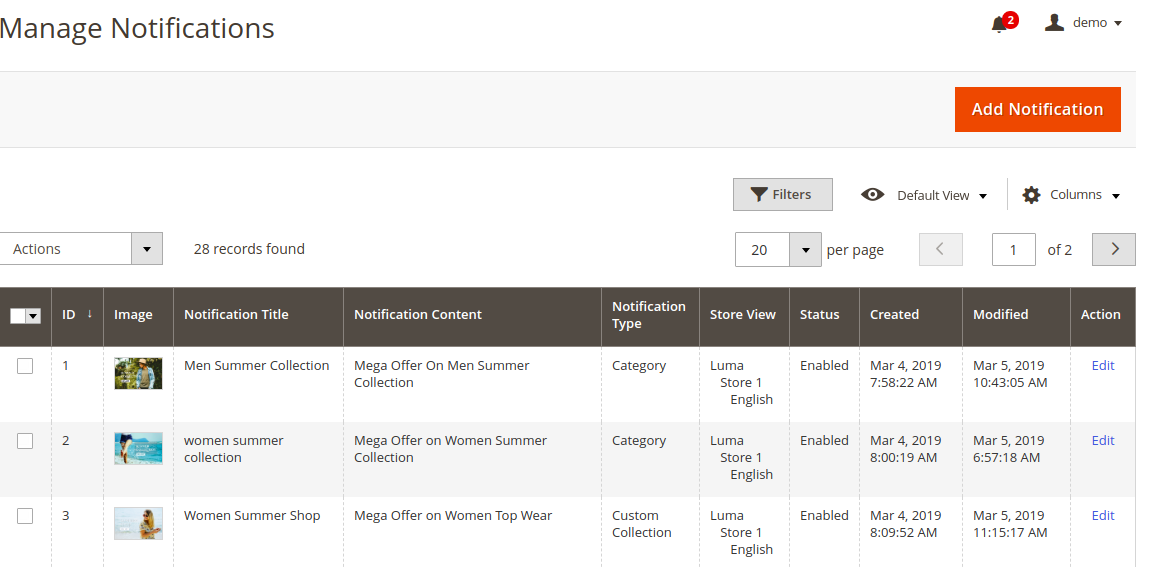
The admin can click on Add Notification to create and share a new notification from here.
Thus, these notifications can be linked to
- Product,
- category,
- custom collection and
- other(which can comprise of- CMS pages, other additional pages).

Front End View-

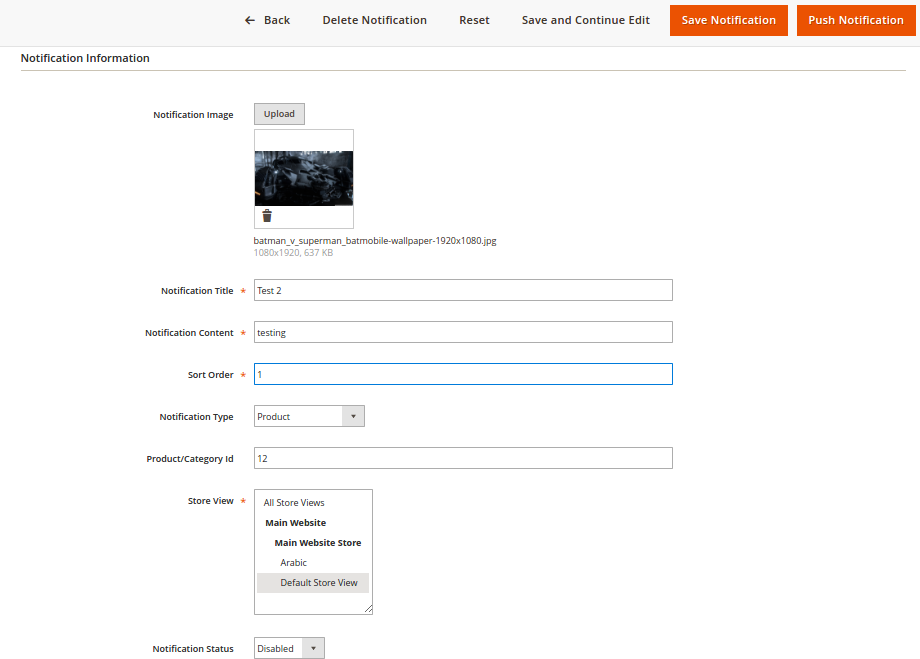
The admin needs to enter details as-
- Title- The admin can mention the topic of notification in this section, to symbolize the notification.
- Content- The details of the notification which contains the information about the notification.
- Type- The admin can select here the notification type with which the notifications are linked. It can be either- Product, category, Custom Collection, or Other types of pages.
- Product/Category Id- If the notification is of product type the admin needs to enter the ProductId of the product. However, if the notification type is category then provide the Category Id of the product.
- Store View- The admin can select the view for which the notification is enabled. This is done to add a notification in different languages on the store.
- Notification Status- The admin can enable or disable the notification as per the requirement.
Note-
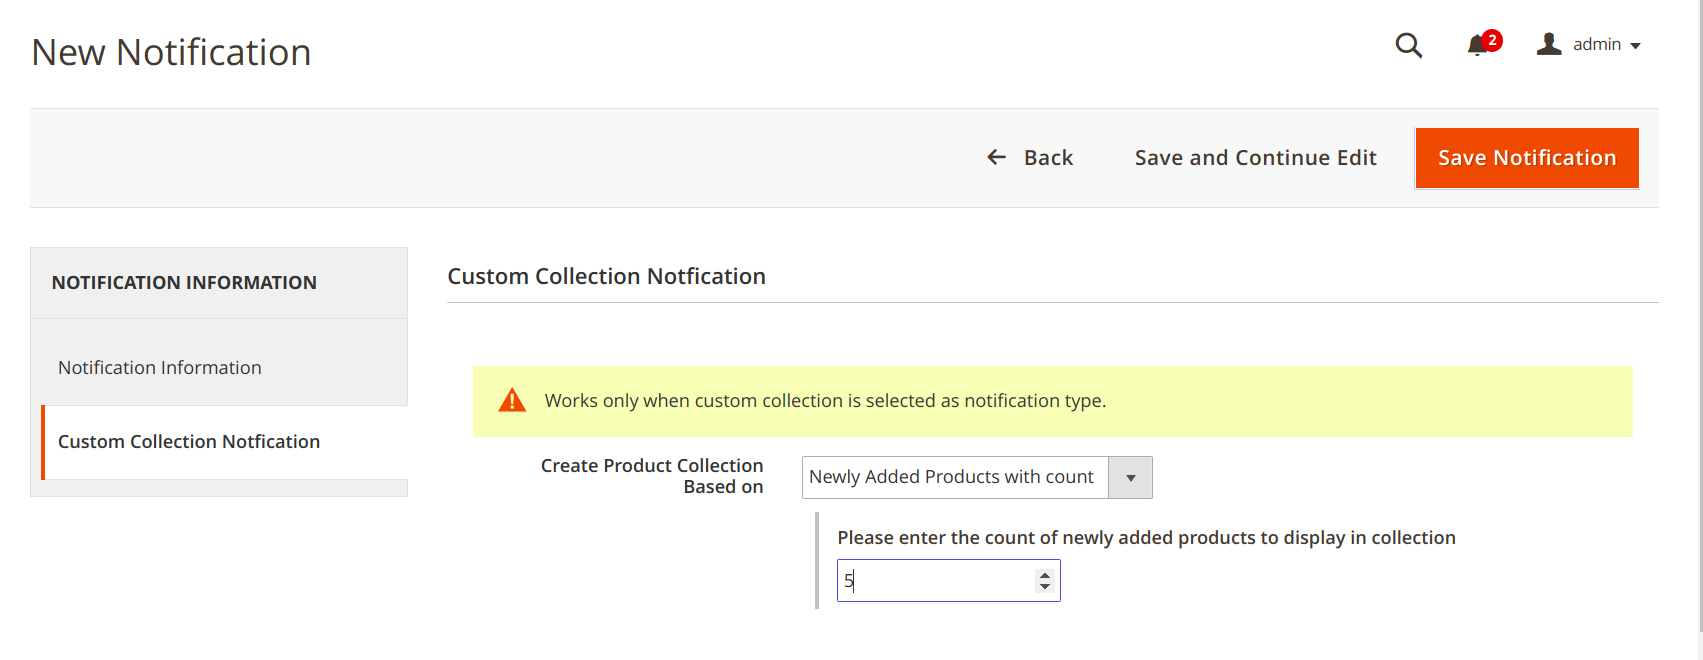
If the notification type is the custom collection. In that case, we need to enter ‘Create Product Collection Based on‘ of the Product Attribute Assigned or Product ids or Newly Added Products with Counts.
Here, when the customer selects the Product Attribute Assigned. Then, they need to enter the corresponding Product Type which they wish to see in the custom collection notification.
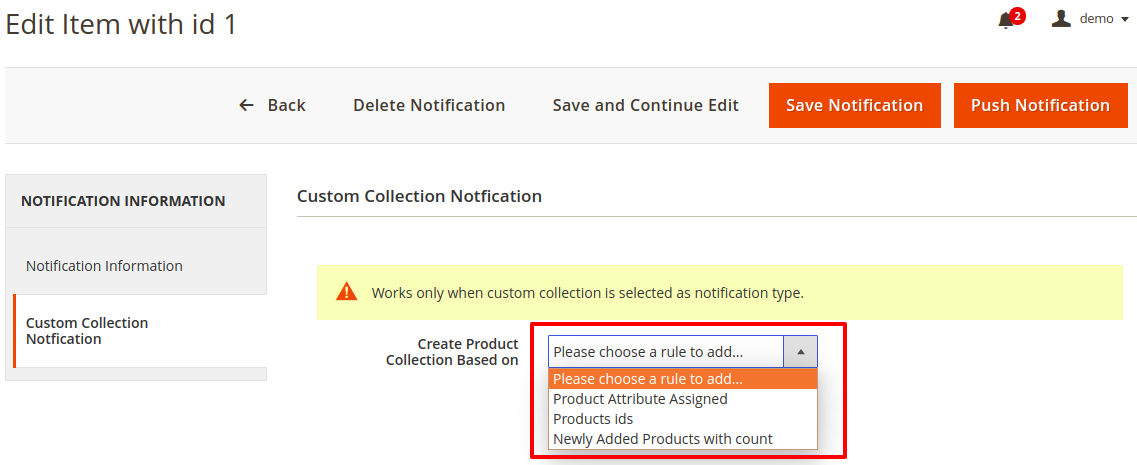
However, if the admin selects the product ids option then one needs to select a product from the collection of products.
In Custom Collection Notification type the admin can enter Newly Added Products with Count. Hence, here, the admin needs to enter the number of new products to be displayed in the collection.
Edit Notification
Editing a notification has no difference from adding a notification. The difference is, here you are updating the notification with new updated information.
Thus, the admin will click on the Edit button present in the Action column of the notification.

After clicking the Edit, the notification information can be updated. In the edit section, you can push the notification by clicking on the Push Notification button.
Push The Notification
For pushing the notifications first select the notifications via notification checkbox. The admin can select all the notifications on a go.
Hence, this enables mass notification management by just selecting the corresponding checkbox column heading section.

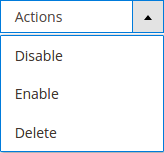
After selecting the notifications click on the Actions drop-down. In the Actions drop-down, there will be an option for pushing the notifications.
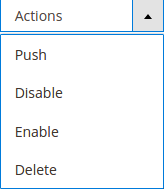
Click on the Push option. Wherein a pop-up for Push confirmation will appear. Click on Ok to push the selected notifications.

Enable / Disable The Notification
For enabling/disabling the notifications first select the notifications via the notifications checkbox. However, this can allow for mass action performance.
After selecting the notifications click on the Actions drop-down. So, in the Actions drop-down, there will be an option for enabling/disabling the notifications.
Click on the Enable or Disable option. A pop-up for confirming enabling will appear if the notification is selected for enabling. Click on Ok to enable the selected notifications.

A pop-up for confirming disabling will appear if the notification is selected for disabling. Click on Ok to disable the selected notifications.

Delete The Notification
For deleting the notifications first select the notifications via notifications checkbox.No, the admin will select the notification at once from the mass selection checkbox present in the checkbox column heading section.
After selecting the notifications click on the Actions drop-down. However, in the Actions drop-down, there will be an option for deleting the notifications.
Click on the Delete option. A pop-up for confirming delete will appear. So, Click on Ok to delete the selected notifications.

3- Banner Image Configuration
The admin can configure the banners from this section of the admin panel.
Thus the admin can configure information such as image, sorting order, category/ product link to the banner, and the store view of the banner.
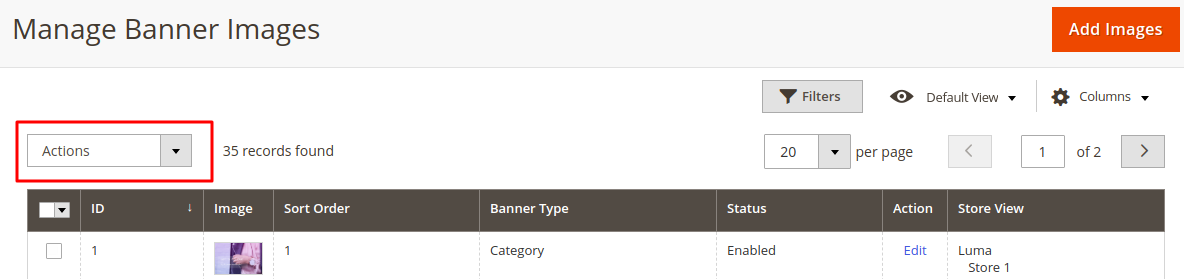
So, now the app owner can manage the banner images by adding / editing / deleting banner images. The admin can follow the navigation as-
Mobikul Tab > Manage Banner Images
Add New Banner Images

Click on the Add Images button for adding new banner images. You can configure the banner image as per your requirement by setting up the banner information.
- Banner Image: The admin can upload the banner image from this field which will be a part of the homepage.
- Sort Order: This section determines the sequence of banners or at which number the banner will be found on the app homepage.
- Banner Type- The admin can specify the type of banner in this section by specifying it as a category or product.
- View- The admin can select the view where the banner will be visible.
- Product/Category Id: If the banner image type is a product then provide the Product Id/Category Id of the product to which you want to be redirected when the banner image is clicked.
- Banner Status- The admin can enable the status of the banner to make it visible on the homepage.
Edit Banner Image

Editing a banner image has no difference from adding a banner image. The major difference is, here you are updating the banner image with new updated information.
Thus, the banner image can be edited by simply clicking on the related Edit button present in the Action column of the banner image.
Enable / Disable Banner Image
For enabling/disabling the banner image first select the banner images via the banner image checkbox.
Thus, the admin will select the banner image as mass selection via the checkbox present in the checkbox column heading section.
After selecting the banner images click on the Actions drop-down. Thus, in the Actions drop-down, there will be an option for enabling/disabling the banner images.
Click on the Enable or Disable option. A pop-up for confirming enabling will appear if the banner image is elected for enabling. So, click on Ok to enable the selected banner images.

A pop-up for confirming disabling will appear if the banner image is selected for disabling. Now, click on Ok to disable the selected banner images.

Delete Banner Image
For deleting the banner image first select the banner images via banner image checkbox. Thus, all the banner image can be selected at once by mass selection checkbox present in the checkbox column heading section.
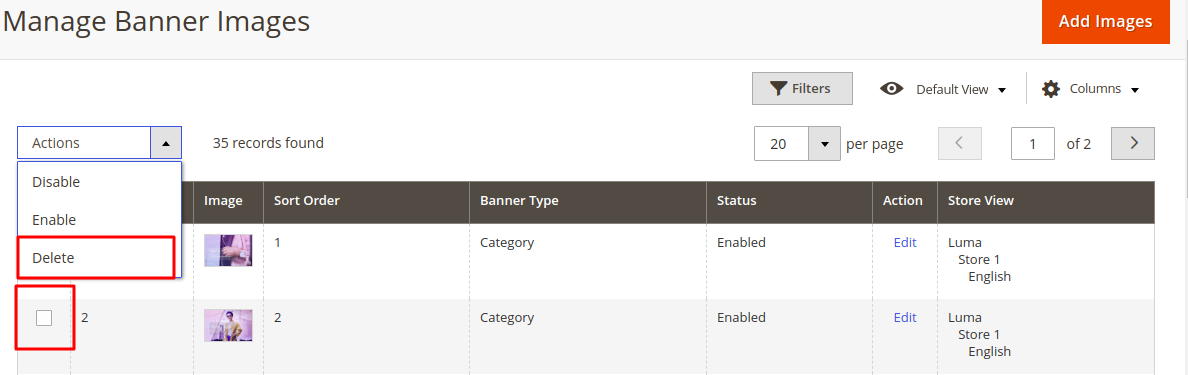
After selecting the banner images click on the Actions drop-down. In the Actions drop-down, there will be an option for deleting the banner images.
Click on the Delete option. A pop-up for delete confirmation will appear. Click on Ok to delete the selected banner images.

Front End View-

Manage Carousel
The application homepage is divided into multiple carousels which can be managed from the backend.
Wherein the admin can enter the information in the carousel from here to be displayed on the homepage. These sections will contain information inform in the form of images or products.
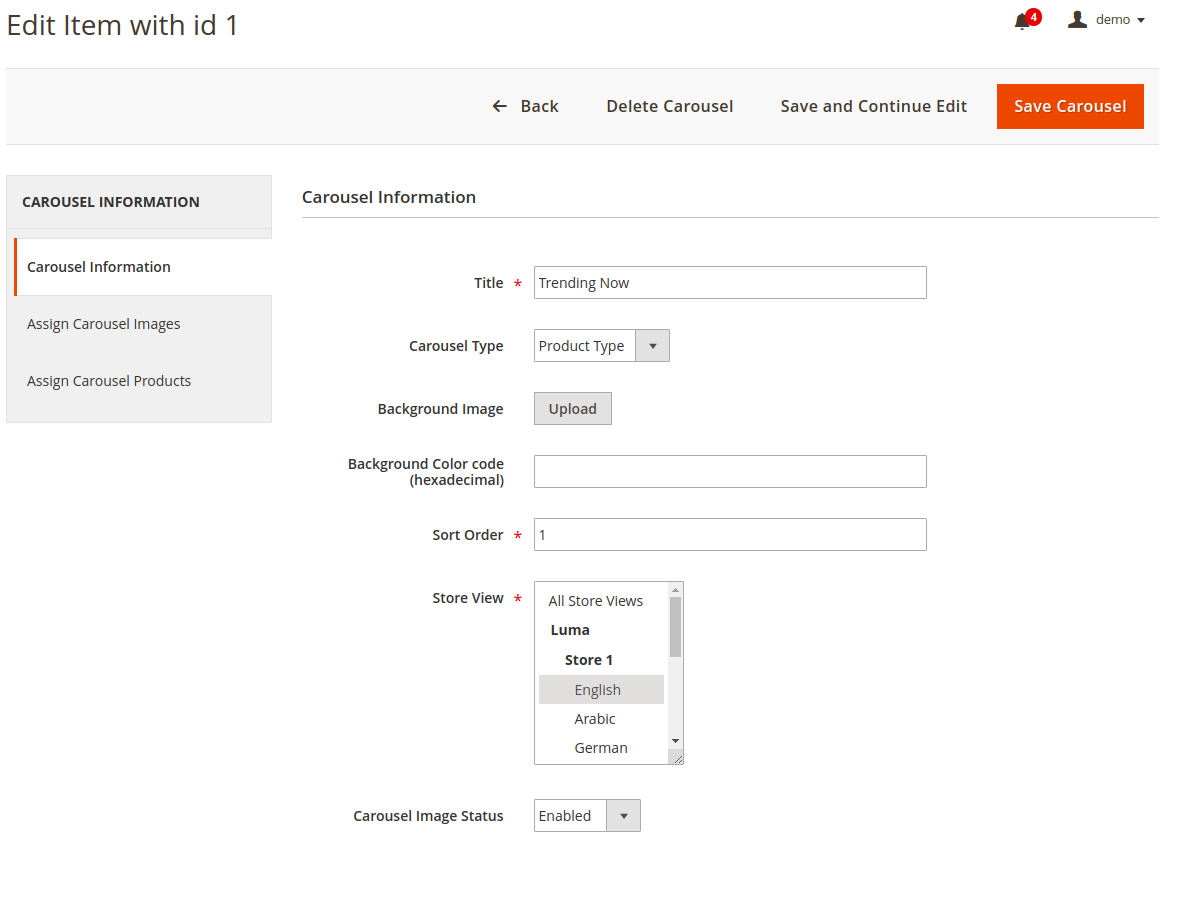
The admin can enter information like-
- Title- The name of the carousel can be entered in this section.
- Carousel Type- In this field the admin can enter the type of carousel as image or product type.
- Background Image- The background of the carousel can be set in this section in the form of the image.
- Background Color code- The admin can set a solid color for the image by mentioning the color code in this section for the background.
- Sort Order- The admin can enter the order of the carousel in this section.
- Store View- The admin can set different banners for different views.
- Carousel Image Status- This will be set to enable to make it visible on the homepage.
Here if the Carousel type is the Image, then the carousel must be assigned an image.
The images can be assigned to the carousel in Assign Carousel Images Tab.
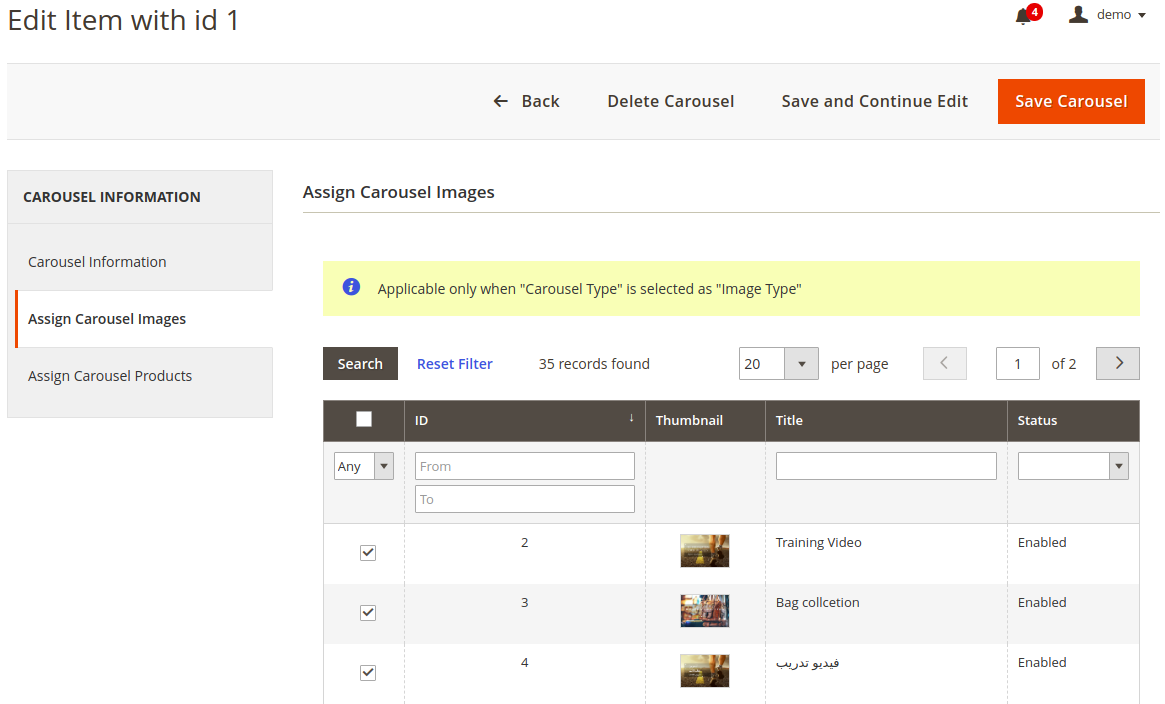
The admin can assign images from this section by selecting them via the checkbox.
However, these images appear here from Mobikul Carousel Images.
Carousel Images
The admin can add/edit carousel images from Mobikul Carousel Images.

For adding a new image the admin needs to click on Add Image. However, to edit them the admin can click on the edit option.

Front End View-
The admin can define the following details while adding the image-
- Carousel image- The admin can upload an image in this section.
- Title- The image name can be defined in this section.
- Carousel Image Type- The image type can be shared in this section wherein the admin defines if the image is linked to a category or product.
- Product/Category Id- The admin can state the id of the product or category as chosen in the above option.
- Carousel Image status- This must be set as enable to make it visible in the Assign Carousel Images Tab.
If the admin has selected Carousel type as the Product Type. Then the admin can assign the product in Assign Carousel Products.
For this, the admin can select the products to be assigned to the image banner. The admin can select the checkbox corresponding to the product type.

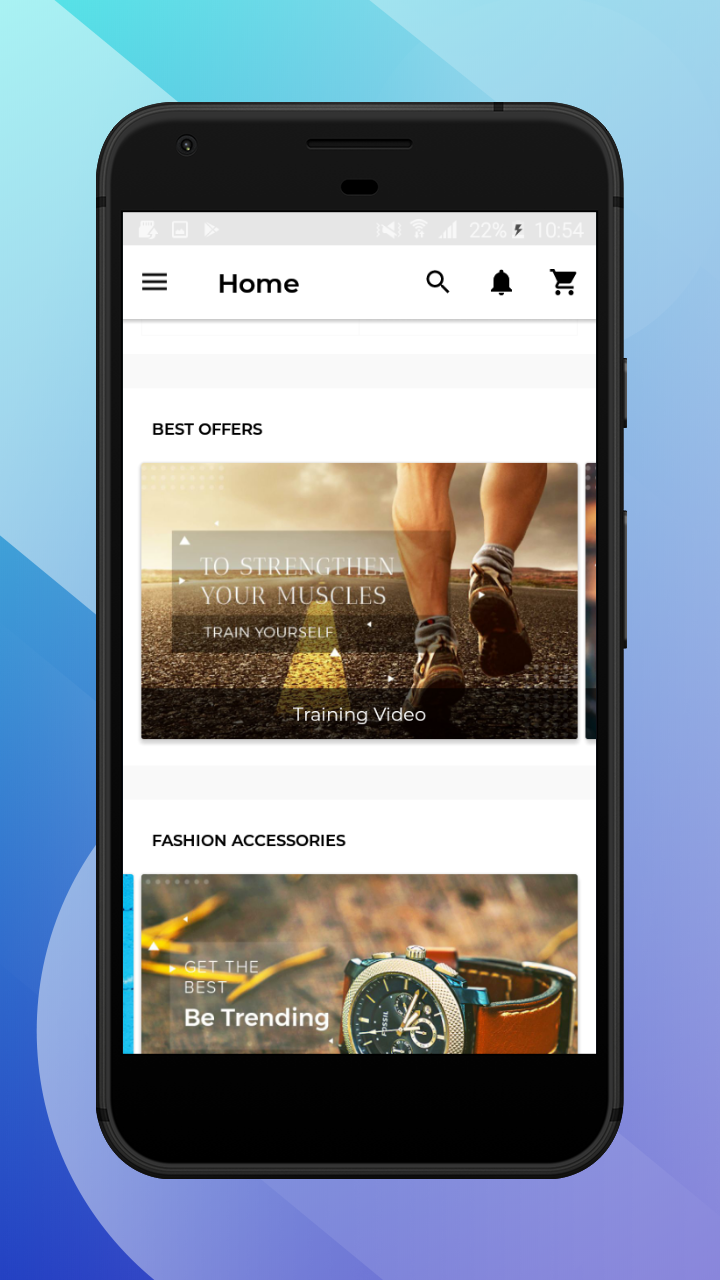
4-Manage Featured Categories
The Mobikul Mobile App builder supports displaying and configuring featured categories. The featured categories can be easily configured from the admin panel.
The featured category can be configured with information such as-
- the image of the featured category,
- the sorting order of the featured category among other featured categories and
- the information about the category to which all the initial information has been associated.
For this, the admin can navigate to- Mobikul Tab > Manage Featured Categories.
I-Add New Featured Category
Click on the Add Featured Category button for adding a new featured category.
The admin can configure the featured category as per your requirement by setting up the featured category information.
Thus, the Featured Category Information has two sections to be configured for setting up the newly added featured category.
The first option will allow the basic configuration of the featured category information.
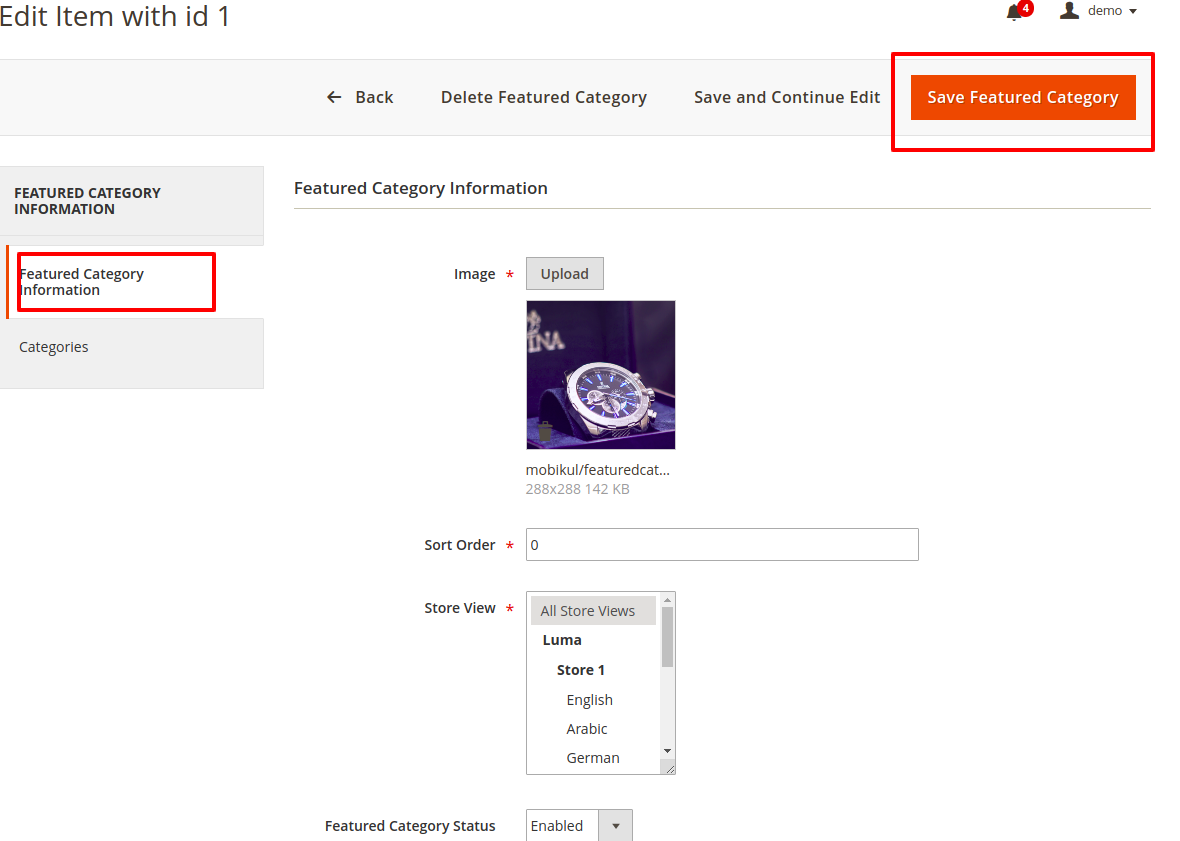
Front End View-

- Image: Upload the featured category image from this field.
- Sort Order: This is the sort order of the featured category among other featured categories.
- Store View: The featured category can be shown store view wise. “All Store Views” can be selected for displaying the featured category in all the store views.
- Featured Category Status: The featured category can be enabled or disabled as per the requirement.
The second option is the category configuration of the featured category.

The admin here chooses the category which will be redirected when the featured category image will be clicked.
II-Edit Featured Category
Editing a featured category is similar to the add featured category. Here, just you need to click on the edit button wherein the admin can just update the information of the category.

Enable / Disable Featured Category
For enabling/disabling the featured category first select the featured category via featured category checkbox. All the featured category can be selected at once by mass selection checkbox present in the checkbox column heading section.
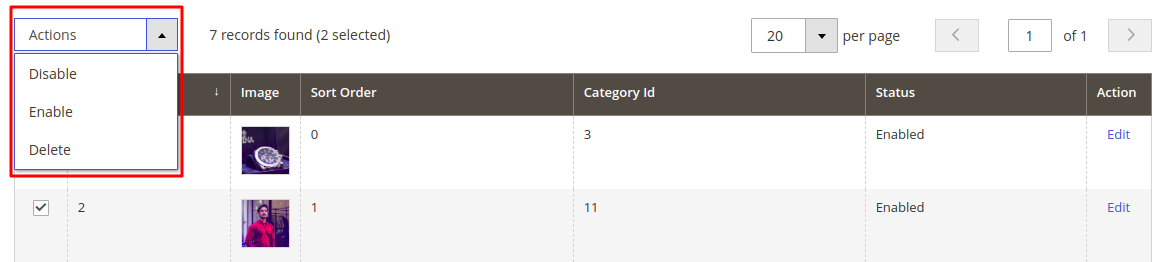
After selecting the featured category click on the Actions drop-down. In the Actions drop-down, there will be an option for enabling/disabling the featured category.
Click on the Enable or Disable option. A pop-up for confirming enabling will appear if the featured category is selected for enabling. Click on Ok to enable the selected featured category.

A pop-up for confirming disabling will appear if the featured category is selected for disabling. Click on Ok to disable the selected featured category.

III-Delete Featured Category
For deleting the featured category first select the featured category via featured category checkbox. All the featured category can be selected at once by mass selection checkbox present in the checkbox column heading section.
After selecting the featured category click on the Actions drop-down. In the Actions drop-down, there will be an option for deleting the featured category.
Click on the Delete option. A pop-up for delete confirmation will appear. Click on Ok to delete the selected featured category.
Front End View-
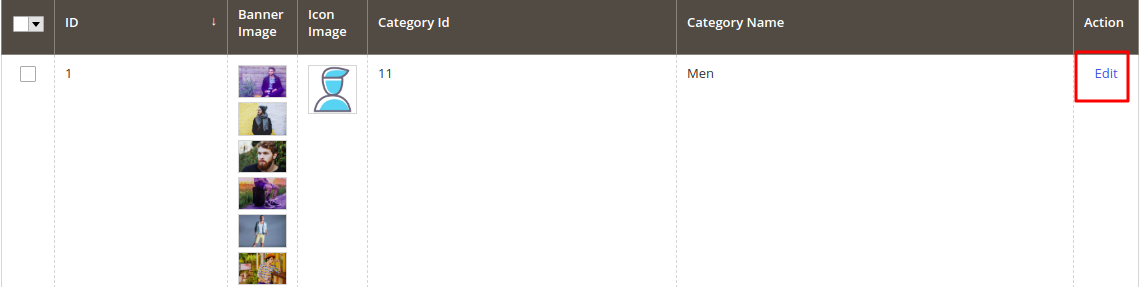
Category’s Banner and Icon Configuration
The banner image and icon can be configured for each category. The category’s banner and icon be added/edited/deleted easily from the admin panel’s Mobikul’s menu options.
For configuring the category’s banner and icon you need to navigate through the following path of your admin panel.
Mobikul Tab > Manage Category’s Banners and Icons
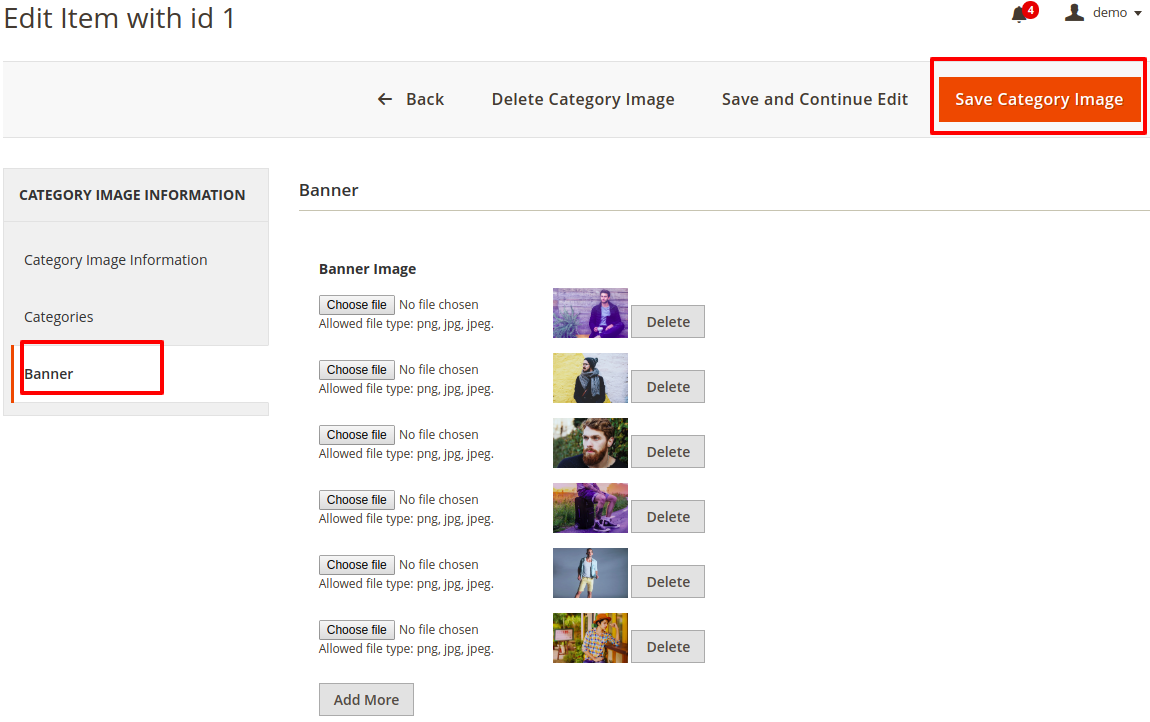
I-Add Category’s Banner And Icon
Click on the Add Images button for adding a new banner and icon to a category.
The admin can configure the banner and icon as per your requirement by setting up the category image information.
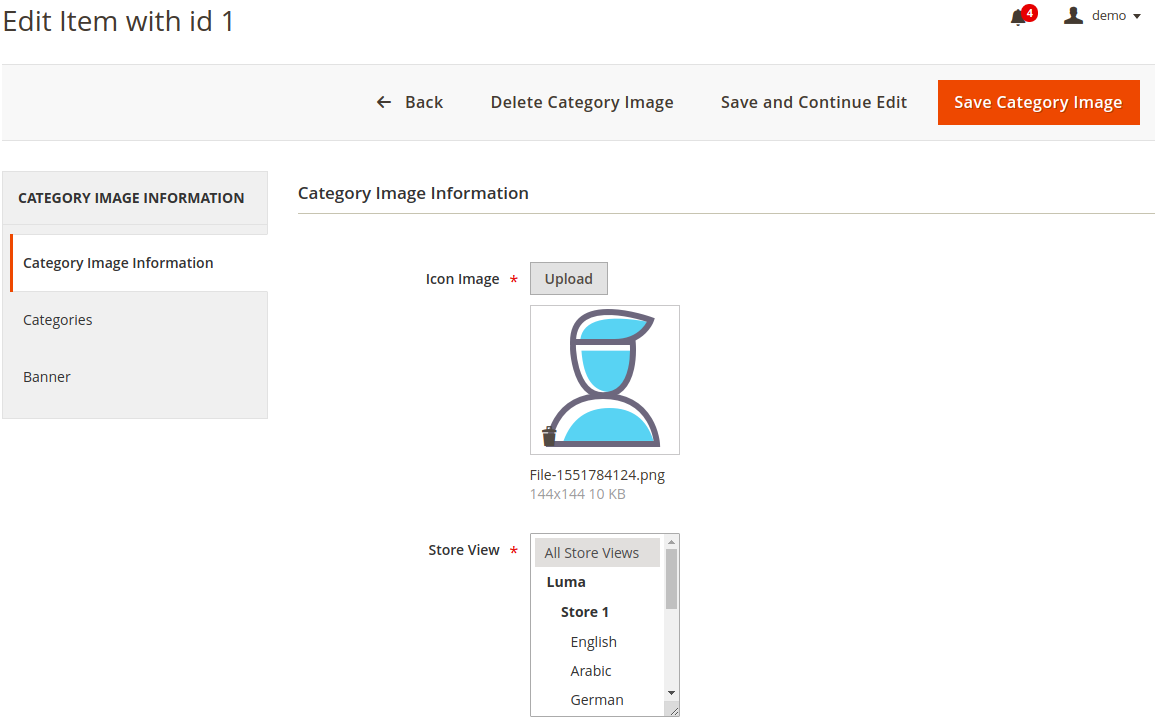
Here, the admin can enter the details of the category in this section-
- Icon image- The admin can enter the icon here for the category.
- Store View- The admin can select the view for which category image will be visible.
After setting the icon the admin can select the categories associated with the Category.
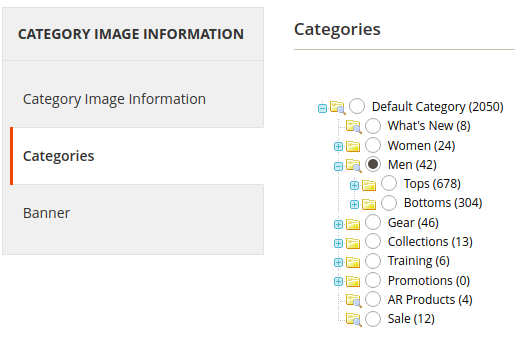
Once, the category selection is done the admin can enter multiple banners from Banner tab.
The admin here has the facility to add more than one category from here.
III-Edit Category’s Banner And Icon
Editing a banner and icon of a category has no difference from adding a category’s banner and icon.
The difference is, here you are updating the banner and icon with new updated information.
So, the category’s banner and icon can be edited by simply clicking on the related Edit button present in the Action column of the category’s banner and icon.
IV-Delete Category’s Banner And Icon
For deleting the banner and icon of a category first select the category via category’s banner and icon check box.
Thus, all the categories can be selected at once by mass selection checkbox present in the checkbox column heading section.
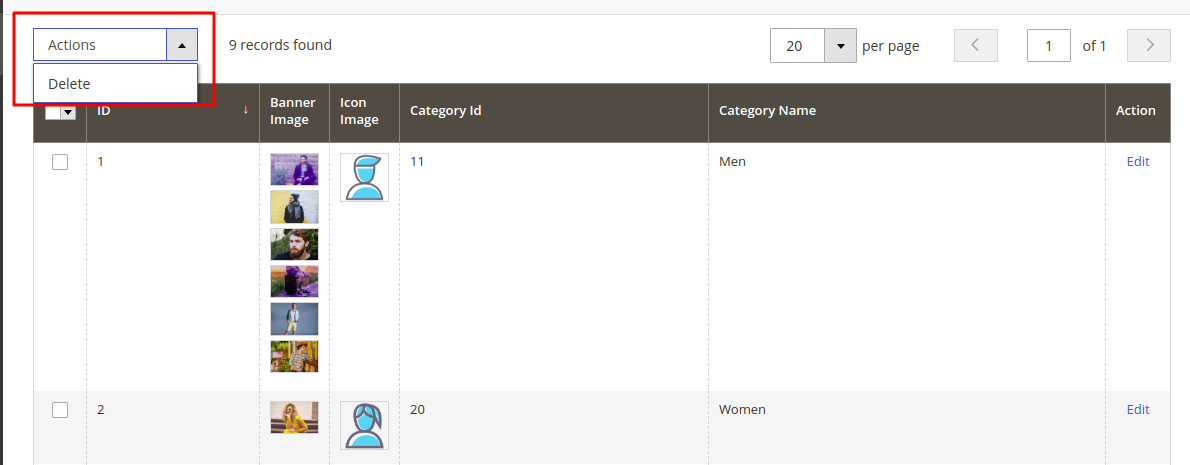
After selecting the category click on the Actions drop-down. In the Actions drop-down, there will be an option for deleting the category’s banner and icon.
Click on the Delete option. A pop-up for delete confirmation will appear. Click on Ok to delete the selected category’s banner and icon.
Front End View-
![]()
Manage Walk Through
Firstly, the admin needs to add the walk through version from the configuration by navigating to Stores > Configuration > Walk Through Settings.

The admin can manage the walkthrough configuration by navigating to the Mobikul > Manage Walk Through. There the list of walk through will be visible as shown in the image below:

The admin can create the new walk through by clicking on the Add Walk Through button available in the top right corner. Further, the admin needs to provide basic details like Walk Through Image, Title, Description, Color code (hexadecimal), Sort Order, and

Moreover, the admin can also edit the previously created walk throughs by clicking its respective edit button present in the list. Further, the page will view as shown in the image below:

Walk Through Mobile App View
The walk through will look somewhat like the images shown below:


Home Layout Configuration
The admin can set the Home Layout as Layout One and Layout Two as shown in the image below:
Frontend View


App Category View
The admin can also manage the category view. Two category views are provided in the demo that is Default Category View and Tab Category View:


Launcher Icon Configuration
The admin can also select the launcher icon. Further, the admin can manage the same from the admin panel:
![]()
There are five types of launcher icons available as in the image below:


Dynamic Theme Management
The admin can also manage and configure the frontend appearance of multiple sections of the mobile app from the backend. The configurations that come under this sections are mentioned below:
Light Mode Theme Configuration
The admin can also manage the theme configuration when the mobile phone theme mode is set to light. For this, the admin needs to enter the details like App Button Color, App Theme Color, App Theme Text Color, App Button Text Color, Upload App Logo, and Upload Splash Image.

Frontend View on Light Mode

Dark Mode Theme Configuration
The admin can also manage the theme configuration when the mobile phone theme mode is set to dark. For this, the admin needs to enter the details like App Button Color, App Theme Color, App Theme Text Color, App Button Text Color, Upload App Logo, and Upload Splash Image.

Frontend View on Dark Mode

Thus, if you have any issues then please let us know anytime. You can raise a ticket for any query at webkul.uvdesk.com.
Be the first to comment.