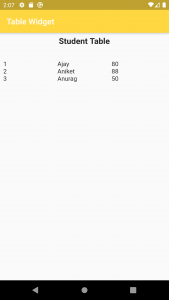
Table Widget in Flutter is used to show our data in a structured format.
If we want our data to be shown horizontally, we prefer using the Row widget.
If we want to display our data in a single column, we prefer using Column Widget.
When we want to display the data horizontally as well as vertically, the Table widget is the one that is preferred.
Check out more about Flutter app development services by Mobikul.
Some Properties of Table widget
children => This property takes a list of table row as a parameter List<TableRow>. TableRow contains a list of widgets as children.
columnWidths => This property determines the width of the columns in the Table widget
textDirection => It is used to define the direction in which columns are ordered in Table. It can be either from left-to-right or from right-to-left.
defaultColumnWidth => This property takes in TableColumnWidth class as the input parameter to set the default width of the column in the Table widget.
border => This property takes TableBorder widget as the parameter and it sets the border for the table. By default, there is no border.
defaultVerticalAlignment => This property takes TableCellVerticalAlignment as the parameter value to sets the alignment of cells vertically in the table.
textBaseline => Using this property we can specify a horizontal line uses to align text on the screen inside the Table widget.
|
1 2 3 4 5 6 7 8 9 10 11 12 13 14 15 16 17 18 19 20 21 22 23 24 25 26 27 28 29 30 31 32 33 34 35 36 37 38 39 40 41 42 43 44 45 46 47 48 49 50 51 52 53 54 55 56 57 58 59 60 61 62 63 64 65 66 67 68 |
import 'package:flutter/material.dart'; void main() { runApp(MyApp()); } class MyApp extends StatelessWidget { @override Widget build(BuildContext context) { return MaterialApp( home: MyHomePage(), debugShowCheckedModeBanner: false, ); } } class MyHomePage extends StatefulWidget { @override _MyHomePageState createState() => _MyHomePageState(); } class _MyHomePageState extends State<MyHomePage> { @override Widget build(BuildContext context) { return Scaffold( appBar: AppBar( title:Text("Table Widget"), backgroundColor: Colors.amberAccent, ), body: Column( children:<Widget>[ Padding( padding: const EdgeInsets.all(8.0), child: Text("Student Table",style: TextStyle(fontWeight:FontWeight.bold,fontSize: 20.0),), ), SizedBox(height: 20.0), Padding( padding: const EdgeInsets.all(8.0), child: Table( children: [ TableRow( children: [ Text("1",style: TextStyle(fontSize: 15.0),), Text("Ajay",style: TextStyle(fontSize: 15.0),), Text("80",style: TextStyle(fontSize: 15.0),), ] ), TableRow( children: [ Text("2",style: TextStyle(fontSize: 15.0),), Text("Aniket",style: TextStyle(fontSize: 15.0),), Text("88",style: TextStyle(fontSize: 15.0),), ] ), TableRow( children: [ Text("3",style: TextStyle(fontSize: 15.0),), Text("Anurag",style: TextStyle(fontSize: 15.0),), Text("50",style: TextStyle(fontSize: 15.0),), ] ), ], ), ), ] ), ); } } |
This is the basic structure of our app after writing out the basic code, but we know that it is not looking good
So, in order to make our UI look better, we will add a border to the table with the help of Border property.
|
1 2 3 4 5 6 7 8 9 10 11 12 13 14 15 16 17 18 19 20 21 22 23 24 25 26 |
Table( border: TableBorder.all(color: Colors.lightBlueAccent,width: 2.0), children: [ TableRow( children: [ Text("1",style: TextStyle(fontSize: 15.0),), Text("Ajay",style: TextStyle(fontSize: 15.0),), Text("80",style: TextStyle(fontSize: 15.0),), ] ), TableRow( children: [ Text("2",style: TextStyle(fontSize: 15.0),), Text("Aniket",style: TextStyle(fontSize: 15.0),), Text("88",style: TextStyle(fontSize: 15.0),), ] ), TableRow( children: [ Text("3",style: TextStyle(fontSize: 15.0),), Text("Anurag",style: TextStyle(fontSize: 15.0),), Text("50",style: TextStyle(fontSize: 15.0),), ] ), ], ), |
For providing different column widths to each column we have a property named columnWidths
|
1 2 3 4 5 6 7 8 9 10 11 12 13 14 15 16 17 18 19 20 21 22 23 24 25 26 27 28 29 30 31 |
Table( columnWidths: { 0: FlexColumnWidth(2), 1: FlexColumnWidth(4), 2: FlexColumnWidth(4), }, border: TableBorder.all(color: Colors.lightBlueAccent,width: 2.0), children: [ TableRow( children: [ Text("1",style: TextStyle(fontSize: 15.0),), Text("Ajay",style: TextStyle(fontSize: 15.0),), Text("80",style: TextStyle(fontSize: 15.0),), ] ), TableRow( children: [ Text("2",style: TextStyle(fontSize: 15.0),), Text("Aniket",style: TextStyle(fontSize: 15.0),), Text("88",style: TextStyle(fontSize: 15.0),), ] ), TableRow( children: [ Text("3",style: TextStyle(fontSize: 15.0),), Text("Anurag",style: TextStyle(fontSize: 15.0),), Text("50",style: TextStyle(fontSize: 15.0),), ] ), ], ), |
As a result, we will get the columns with different column widths.
Conclusion
In this blog, we have discussed Table Widget in Flutter.
I hope this blog will help you in getting some basic knowledge about this widget.
You may also check our other blogs – https://mobikul.com/blog/
Thank you for reading!!


Be the first to comment.