In this blog we will discuss about How to use open source LLM in mobile devices.
Introduction
LLM stands for Large Language Model a type of artificial intelligence trained on Large amounts of text data to understand and generate human-like language. These models can answer questions.
What is an Open-Source LLM
An Open-Source LLM (Large Language Model) in a mobile device refers to a freely available AI language model that can run directly on smartphones or tablets, without needing internet or cloud servers.
These models are designed to understand and generate human-like language, and when optimized properly.
The model weights are publicly available, anyone can download and use them.
Open-source, meaning its weights and code are freely available.
How Does It Work?
Choose a small model:
Mobile phones can’t handle huge models like the cloud can, so developers use small, efficient models.
Make the model even smaller:
This is done using a process called quantization, which reduces the file size so it fits in your phone’s memory.
Build a mobile app:
The app sends your question to the LLM (Large Language Model) running on the phone and gets the answer just like a chatbot, but everything happens offline.
Everything runs on your phone:
No internet needed, no sending data to the cloud. It’s private and fast.
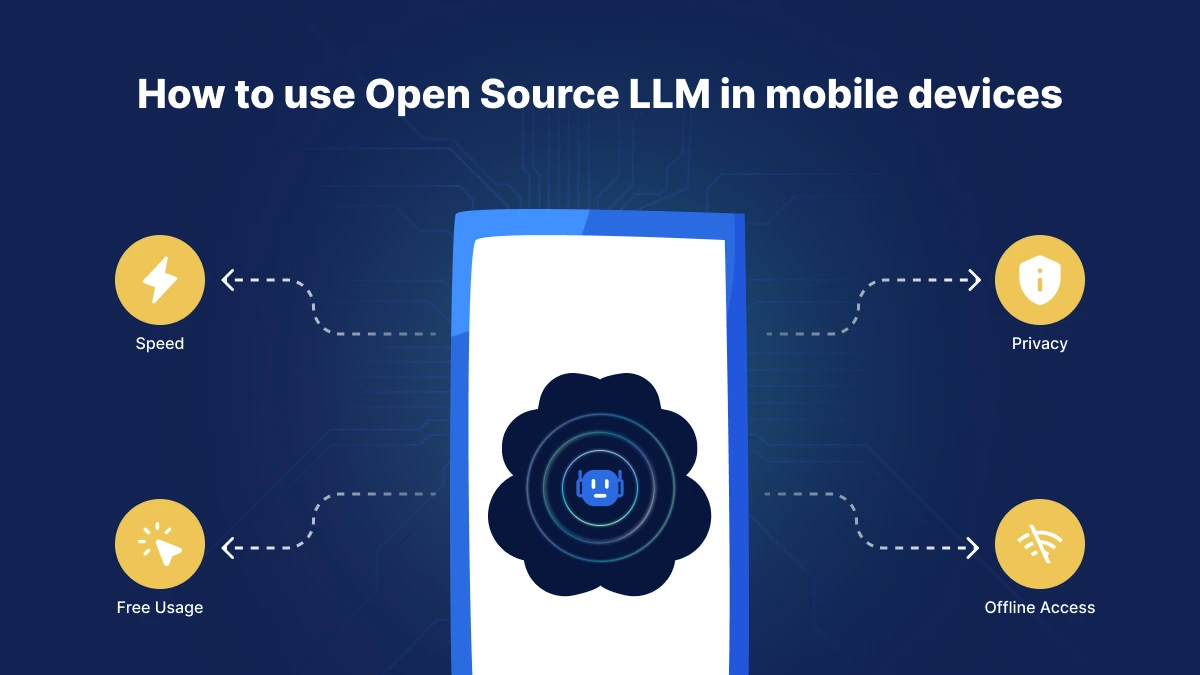
Why Is This Useful?
Below mention some point why we use this.
Privacy:
With on-device LLMs, the model is running locally. Your inputs and outputs never leave your phone.
Offline Access:
You don’t need an internet connection to use the model.
Offline AI lets you interact with LLMs without relying on connectivity.
Speed:
On-device processing is faster because:
No network latency (delay due to sending/receiving data over the internet).
Free Usage – No API cost:
Running your own open-source LLM on your device – no cost per query.
Implementation
We are going to implement this using Flutter so we need to follow below steps to implement this topic.
Step 1:
First of all we need to create a new flutter project and create a StatefulWidget and add below mention code in this screen.
|
1 2 3 4 5 6 7 8 9 10 11 12 13 14 15 16 17 18 19 20 21 22 23 24 25 26 27 28 29 30 31 32 33 34 35 36 37 38 39 40 41 42 43 |
@override void initState() { super.initState(); _downloadService = ModelDownloadService( modelUrl: widget.model.url, modelFilename: widget.model.filename, licenseUrl: widget.model.licenseUrl, ); _downloadModel(); } Future<void> _downloadModel() async { if (widget.model.needsAuth && _token.isEmpty) { ScaffoldMessenger.of(context).showSnackBar( const SnackBar(content: Text('Please set your token first.')), ); return; } try { await _downloadService.downloadModel( token: widget.model.needsAuth ? _token : '', // Pass token only if needed onProgress: (progress) { setState(() { _progress = progress; }); }, ); setState(() { needToDownload = false; }); } catch (e) { if (context.mounted) { ScaffoldMessenger.of(context).showSnackBar( const SnackBar(content: Text('Failed to download the model.')), ); } } finally { setState(() { _progress = 0.0; }); } } |
We need to call this method _downloadModel() form method initState().
|
1 2 3 4 5 6 7 8 9 10 11 12 13 14 15 16 17 18 19 20 21 22 23 24 25 26 27 28 29 30 31 32 33 34 35 36 37 38 39 40 41 42 43 44 45 46 47 48 49 50 51 52 53 54 55 56 57 |
Future<void> downloadModel({ required String token, required Function(double) onProgress, }) async { http.StreamedResponse? response; IOSink? fileSink; try { final filePath = await getFilePath(); final file = File(filePath); // Check if file already exists and partially downloaded int downloadedBytes = 0; if (file.existsSync()) { downloadedBytes = await file.length(); } // Create HTTP request final request = http.Request('GET', Uri.parse(modelUrl)); if (token.isNotEmpty) { request.headers['Authorization'] = 'Bearer $token'; } // Resume download if partially downloaded if (downloadedBytes > 0) { request.headers['Range'] = 'bytes=$downloadedBytes-'; } // Send request and handle response response = await request.send(); if (response.statusCode == 200 || response.statusCode == 206) { final contentLength = response.contentLength ?? 0; final totalBytes = downloadedBytes + contentLength; fileSink = file.openWrite(mode: FileMode.append); int received = downloadedBytes; // Listen to the stream and write to the file await for (final chunk in response.stream) { fileSink.add(chunk); received += chunk.length; // Update progress onProgress(totalBytes > 0 ? received / totalBytes : 0.0); } } else { throw Exception('Failed to download the model.'); } } catch (e) { if (kDebugMode) { print('Error downloading model: $e'); } rethrow; } finally { if (fileSink != null) await fileSink.close(); } } |
Above this code is helpful to download model using huggingface token.
|
1 2 3 4 |
Future<String> getFilePath() async { final directory = await getApplicationDocumentsDirectory(); return '${directory.path}/$modelFilename'; } |
This function gets the app’s document directory and returns the full file path by appending modelFilename to it. It’s commonly used to locate where to read/write files locally in a Flutter app.
Step 2:
In this step we need to create an enum named Model, which will help in downloading models.
|
1 2 3 4 5 6 7 8 9 10 11 12 13 14 15 16 17 18 19 20 21 22 23 24 25 26 27 28 29 30 31 32 33 34 35 36 37 38 39 40 41 42 |
enum Model { gemma3GpuLocalAsset( // model file should be pre-downloaded and placed in the assets folder url: 'assets/gemma3-1b-it-int4.task', filename: 'gemma3-1b-it-int4.task', displayName: 'Gemma3 1B IT (CPU / Local)', licenseUrl: '', needsAuth: false, localModel: true, preferredBackend: PreferredBackend.gpu, modelType: ModelType.gemmaIt, temperature: 0.1, topK: 64, topP: 0.95, ), final String url; final String filename; final String displayName; final String licenseUrl; final bool needsAuth; final bool localModel; final PreferredBackend preferredBackend; final ModelType modelType; final double temperature; final int topK; final double topP; // Constructor for the enum const Model({ required this.url, required this.filename, required this.displayName, required this.licenseUrl, required this.needsAuth, this.localModel = false, required this.preferredBackend, required this.modelType, required this.temperature, required this.topK, required this.topP, }); } |
This enum is helpful to download model.
Step 3:
In this step we need to create a StatefulWidget which name is ChatScreen and add below mention menthod code.
|
1 2 3 4 5 6 7 8 9 10 11 12 13 14 15 16 17 18 19 20 21 22 23 |
Future<void> _initializeModel() async { if (!await _gemma.modelManager.isModelInstalled) { final path = kIsWeb ? widget.model.url : '${(await getApplicationDocumentsDirectory()).path}/${widget.model.filename}'; await _gemma.modelManager.setModelPath(path); } final model = await _gemma.createModel( modelType: super.widget.model.modelType, preferredBackend: super.widget.model.preferredBackend, maxTokens: 1024, ); chat = await model.createChat( temperature: super.widget.model.temperature, randomSeed: 1, topK: super.widget.model.topK, topP: super.widget.model.topP, tokenBuffer: 256, ); setState(() { _isModelInitialized = true; }); } |
Above code is helpful to initialize model at chat screen.
Step 4:
We need to create chat screen ui with below mention code. we need to add this code in ChatScreen.dart
|
1 2 3 4 5 6 7 8 9 10 11 12 13 14 15 16 17 18 19 20 21 22 23 24 25 26 27 28 29 30 31 32 33 34 35 36 37 38 39 40 41 42 43 44 45 46 47 48 49 50 51 52 53 54 55 56 57 58 59 60 61 62 63 64 65 66 67 68 69 70 71 72 73 74 75 76 77 78 79 80 81 82 83 84 85 86 |
import 'package:flutter/foundation.dart'; import 'package:flutter/material.dart'; import 'package:flutter_gemma/core/chat.dart'; import 'package:flutter_gemma/flutter_gemma.dart'; import 'package:flutter_gemma_example/chat_widget.dart'; import 'package:flutter_gemma_example/loading_widget.dart'; import 'package:flutter_gemma_example/models/model.dart'; import 'package:path_provider/path_provider.dart'; class ChatScreen extends StatefulWidget { const ChatScreen({super.key, this.model = Model.gemma3Gpu}); final Model model; @override ChatScreenState createState() => ChatScreenState(); } class ChatScreenState extends State<ChatScreen> { final _gemma = FlutterGemmaPlugin.instance; InferenceChat? chat; final _messages = <Message>[]; bool _isModelInitialized = false; String? _error; @override void initState() { super.initState(); _initializeModel(); } @override void dispose() { super.dispose(); _gemma.modelManager.deleteModel(); } @override Widget build(BuildContext context) { return Scaffold( appBar: AppBar( backgroundColor: Colors.black, title: const Text( 'Mobikul Chatbot', style: TextStyle(fontSize: 20), ), ), body: Stack(children: [ Center( child: Image.asset( 'assets/background.png', fit: BoxFit.fill, height: MediaQuery.of(context).size.height, width: MediaQuery.of(context).size.width, ), ), _isModelInitialized ? Column(children: [ if (_error != null) _buildErrorBanner(_error!), Expanded( child: ChatListWidget( chat: chat, gemmaHandler: (message) { setState(() { _messages.add(message); }); }, humanHandler: (text) { setState(() { _error = null; _messages.add(Message(text: text, isUser: true)); }); }, errorHandler: (err) { setState(() { _error = err; }); }, messages: _messages, ), ) ]) : const LoadingWidget(message: 'Initializing the model'), ]), ); } } |
Step 5:
We need to create below mention method to show error text message when error is occurred.
|
1 2 3 4 5 6 7 8 9 10 11 12 |
Widget _buildErrorBanner(String errorMessage) { return Container( width: double.infinity, color: Colors.red, padding: const EdgeInsets.all(8.0), child: Text( errorMessage, style: const TextStyle(color: Colors.white), textAlign: TextAlign.center, ), ); } |
We need to add this method in ChatScreen, this method is helpful to display error message.
Output
How to use open source LLM in mobile devices
An LLM (Large Language Model) in a mobile device refers to a freely available AI language model that can run directly on smartphones or tablets, without needing internet or cloud servers.
Conclusion
In this blog, we have explored how to implement Open-source LLMs on mobile devices.
You can also check other blogs from here for more knowledge.

Be the first to comment.