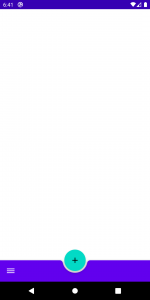
BottomAppBar with Floating action button in Android :
In this article, we are going to learn how to use the BottomAppBar with Floating action button in Android.
Bottom App Bar :
Android’s bottom app bar component APIs provide support for the navigation icon, action items, overflow menu, and more for informing the user as to what each action performs. While optional, their use is strongly encouraged.
Content descriptions
When using icons for navigation icons, action items, and other elements of bottom app bars, you should set a content description on them so that screen readers like TalkBack are able to announce their purpose or action, if any.
For an overall content description of the bottom app bar, set and android:contentDescription or use the setContentDescription method on the BottomAppBar.
For the navigation icon, this can be achieved via the app:navigationContentDescription attribute or setNavigationContentDescription method.
Bottom app bars provide access to a bottom navigation drawer and up to four actions, including the floating action button.
A BottomAppBar can be included in your screen layout like so :
|
1 2 3 4 5 6 7 8 9 10 11 12 13 14 15 16 17 18 19 20 21 22 23 24 25 26 27 28 29 30 31 |
<?xml version="1.0" encoding="utf-8"?> <androidx.constraintlayout.widget.ConstraintLayout xmlns:android="http://schemas.android.com/apk/res/android" xmlns:app="http://schemas.android.com/apk/res-auto" xmlns:tools="http://schemas.android.com/tools" android:layout_width="match_parent" android:layout_height="match_parent" tools:context=".MainActivity"> <TextView android:layout_width="wrap_content" android:layout_height="wrap_content" android:text="Hello World!" app:layout_constraintBottom_toBottomOf="parent" app:layout_constraintLeft_toLeftOf="parent" app:layout_constraintRight_toRightOf="parent" app:layout_constraintTop_toTopOf="parent" /> <androidx.coordinatorlayout.widget.CoordinatorLayout android:layout_width="match_parent" android:layout_height="match_parent"> <com.google.android.material.bottomappbar.BottomAppBar android:id="@+id/bottom_app_bar" android:layout_width="match_parent" android:layout_height="wrap_content" android:layout_gravity="bottom" app:backgroundTint="@color/colorPrimary" app:navigationIcon="@drawable/drawer_icon" /> </androidx.coordinatorlayout.widget.CoordinatorLayout> </androidx.constraintlayout.widget.ConstraintLayout> |
Note: Please make use that you are using the “Theme.MaterialComponents.DayNight.NoActionBar” in you app AppTheme like below. If you are not using the MaterialComponents theme then you can not use the BottomoAppBar.
styles.xml :
|
1 2 3 4 5 6 7 8 9 |
<resources> <!-- Base application theme. --> <style name="AppTheme" parent="Theme.MaterialComponents.DayNight.NoActionBar"> <!-- Customize your theme here. --> <item name="colorPrimary">@color/colorPrimary</item> <item name="colorPrimaryDark">@color/colorPrimaryDark</item> <item name="colorAccent">@color/colorAccent</item> </style> </resources> |
Anchoring a Floating Action Bar :
A FloatingActionButton can be anchored to a BottomAppBar. We are using “layout_anchor” to attach the FAB to the BottomAppBar. You just have pass the id at which you want to anchor your FAB.
In my case, I have chosen the default properties. “cradled” within a cutout. This is the default behavior.
In order to implement this, the FAB also needs to be within the parent CoordinatorLayout :
|
1 2 3 4 5 6 7 8 9 10 11 12 13 14 15 16 17 18 19 20 21 22 23 24 25 26 27 28 29 30 |
<?xml version="1.0" encoding="utf-8"?> <androidx.constraintlayout.widget.ConstraintLayout xmlns:android="http://schemas.android.com/apk/res/android" xmlns:app="http://schemas.android.com/apk/res-auto" xmlns:tools="http://schemas.android.com/tools" android:layout_width="match_parent" android:layout_height="match_parent" tools:context=".MainActivity"> <androidx.coordinatorlayout.widget.CoordinatorLayout android:layout_width="match_parent" android:layout_height="match_parent"> <com.google.android.material.bottomappbar.BottomAppBar android:id="@+id/bottom_app_bar" android:layout_width="match_parent" android:layout_height="wrap_content" android:layout_gravity="bottom" app:backgroundTint="@color/colorPrimary" app:navigationIcon="@drawable/ic_baseline_dehaze_24" /> <com.google.android.material.floatingactionbutton.FloatingActionButton android:id="@+id/fab" android:layout_width="wrap_content" android:layout_height="wrap_content" android:src="@drawable/ic_baseline_add_24" app:layout_anchor="@id/bottom_app_bar" /> </androidx.coordinatorlayout.widget.CoordinatorLayout> </androidx.constraintlayout.widget.ConstraintLayout> |
Here we achieve the BottomAppBar with Floating action button in Android.


Be the first to comment.