Introduction:-
UIBezierPath() – A Bezier Path that consists of straight and curved line segments that you can render in your custom views. and we can say that to use of Bezier Path curve we can make effective UIViews with so many designs which make our UIDesign is more attractive
I used a specific view shape, on this concept you learn that how can be applied to any shape. This example shows the process of designing the shape which you want to draw it on a view.
UIBezierPath() – We can use this method to make different views like chat-bubble and shapes.
How to draw a BezierPath Curve in a custom view
Main steps of the curve:
- Design the outline of the shape you want.
- Divide the outline path into segments of line, arcs, and curves.
- Build that path programmatically.
- Draw the Path either in drawRect or using CAShapeLayer
Basic Functionality:-
- 1. addLine(CGPoint) – we can use this function to drawing a line between two-point.
- 2. addQurdCurve(toPoint: CGPoint, controlPoint: CGPoint) – we can use this function for draw a rounded corner between two point.
- 3. addCurve(toPoint: CGPoint, control1Point:CGPoint. control2Point: CGPoint) – we can use this function for draw a curve between two point.
CGPoint:The CG point of the curve is a geometric structure. or we can say, A structure that consists of a point with a two-dimensional coordinates system i.e x and y.
example: CGPoint(x: 0.0, y: 0.0)
toPoint:The end point of the curve
controlPoint1: First control point to use when computing the curve.
controlPoint2:Second control point to use when computing the curve.
Step 1:– Create a bezierPath.swift file.
Here we have a bezierPath code of the above example in which we can make our view.
|
1 2 3 4 5 6 7 8 9 10 11 12 13 14 15 16 17 18 19 20 21 22 23 24 25 26 27 28 29 30 31 32 |
import Foundation import UIKit class BrezerPath: UIView{ override func draw(_ rect: CGRect) { let bezierPath = UIBezierPath() bezierPath.move(to: CGPoint(x: rect.maxX+5, y: rect.minY))//a bezierPath.addLine(to: CGPoint(x: rect.maxX, y: rect.minY))//b bezierPath.addLine(to: CGPoint(x: rect.maxX-10, y: 10))//c bezierPath.addLine(to: CGPoint(x: rect.maxX-10, y: rect.maxY-5))//d bezierPath.addQuadCurve(to: CGPoint(x: rect.maxX-15, y: rect.maxY), controlPoint: CGPoint(x: rect.maxX-10, y: rect.maxY)) bezierPath.addLine(to: CGPoint(x: rect.maxX-15, y: rect.maxY))//e bezierPath.addLine(to: CGPoint(x:rect.minX+5, y:rect.maxY))//f bezierPath.addQuadCurve(to: CGPoint(x: rect.minX, y: rect.maxY-5), controlPoint: CGPoint(x: rect.minX, y: rect.maxY)) bezierPath.addLine(to: CGPoint(x: rect.minX, y: rect.maxY-5))//g bezierPath.addLine(to: CGPoint(x: rect.minX, y: rect.minY+5))//h bezierPath.addQuadCurve(to: CGPoint(x: rect.minX+5, y: rect.minY), controlPoint: CGPoint(x: rect.minX, y: rect.minY)) bezierPath.addLine(to: CGPoint(x: rect.minX+5, y: rect.minY))//i UIColor.blue.setFill() bezierPath.fill() bezierPath.close() } } |
Step 2:- UIStoryboard screen image with a view class
Take view in the view controller and change view class name of the view to your bezierPath.swift class
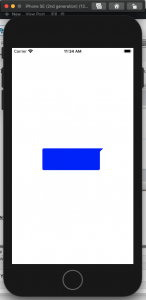
Step 3:- Final iPhone Output
Here we have the final output in our simulator.
Conclusion –
In this blog, we have discussed how to draw a custom view or custom shape by using BezierPath curve.
I hope this blog will help you in getting some basic knowledge about the BezierPath curve
Thanks for reading!


Be the first to comment.