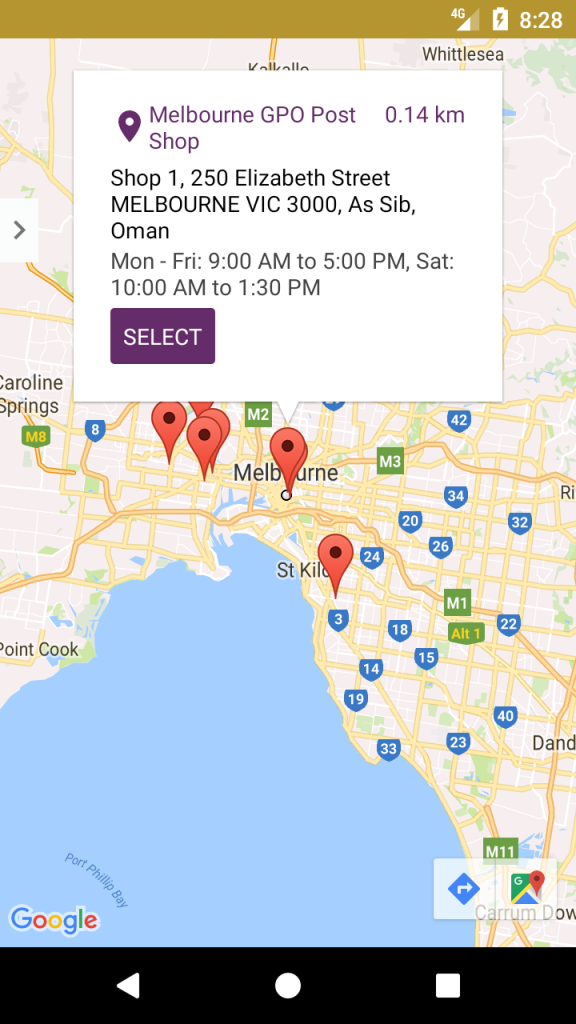
In this blog on google map, we are going to add custom info window on a map marker using GoogleMap.InfoWindowAdapter interface. The idea of adding custom info window is to add something that has more meaning instead of a simple “dull” title.
Getting Started with Google Map
If you want to setup Google map in your existing project I recommend you to read this. Once the Google map is added to your project your activity or fragment (depends on where you are displaying your map), your activity or fragment will look like this:
|
1 2 3 4 5 6 7 8 9 10 11 12 13 14 |
// Adding Google Map support fragment in our view SupportMapFragment supportMapFragment = SupportMapFragment.newInstance(); FragmentTransaction fragmentTransaction = getActivity().getSupportFragmentManager().beginTransaction(); fragmentTransaction.add(R.id.map, supportMapFragment); fragmentTransaction.commit(); supportMapFragment.getMapAsync(this); // Callback from google map when initialized perfectly @Override public void onMapReady(GoogleMap googleMap) { } |
Now we have an instance of googleMap in the onMapReady callback. We can add markers and perform any other operation from here onwards. But how to add custom info window.
Back to Info Window
Let us give you an example of how the map looks after adding custom info window:
Pretty cool, huh.
Now as I said earlier we can perform any operation on google map in onMapReady. All we need to do is to setInfoWindowAdapter on google map. Here is how it looks:
|
1 2 3 4 5 6 7 8 9 10 11 12 13 14 |
googleMap.setInfoWindowAdapter(new GoogleMap.InfoWindowAdapter() { @Override public View getInfoWindow(Marker marker) { return null; } @Override public View getInfoContents(Marker marker) { ItemOmanPostAddressMapInfoWindowBinding itemOmanPostAddressMapInfoWindowBinding = DataBindingUtil.inflate(LayoutInflater.from(getContext()), R.layout.item_oman_post_address_map_info_window, null, true); itemOmanPostAddressMapInfoWindowBinding.setData(getRelevantData(marker.getPosition())); itemOmanPostAddressMapInfoWindowBinding.executePendingBindings(); return itemOmanPostAddressMapInfoWindowBinding.getRoot(); } }); |
here, item_oman_post_address_map_info_window is the layout that has been used in the info window of a marker. You can inflate any view, update the content like setting text, color etc. Same thing is done by us in getInfoContents() using Android data binding.
So far so good, but there is some problem.
Click on items that are inside the custom view added:
Yes, we cannot perform events and click operation on the view added inside the info window of the marker. But the whole info window is clickable by default. All you need to do is to setOnInfoWindowClickListener on the google map. The method onInfoWindowClick gives the marker instance of selected item window. And we can use the details of the marker to predict which item window is tapped.
|
1 2 3 4 5 6 |
googleMap.setOnInfoWindowClickListener(this); @Override public void onInfoWindowClick(Marker marker) { // Perform event on click of info window of a marker } |
Container dimension of info window is limited:
Yes, that’s true. Here is how your view looks no matter what height and width you have set to the inflated view.
Sad but true. It ignores the layout dimensions and margin and your views are clipped off. You can prevent this by adding a 9.png at the background of the root of inflated view in info window container. Here is 9.png sample:
 As you can see the image is scalable both horizontally and vertically so there is no issue what are the dimensions of the view that it can hold.


Be the first to comment.