Hello, In this blog we are going to learn about the Advanced usage of UIAlertController and pickers Swift
We can create multiple types using an alert controller like date picker, country picker, contact picker, phone code, etc
We will learn about 2 types and for rest please create by your own
1. Date picker
Create a date picker controller
|
1 2 3 4 5 6 7 8 9 10 11 12 13 14 15 16 17 18 19 20 21 22 23 24 25 26 27 28 29 30 31 32 33 34 35 36 37 38 39 40 |
final class DatePickerViewController: UIViewController { public typealias Action = (Date) -> Void fileprivate var action: Action? fileprivate lazy var datePicker: UIDatePicker = { [unowned self] in $0.addTarget(self, action: #selector(DatePickerViewController.actionForDatePicker), for: .valueChanged) return $0 }(UIDatePicker()) required init(mode: UIDatePicker.Mode, date: Date? = nil, minimumDate: Date? = nil, maximumDate: Date? = nil, action: Action?) { super.init(nibName: nil, bundle: nil) datePicker.datePickerMode = mode datePicker.date = date ?? Date() datePicker.minimumDate = minimumDate datePicker.maximumDate = maximumDate self.action = action } required init?(coder aDecoder: NSCoder) { fatalError("init(coder:) has not been implemented") } deinit { Log("has deinitialized") } override func loadView() { view = datePicker } @objc func actionForDatePicker() { action?(datePicker.date) } public func setDate(_ date: Date) { datePicker.setDate(date, animated: true) } } |
Next, please create a function in alert controller extension
|
1 2 3 4 5 6 7 |
extension UIAlertController { func addDatePicker(mode: UIDatePicker.Mode, date: Date?, minimumDate: Date? = nil, maximumDate: Date? = nil, action: DatePickerViewController.Action?) { let datePicker = DatePickerViewController(mode: mode, date: date, minimumDate: minimumDate, maximumDate: maximumDate, action: action) set(vc: datePicker, height: 217) } } |
Next, please call the alert from your view controller
|
1 2 3 4 5 6 |
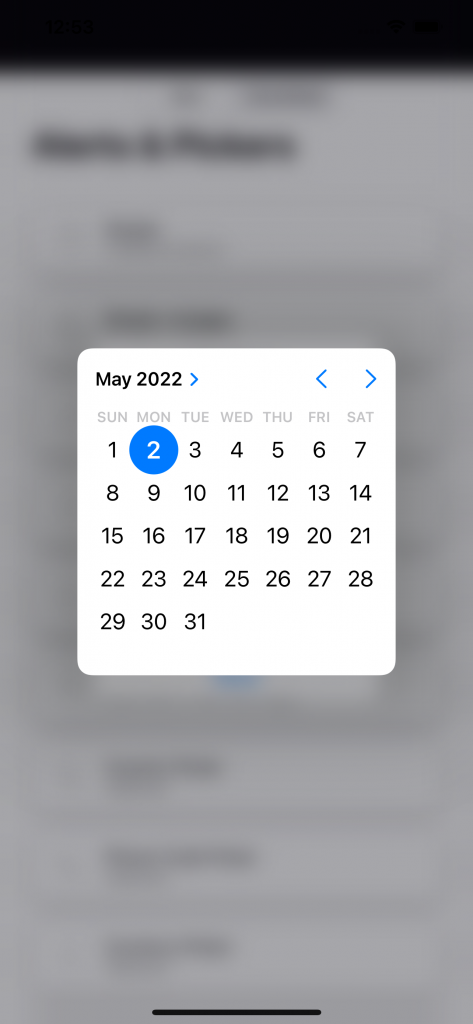
let alert = UIAlertController(style: self.alertStyle, title: "Date Picker", message: "Select Date") alert.addDatePicker(mode: .dateAndTime, date: Date(), minimumDate: nil, maximumDate: nil) { date in Log(date) } alert.addAction(title: "Done", style: .cancel) alert.show() |
After using this you will get below type of view on your controller


2. Contact picker
Create a view controller to select the contacts from the device
|
1 2 3 4 5 6 7 8 9 10 11 12 13 14 15 16 17 18 19 20 21 22 23 24 25 26 27 28 29 30 31 32 33 34 35 36 37 38 39 40 41 42 43 44 45 46 47 48 49 50 51 52 53 54 55 56 57 58 59 60 61 62 63 64 65 66 67 68 69 70 71 72 73 74 75 76 77 78 79 80 81 82 83 84 85 86 87 88 89 90 91 92 93 94 95 96 97 98 99 100 101 102 103 104 105 106 107 108 109 110 111 112 113 114 115 116 117 118 119 120 121 122 123 124 125 126 127 128 129 130 131 132 133 134 135 136 137 138 139 140 141 142 143 144 145 146 147 148 149 150 151 152 153 154 155 156 157 158 159 160 161 162 163 164 165 166 167 168 169 170 171 172 173 174 175 176 177 178 179 180 181 182 183 184 185 186 187 188 189 190 191 192 193 194 195 196 197 198 199 200 201 202 203 |
final class ContactsPickerViewController: UIViewController { // MARK: UI Metrics struct UI { static let rowHeight: CGFloat = 58 static let separatorColor: UIColor = UIColor.lightGray.withAlphaComponent(0.4) } // MARK: Properties public typealias Selection = (Contact?) -> () fileprivate var selection: Selection? //Contacts ordered in dicitonary alphabetically fileprivate var orderedContacts = [String: [CNContact]]() fileprivate var sortedContactKeys = [String]() fileprivate var filteredContacts: [CNContact] = [] fileprivate var selectedContact: Contact? fileprivate lazy var searchView: UIView = UIView() fileprivate lazy var searchController: UISearchController = { $0.searchResultsUpdater = self $0.searchBar.delegate = self $0.dimsBackgroundDuringPresentation = false /// true if search bar in tableView header $0.hidesNavigationBarDuringPresentation = true $0.searchBar.searchBarStyle = .minimal $0.searchBar.textField?.textColor = .black $0.searchBar.textField?.clearButtonMode = .whileEditing return $0 }(UISearchController(searchResultsController: nil)) fileprivate lazy var tableView: UITableView = { [unowned self] in $0.dataSource = self $0.delegate = self //$0.allowsMultipleSelection = true $0.rowHeight = UI.rowHeight $0.separatorColor = UI.separatorColor $0.bounces = true $0.backgroundColor = nil $0.tableFooterView = UIView() $0.sectionIndexBackgroundColor = .clear $0.sectionIndexTrackingBackgroundColor = .clear $0.register(ContactTableViewCell.self, forCellReuseIdentifier: ContactTableViewCell.identifier) return $0 }(UITableView(frame: .zero, style: .plain)) // MARK: Initialize required init(selection: Selection?) { self.selection = selection super.init(nibName: nil, bundle: nil) } required init?(coder aDecoder: NSCoder) { fatalError("init(coder:) has not been implemented") } deinit { let _ = searchController.view Log("has deinitialized") } override func loadView() { view = tableView } override func viewDidLoad() { super.viewDidLoad() if UIDevice.current.userInterfaceIdiom == .pad { preferredContentSize.width = UIScreen.main.bounds.width / 2 } searchView.addSubview(searchController.searchBar) tableView.tableHeaderView = searchView extendedLayoutIncludesOpaqueBars = true edgesForExtendedLayout = .bottom definesPresentationContext = true updateContacts() } override func viewWillLayoutSubviews() { super.viewWillLayoutSubviews() tableView.tableHeaderView?.height = 57 searchController.searchBar.sizeToFit() searchController.searchBar.frame.size.width = searchView.frame.size.width searchController.searchBar.frame.size.height = searchView.frame.size.height } override func viewDidLayoutSubviews() { super.viewDidLayoutSubviews() preferredContentSize.height = tableView.contentSize.height Log("preferredContentSize.height = \(preferredContentSize.height), tableView.contentSize.height = \(tableView.contentSize.height)") } func updateContacts() { checkStatus { [unowned self] orderedContacts in self.orderedContacts = orderedContacts self.sortedContactKeys = Array(self.orderedContacts.keys).sorted(by: <) if self.sortedContactKeys.first == "#" { self.sortedContactKeys.removeFirst() self.sortedContactKeys.append("#") } DispatchQueue.main.async { self.tableView.reloadData() } } } func checkStatus(completionHandler: @escaping ([String: [CNContact]]) -> ()) { Log("status = \(CNContactStore.authorizationStatus(for: .contacts))") switch CNContactStore.authorizationStatus(for: .contacts) { case .notDetermined: /// This case means the user is prompted for the first time for allowing contacts Contacts.requestAccess { [unowned self] bool, error in self.checkStatus(completionHandler: completionHandler) } case .authorized: /// Authorization granted by user for this app. DispatchQueue.main.async { self.fetchContacts(completionHandler: completionHandler) } case .denied, .restricted: /// User has denied the current app to access the contacts. let productName = Bundle.main.infoDictionary!["CFBundleName"]! let alert = UIAlertController(style: .alert, title: "Permission denied", message: "\(productName) does not have access to contacts. Please, allow the application to access to your contacts.") alert.addAction(title: "Settings", style: .destructive) { action in if let settingsURL = URL(string: UIApplication.openSettingsURLString) { UIApplication.shared.open(settingsURL) } } alert.addAction(title: "OK", style: .cancel) { [unowned self] action in self.alertController?.dismiss(animated: true) } alert.show() } } func fetchContacts(completionHandler: @escaping ([String: [CNContact]]) -> ()) { Contacts.fetchContactsGroupedByAlphabets { [unowned self] result in switch result { case .success(let orderedContacts): completionHandler(orderedContacts) case .error(let error): Log("------ error") let alert = UIAlertController(style: .alert, title: "Error", message: error.localizedDescription) alert.addAction(title: "OK") { [unowned self] action in self.alertController?.dismiss(animated: true) } alert.show() } } } func contact(at indexPath: IndexPath) -> Contact? { if searchController.isActive { return Contact(contact: filteredContacts[indexPath.row]) } let key: String = sortedContactKeys[indexPath.section] if let contact = orderedContacts[key]?[indexPath.row] { return Contact(contact: contact) } return nil } func indexPathOfSelectedContact() -> IndexPath? { guard let selectedContact = selectedContact else { return nil } if searchController.isActive { for row in 0 ..< filteredContacts.count { if filteredContacts[row] == selectedContact.value { return IndexPath(row: row, section: 0) } } } for section in 0 ..< sortedContactKeys.count { if let orderedContacts = orderedContacts[sortedContactKeys[section]] { for row in 0 ..< orderedContacts.count { if orderedContacts[row] == selectedContact.value { return IndexPath(row: row, section: section) } } } } return nil } } |
Please create a function to add contact view contact view controller in alert extension
|
1 2 3 4 5 6 7 8 9 10 11 12 13 14 15 16 17 18 19 20 21 22 23 24 25 |
extension UIAlertController { /// Add Contacts Picker /// /// - Parameters: /// - selection: action for selection of contact func addContactsPicker(selection: @escaping ContactsPickerViewController.Selection) { let selection: ContactsPickerViewController.Selection = selection var contact: Contact? let addContact = UIAlertAction(title: "Add Contact", style: .default) { action in selection(contact) } addContact.isEnabled = false let vc = ContactsPickerViewController { new in addContact.isEnabled = new != nil contact = new } set(vc: vc) addAction(addContact) } } |
Then create an alert view in your contact
|
1 2 3 4 |
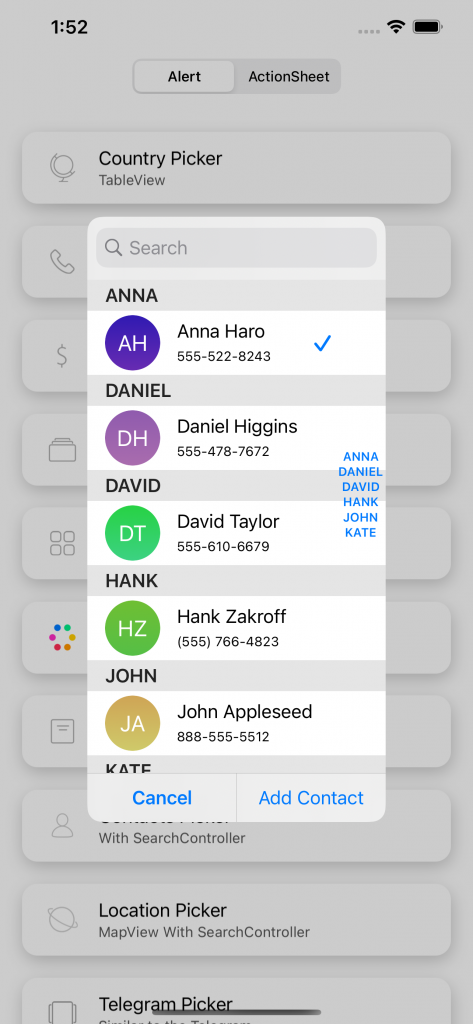
let alert = UIAlertController(style: self.alertStyle) alert.addContactsPicker { contact in Log(contact) } alert.addAction(title: "Cancel", style: .cancel) alert.show() |
After that you will get below screen
|
1 |

And for the other types Please do it on your own
Thank you for reading this article. I hope this article helped you to implement Advanced usage of UIAlertController and pickers Swift,
After that, if you want to read more articles regarding iOS Development click here or if you want to read more about advance alert click here.
For other technical blogs, please click here.

Be the first to comment.