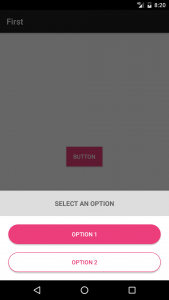
Bottom sheet is a very simple layout that is added to Android design library in version 23.2. It is the layout shown from the bottom of the screen. It can be used to show the additional information to the user. You can apply Bottom sheet behavior to any layout and it will be shown from the bottom of the screen. But here we will discuss Bottom sheet as Dialog i.e a full width dialog that is aligned to the bottom of the screen. Here I had created a BottomSheetDailog on click of a button.
So my main.xml looks like
|
1 2 3 4 5 6 7 8 9 10 11 12 13 14 15 16 17 |
<?xml version="1.0" encoding="utf-8"?> <LinearLayout xmlns:android="http://schemas.android.com/apk/res/android" android:orientation="vertical" android:layout_width="match_parent" android:layout_height="match_parent"> <Button android:id="@+id/button_dialog" android:onClick="onClickButtonDialog" android:background="#ec3e7b" android:textColor="#ffffff" android:layout_width="wrap_content" android:layout_height="wrap_content" android:layout_gravity="center" android:text="Button"/> </LinearLayout> |
Now on click of Button we will show a dailog as:
|
1 2 3 4 5 6 |
public void onClickFingetprintButton(View v){ Dialog d = new BottomSheetDialog(this); d.setContentView(R.layout.dailog); d.setCancelable(true); d.show(); } |
And the layout of the dialog is dailog.xml :
|
1 2 3 4 5 6 7 8 9 10 11 12 13 14 15 16 17 18 19 20 21 22 23 24 25 26 27 28 29 30 31 32 33 34 35 36 37 38 39 40 41 42 43 44 45 46 47 |
<?xml version="1.0" encoding="utf-8"?> <LinearLayout xmlns:android="http://schemas.android.com/apk/res/android" android:layout_width="match_parent" android:layout_height="wrap_content" android:background="#FFFFFF" android:orientation="vertical"> <TextView android:id="@+id/title" android:layout_width="match_parent" android:layout_height="wrap_content" android:gravity="center_horizontal" android:padding="20dp" android:text="SELECT AN OPTION" android:layout_marginBottom="20dp" android:background="#DDDDDD" android:textSize="16sp" android:textStyle="bold"/> <Button android:layout_width="match_parent" android:background="@drawable/rounded_corner_accent" android:layout_marginBottom="20dp" android:layout_marginLeft="20dp" android:layout_marginStart="20dp" android:layout_marginRight="20dp" android:layout_marginEnd="20dp" android:text="OPTION 1" android:onClick="onClickSignUp" android:textColor="#FFFFFF" android:layout_height="wrap_content"/> <Button android:layout_width="match_parent" android:layout_marginBottom="20dp" android:layout_marginLeft="20dp" android:layout_marginStart="20dp" android:layout_marginRight="20dp" android:layout_marginEnd="20dp" android:background="@drawable/rounded_stroke_accent" android:onClick="onClickSignIn" android:text="OPTION 2" android:textColor="#ec3e7b" android:layout_height="wrap_content"/> </LinearLayout> |
And its done. After all this you will get a result as:
So you can create any layout as you want in this dialog.


1 comments