Python is an interpreted, high-level and general-purpose programming language. Python was created in the late 1980s, and first released in 1991, by Guido van Rossum as a successor to the ABC programming language. Mainly Python used for machine learning in data science.
Apple doesn’t support Python directly. TensorFlow provides a next-generation platform for machine learning. TensorFlow provides the framework to Implement interpreted python in ios both Swift & Objective-C. Please visit the TensorFlow website to know more about this framework.
In this blog, I will show you how can match 2 faces using python. To implement this we need a .tflite file where we have already implement python code and compressed it. I will share my blog to create .tflite from TensorFlow.
Let’s Start
Swift version: 5.2
iOS version: 14
Xcode: 12.0
First Create a project from Xcode.
File ▸ New ▸ Project…. Choose the iOS ▸ Application ▸ Single View App template and create a new project.
Second, add TensorFlowLiteSwift to your project.
|
1 |
pod 'TensorFlowLiteSwift' |
Add MobileFace.tflite in your project. This file I will share below.
Now create a class with the name MobileFace.
import TensorFlowLite in this class.
Now add some variable which is used in our class.
|
1 2 3 4 5 6 |
private var interpreter: Interpreter? private var fileName = "MobileFace" private var fileType = "tflite" private var imageWidth = 128 private var imageHeight = 128 private var size = 192 |
Now initialize the Interpreter object.
|
1 2 3 4 5 6 7 8 9 |
init() { guard let pPath = Bundle.main.path( forResource: fileName, ofType: fileType) else { return } var options = Interpreter.Options() options.threadCount = 4 interpreter = try? Interpreter(modelPath: path, options: options) try? interpreter?.allocateTensors() } |
Add compare method inside our class. Here we will compare 2 images and return compare result.
|
1 2 3 4 5 6 7 8 9 10 11 12 13 14 15 16 |
func compare(_ image1: UIImage, with image2: UIImage) -> Float { let size = CGSize(width: image_width, height: image_height) let image1 = scaleImage(image: image1, toSize: size) let image2 = scaleImage(image: image2, toSize: size) guard let data = self.data(withProcess: image1, image2: image2) else { return 0 } try? interpreter?.input(at: 0) try? interpreter?.copy(data, toInputAt: 0) try? interpreter?.invoke() var outputTensor = try? interpreter?.output(at: 0) var outputData = try outputTensor?.data as? NSData var output = Array(count: 2 * embeddings_size, elementCreator: Float(0.0)) outputData?.getBytes(&output, length: MemoryLayout<Float>.size * 2 * embeddings_size) Normalize(&output, epsilon: 1e-10) let result = evaluate(&output) return result } |
Now Implement scaleImage method in the class.
|
1 2 3 4 5 6 7 |
func scaleImage(image : UIImage, toSize:CGSize)->UIImage{ UIGraphicsBeginImageContext(toSize) image.draw(in: CGRect(x:0, y:0, width:toSize.width, height:toSize.height)) let scaledImage = UIGraphicsGetImageFromCurrentImageContext() UIGraphicsEndImageContext() return scaledImage! } |
Now Normalize and evaluate our result.
|
1 2 3 4 5 6 7 8 9 10 11 12 13 14 15 16 17 18 19 20 21 22 23 24 25 26 27 28 29 |
func Normalize(_ embeddings: UnsafeMutablePointer<Float>, epsilon: Float) { for i in 0..<2 { var square_sum: Float = 0 for j in 0..<embeddings_size { square_sum += pow(embeddings[i * embeddings_size + j], 2) } let x_inv_norm = sqrt(max(square_sum, epsilon)) for j in 0..<embeddings_size { embeddings[i * embeddings_size + j] = Float(embeddings[i * embeddings_size + j] ) / x_inv_norm } } } func evaluate(_ embeddings: UnsafeMutablePointer<Float>?) -> Float { var dist: Float = 0 for i in 0..<embeddings_size { if let embedding = embeddings?[i], let embedding1 = embeddings?[i + embeddings_size] { dist += pow(embedding - embedding1, 2) } } var same: Float = 0 for i in 0..<400 { let threshold: Float = Float(0.01 * Double((i + 1))) if dist < threshold { same += 1.0 / 400 } } return same } |
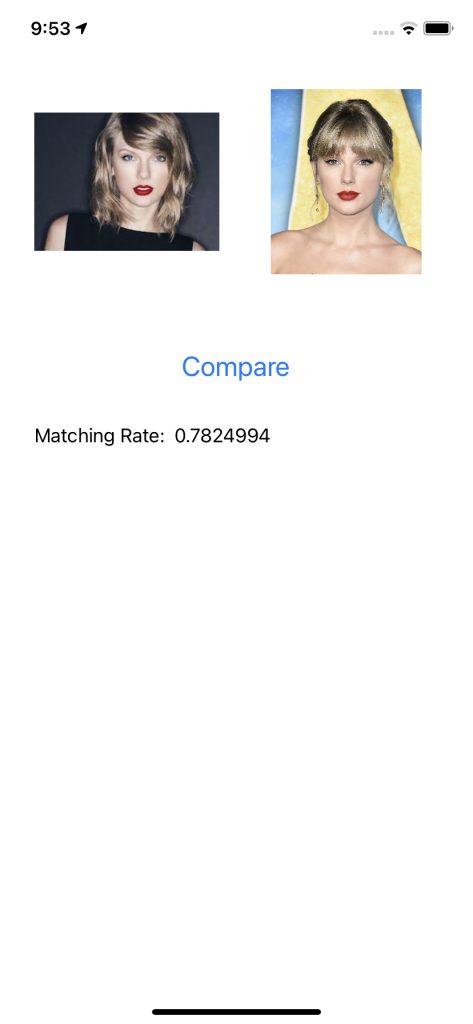
This code is enough to compare to face. Now call this compare method.
|
1 |
let compare = obj.compare(UIImage(named: "image2")!, with: UIImage(named: "image3")!) |
Output:
Conclusion:
We can easily implement Python using swift and it quite easy.
Next blog I will image face detection, crop, and compare using python in swift.
I hope this code will help you better to understand the implementation of Python using swift. If you feel any doubt or query please comment below.
Thank you.


Be the first to comment.