In this blog,
We are going to show you how to make custom tabs in android.
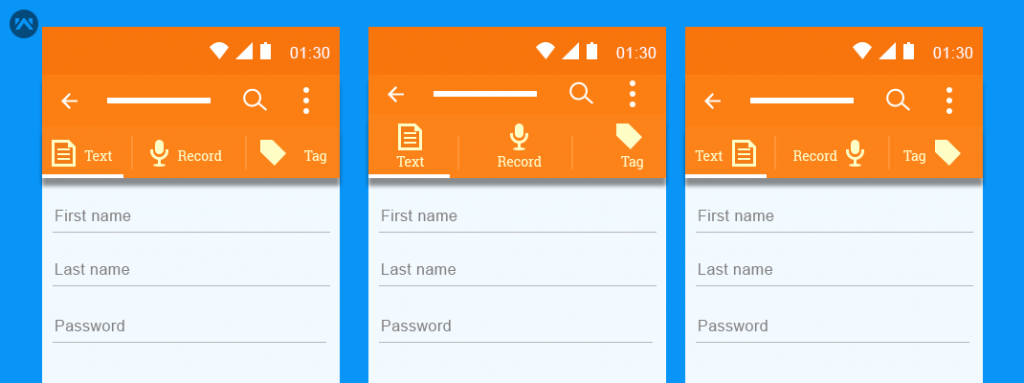
Here we customize the tab with icon and text, you can see the icon is horizontally aligned with tab text.
But if you want to place the icon above the tab label, you have to use a custom view to achieving it.
Code Implementation
1. Open project level build.gradle and add android design support library com.android.support:design:23.0.1
|
1 2 3 4 5 |
dependencies { compile fileTree(dir: 'libs', include: ['*.jar']) compile 'com.android.support:appcompat-v7:23.2.1' compile 'com.android.support:design:23.2.1' } |
2. In layout file activity_main.xml and add tablayout and view pager.
|
1 2 3 4 5 6 7 8 9 10 11 12 13 14 15 16 17 18 19 20 21 22 23 24 25 26 27 28 29 30 31 32 33 34 35 36 37 38 39 |
<android.support.design.widget.CoordinatorLayout xmlns:android="http://schemas.android.com/apk/res/android" xmlns:app="http://schemas.android.com/apk/res-auto" xmlns:tools="http://schemas.android.com/tools" android:layout_width="match_parent" android:layout_height="match_parent" android:fitsSystemWindows="true" tools:context=".MainActivity"> <android.support.design.widget.AppBarLayout android:layout_width="match_parent" android:layout_height="wrap_content" android:theme="@style/AppTheme.AppBarOverlay"> <android.support.v7.widget.Toolbar android:id="@+id/toolbar" android:layout_width="match_parent" android:layout_height="?attr/actionBarSize" android:background="?attr/colorPrimary" app:layout_scrollFlags="scroll|enterAlways" app:popupTheme="@style/AppTheme.PopupOverlay" /> <android.support.design.widget.TabLayout android:id="@+id/tabs" android:layout_width="match_parent" android:layout_height="60dp" android:layout_gravity="bottom" app:tabGravity="fill" app:tabMode="fixed" /> </android.support.design.widget.AppBarLayout> <android.support.v4.view.ViewPager android:id="@+id/viewpager" android:layout_width="match_parent" android:layout_height="match_parent" android:layout_marginBottom="60dp" app:layout_behavior="@string/appbar_scrolling_view_behavior" /> </android.support.design.widget.CoordinatorLayout> |
3. Create an XML layout named custom_tab.xml under res -> layout for define the custom view for the tab.
|
1 2 3 4 5 6 7 8 |
<TextView xmlns:android="http://schemas.android.com/apk/res/android" android:id="@+id/tab" android:layout_width="wrap_content" android:layout_height="wrap_content" android:gravity="center_horizontal" android:textColor="#FFFFFF" android:textSize="@dimen/tab_label" android:textStyle="bold" /> |
4. Create a fragment named Fragment1.java for tab contents
|
1 2 3 4 5 6 7 8 9 10 11 12 13 14 15 16 17 18 19 |
public class Fragment1 extends Fragment { public Fragment1() { // Required empty public constructor } @Override public void onCreate(Bundle savedInstanceState) { super.onCreate(savedInstanceState); } @Override public View onCreateView(LayoutInflater inflater, ViewGroup container, Bundle savedInstanceState) { // Inflate the layout for this fragment return inflater.inflate(R.layout.fragment_one, container, false); } } |
5. In MainActivity.java use the below code for customizing the tab.
|
1 2 3 4 |
TextView tabOne = (TextView) LayoutInflater.from(this).inflate(R.layout.custom_tab, null); tabOne.setText("ONE"); tabOne.setCompoundDrawablesWithIntrinsicBounds(0, R.mipmap.analytics, 0, 0); tabLayout.getTabAt(0).setCustomView(tabOne); |
If you noticed this function createTabIcons in MainActivity.java, I have used custom_tab.xml layout in each tab.
MainActivity.java
|
1 2 3 4 5 6 7 8 9 10 11 12 13 14 15 16 17 18 19 20 21 22 23 24 25 26 27 28 29 30 31 32 33 34 35 36 37 38 39 40 41 42 43 44 45 46 47 48 49 50 51 52 53 54 55 56 57 58 59 60 61 62 63 64 65 66 67 68 69 70 71 72 |
public class MainActivity extends AppCompatActivity { private TabLayout tabLayout; private ViewPager viewPager; @Override protected void onCreate(Bundle savedInstanceState) { super.onCreate(savedInstanceState); setContentView(R.layout.activity_main); Toolbar toolbar = (Toolbar) findViewById(R.id.toolbar); setSupportActionBar(toolbar); viewPager = (ViewPager) findViewById(R.id.viewpager); createViewPager(viewPager); tabLayout = (TabLayout) findViewById(R.id.tabs); tabLayout.setupWithViewPager(viewPager); createTabIcons(); } private void createTabIcons() { TextView tabOne = (TextView) LayoutInflater.from(this).inflate(R.layout.custom_tab, null); tabOne.setText("Tab 1"); tabOne.setCompoundDrawablesWithIntrinsicBounds(0, R.drawable.ic_dash26, 0, 0); tabLayout.getTabAt(0).setCustomView(tabOne); TextView tabTwo = (TextView) LayoutInflater.from(this).inflate(R.layout.custom_tab, null); tabTwo.setText("Tab 2"); tabTwo.setCompoundDrawablesWithIntrinsicBounds(0, R.drawable.ic_category, 0, 0); tabLayout.getTabAt(1).setCustomView(tabTwo); TextView tabThree = (TextView) LayoutInflater.from(this).inflate(R.layout.custom_tab, null); tabThree.setText("Tab 3"); tabThree.setCompoundDrawablesWithIntrinsicBounds(0, R.drawable.ic_order, 0, 0); tabLayout.getTabAt(2).setCustomView(tabThree); } private void createViewPager(ViewPager viewPager) { ViewPagerAdapter adapter = new ViewPagerAdapter(getSupportFragmentManager()); adapter.addFrag(new Fragment1(), "Tab 1"); adapter.addFrag(new Fragment2(), "Tab 2"); adapter.addFrag(new Fragment3(), "Tab 3"); viewPager.setAdapter(adapter); } class ViewPagerAdapter extends FragmentPagerAdapter { private final List<Fragment> mFragmentList = new ArrayList<>(); private final List<String> mFragmentTitleList = new ArrayList<>(); public ViewPagerAdapter(FragmentManager manager) { super(manager); } @Override public Fragment getItem(int position) { return mFragmentList.get(position); } @Override public int getCount() { return mFragmentList.size(); } public void addFrag(Fragment fragment, String title) { mFragmentList.add(fragment); mFragmentTitleList.add(title); } @Override public CharSequence getPageTitle(int position) { return mFragmentTitleList.get(position); } } |
Custom view for tab layout
Maybe this blog is work for you.
