
In this blog, we will discuss the stack widget in Flutter.
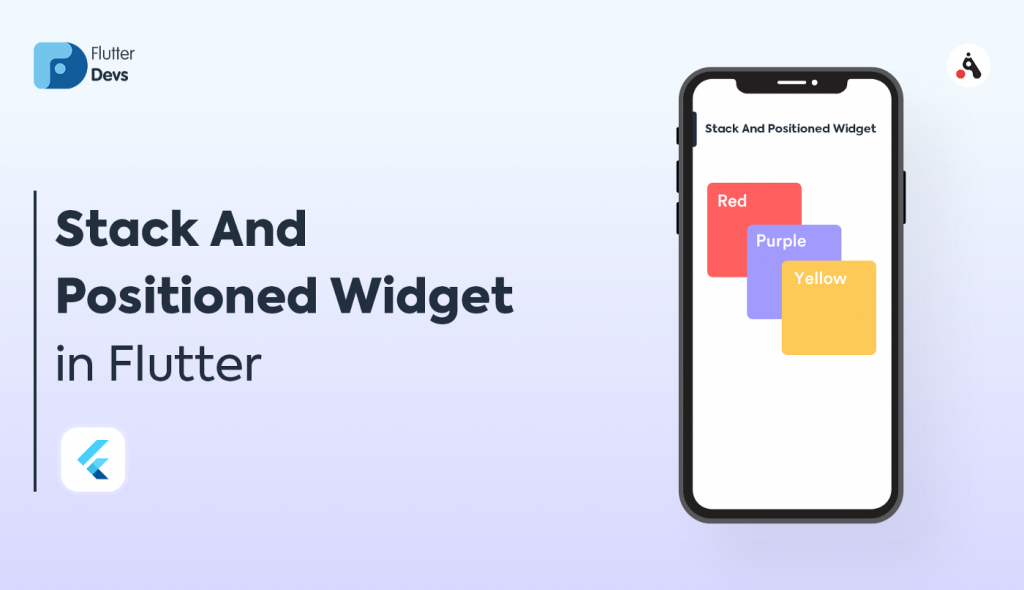
A stack is a Widget in the flutter that contains a list of widgets and positions on top of the others.
The stack allows developers to overlap multiple widgets on a single screen.
And renders them from top to bottom.
The last widget is the top-most widget and the first one is the bottom-most.
You may also check our Flutter app Development Company page.
Some key points of the Stack Widget
- The children of the stack are either positioned or non – positioned.
- The non-positioned child widgets are aligned. It displays on the screen based on the stack’s alignment. The default position of the children is in the top left corner.
- The position items are wrapped in the positioned widget and must have a non-null property.
Let’s see the implementation
|
1 2 3 4 5 6 7 8 9 10 11 12 13 14 15 16 17 18 |
import 'package:flutter/material.dart'; void main() { runApp(const MyApp()); } class MyApp extends StatelessWidget { const MyApp({Key? key}) : super(key: key); // This widget is the root of your application. @override Widget build(BuildContext context) { return MaterialApp( debugShowCheckedModeBanner: false, home: MyHomePage(), ); } } |
MyHomePage class
|
1 2 3 4 5 6 |
class MyHomePage extends StatefulWidget { const MyHomePage({Key? key}) : super(key: key); @override State<MyHomePage> createState() => _MyHomePageState(); } |
|
1 2 3 4 5 6 7 8 9 10 11 12 13 14 15 16 17 18 19 20 21 22 23 24 25 26 27 28 29 30 31 32 33 34 35 36 37 38 39 40 41 42 43 44 45 46 47 48 49 50 51 52 53 54 55 56 57 58 59 60 61 62 63 64 65 66 67 68 69 70 71 72 73 74 75 76 77 |
class _MyHomePageState extends State<MyHomePage> { @override Widget build(BuildContext context) { return Scaffold( appBar: AppBar( title: Text("Stack View"), ), body: Stack( // alignment: Alignment.center, fit: StackFit.loose, children: <Widget>[ Positioned( top: 50, left: 50, child: Container( width: 200, height: 200, color: Colors.red, ), ), Positioned( top: 100, left: 100, height:200, width: 200, child: Container( // width: 200, // height: 200, color: Colors.blue, ), ), Positioned( top: 150, right: 150, child: Container( width: 200, height: 200, color: Colors.yellow, ), ), Positioned( top: 200, left: 200, child: Container( width: 200, height: 200, color: Colors.red, ), ), Positioned( top: 250, left: 250, height:200, width: 200, child: Container( // width: 200, // height: 200, color: Colors.blue, ), ), Positioned( top: 300, right: 200, child: Container( width: 200, height: 200, color: Colors.yellow, ), ), ], ), // This trailing comma makes auto-formatting nicer for build methods. ); } } |
Complete Code
|
1 2 3 4 5 6 7 8 9 10 11 12 13 14 15 16 17 18 19 20 21 22 23 24 25 26 27 28 29 30 31 32 33 34 35 36 37 38 39 40 41 42 43 44 45 46 47 48 49 50 51 52 53 54 55 56 57 58 59 60 61 62 63 64 65 66 67 68 69 70 71 72 73 74 75 76 77 78 79 80 81 82 83 84 85 86 87 88 89 90 91 92 93 94 95 96 97 98 99 100 101 102 103 |
import 'package:flutter/material.dart'; void main() { runApp(const MyApp()); } class MyApp extends StatelessWidget { const MyApp({Key? key}) : super(key: key); // This widget is the root of your application. @override Widget build(BuildContext context) { return MaterialApp( debugShowCheckedModeBanner: false, home: MyHomePage(), ); } } class MyHomePage extends StatefulWidget { const MyHomePage({Key? key}) : super(key: key); @override State<MyHomePage> createState() => _MyHomePageState(); } class _MyHomePageState extends State<MyHomePage> { @override Widget build(BuildContext context) { return Scaffold( appBar: AppBar( title: Text("Stack View"), ), body: Stack( // alignment: Alignment.center, fit: StackFit.loose, children: <Widget>[ Positioned( top: 50, left: 50, child: Container( width: 200, height: 200, color: Colors.red, ), ), Positioned( top: 100, left: 100, height:200, width: 200, child: Container( // width: 200, // height: 200, color: Colors.blue, ), ), Positioned( top: 150, right: 150, child: Container( width: 200, height: 200, color: Colors.yellow, ), ), Positioned( top: 200, left: 200, child: Container( width: 200, height: 200, color: Colors.red, ), ), Positioned( top: 250, left: 250, height:200, width: 200, child: Container( // width: 200, // height: 200, color: Colors.blue, ), ), Positioned( top: 300, right: 200, child: Container( width: 200, height: 200, color: Colors.yellow, ), ), ], ), // This trailing comma makes auto-formatting nicer for build methods. ); } } |
Image

Conclusion
I hope this blog will help you to understand the functionality. You can visit more blogs from here.
Thanks for Reading !!!