
Hi, Today we are going to learn some simple ways to manage Flutter widgets with the help of Wrap Widget.
Introduction
The wrap widget is the same as the Row widget in Flutter as they both create the flow layout aligning their children in a horizontal manner.

The main difference between Row and Wrap is Row enforces a strict layout causing overflow issues while Wrap manages the space and displays the child on the next line.
Why use Wrap?
The main reason to use the Wrap widget over the Row widget is that Wrap does not enforce specific constraints.
Unlike Row, which tries to fit all its children in a single line, Wrap automatically moves overflowing widgets to the next line when space is exceeded.
Normally, when we want to add multiple widgets in a single line, we use the Row widget, and it works fine. However, the problem arises when there isn’t enough room for the widgets.
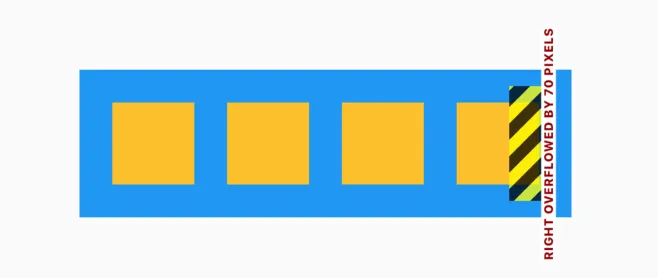
This is the major issue with the Row widget, if there’s insufficient space, it will throw an overflow error for the extra widgets.
|
1 2 3 4 5 6 7 8 9 |
Row( children: [ Widget(), Widget(), Widget(), Widget(), ], ) |
Now if we exceed the horizontal width limit we will start getting errors like these:-
This is where the Flutter Wrap widget comes into action.
The Wrap widget in Flutter arranges children like a Row, but when space runs out, it moves overflow widgets to the next line, ensuring all widgets fit within the layout constraints.
|
1 2 3 4 5 6 7 8 9 |
Wrap( children: [ Widget(), Widget(), Widget(), Widget(), Widget(), ], ) |
If we execute the same line of code but with the wrap widget we will see a little change, as it will automatically move the widget to the next line if it exceeds the size constraints.

Properties
The Wrap widget comes with some amazing properties like:-
Direction: By default, direction for widget is horizontal but we can make it vertical by changing the axis from Axis.horizontal to Axis.vertical.
alignment: with this property, the alignment property is for aligning widgets.
spacing: With this, we can give space between the children.
runAlignment: runAlignment property shows how widgets should be placed on the cross-axis. By default, we have runAlignment as WrapAlignment.start.
runSpacing: With this property, we can equally provide the runSpacing between the runs. (ex: runSpacing:5.0).
crossAxisAlignment: We can align the children relative to each other in cross Axis.
textDirection: We can arrange children in a row using textDirection.
clipBehaviour: This property manages the clipBehaviour of children widgets.
children: It takes the list of Widgets that need to be displayed on the screen.
verticalDirection: This property takes in VerticalDirection enum as the object to. This property decides the order in which each child’s widget will be placed on the screen in a vertical sense.
runtimeType: It determines the type of the Wrap widget at the run time.
key: This property decides how one widget will replace another widget on the screen.
Conclusion
Now, We have finally learned how to manage the widget overflow with the help of the Wrap widget. You can also check out more amazing blogs on Flutter with Mobikul Bogs.
You may also check our interactive app designs by our Flutter app development company
References:- Flutter Official Doc